Introduction
Ymir is a high-level, statically typed programming language designed to help developers to save time by providing strong and safe semantic. The semantic of this language is oriented towards safety, concurrency and speed of execution. These objectives are achieved thanks to its high expressiveness and its direct compilation into an efficient native machine language.
This documentation explores the main concepts of Ymir, providing a set of examples that demonstrate the strengths of this new language. It also presents an introduction to the standard library.
Important
Before starting to discuss the language, please keep in mind that it is still under development and that sometimes things may not work as expected. If you encounter errors that you do not understand or think are incorrect, please contact us at: gnu.ymir@mail.com. We look forward to receiving your mails!
Even more, all contributions are very welcome, whether to improve the documentation, to propose improvements to the language or std, to the runtime, or even to the automatic release generation procedure. All code repositories are available on github. In this documentation, known limitations of the language are sometimes highlighted, and calls for contribution.
Installation
The reference compiler of Ymir is based on the compiler GCC, which offer strong static optimization, as well as a vast set of supported target architectures.
This compiler can be installed on linux debian system, by following those simple steps:
- First, you need to download the package :
Other gyc versions using other gcc backend versions are available at release.
- And then, you need to install it using dpkg :
$ sudo dpkg -i gyc-11_11.3.0_amd64.deb
This package depends on :
- g++-11
- gcc-11
- libgc-dev
If one of them is not installed, you will get an error, that can be resolved by running the following command :
sudo apt --fix-broken install
And then reinstall the package that has previously failed (dpkg).
The compiler is now installed and is named gyc
$ gyc --version

gyc (GCC) 11.3.0
Copyright (C) 2021 Free Software Foundation, Inc.
This is free software; see the source for copying conditions.  There is NO
warranty; not even for MERCHANTABILITY or FITNESS FOR A PARTICULAR PURPOSE.
Uninstallation
As for any debian package, the uninstall is done as follows :
$ dpkg -r gyc
Hello World
The following source code is the Ymir version of the famous program "Hello world !"
import std::io // importation of the module containing io functions

// This is a comment

/** This is a function declaration
  * The main function, is the first one to be called
  */
def main () {
    // Print 'Hello World !!' to the console
    println ("Hello World !!");
}
A binary can be generated using GYC.
$ gyc hello.yr
This command produces a binary a.out that can be executed.
$ ./a.out
Hello World !!
The command line options of gyc are the same as those of all gcc suite compilers, with few exceptions that will be clarified in this documentation.
The option -o can be used to define the name of the output executable.
$ gyc hello.yr -o hello
$ ls
hello  hello.yr
$ ./hello
Hello World !!
Comments
Ymir offers different types of comments.
-
// A line of comment that stop at the end of the line -
/* Multi-line comment that stops at the final delimiter */
def main ()
    throws &AssertError // Not what's important for the moment
{
    // This is an example of comment

    /*
     * This is another example of comment
     * Where, the stars are optionnal
     */

    /*
    And this is the proof
    */

    // None of the comment lines have an influence on the compilation

    let x = 1 + /* 2 + */  3;
    assert (x == 4);
}
In the above pogram, calling assert will throw an exception if
the test is false. Errors are presented in the Error
Handling
chapter. For the moment, we can consider that the exception simply
stops the program when the test fails.
We will see in the Documentation chapter, that comments are very usefull, to generate documentations.
Basic programming concepts
This chapter covers the basic concepts of Ymir programming language. Specifically, you will learn about variables, mutability, native types, functions and control flows.
Variables and Mutability
Variables are declared with the keyword let. The grammar of a
variable declaration is presented in the following code block.
var_declaration := 'let' inner_var_decl (',' inner_var_decl)*
inner_var_decl  := (decorator)* identifier (':' type)? '=' expression
decorator := 'mut' | 'dmut' | 'ref'
identifier := ('_')* [A-z] ([A-z0-9_])*
The declaration of a variable is composed of four parts, 1) the identifier that will be used to refer to the variable in the program,
- the decorators, that will give a different behavior to the program regarding the variable, 3) a value, that sets the initial value of the variable, and 4) a type, optional part of a variable declaration, which when omitted is infered from the type of the initial value of the variable. Conversely, when specified the type of a variable is statically checked and compared to the initial value of the variable.
Variable type
The type of the variable, as presented in the introduction, is
specified in the variable declaration. This implies a static typing of
each variable, whereby a variable cannot change its type during its
lifetime. To illustrate this point, the following source code declares
a variable of type i32, and tries to put a value of type
f32 in it. The language does not accept this behavior, and the
compiler returns an error.
def main () {
    let mut x = 12; // 12 is a literal of type i32
    //  ^^^ this decorator, presented in the following sub section, is not the point of this example

    x = 89.0f; // 89.0f is a literal of type f32 (floating point value)
}
The compiler, because the source code is not an acceptable Ymir
program, returns an error. The error presented in the following
block, informs that the variable x of type i32, is
incompatible with a value of type f32.
Error : incompatible types mut i32 and f32
 --> main.yr:(5,4)
 5  ┃ 	x = 89.0f; // 89.0f is a literal of type f32 (floating point value)
    ╋ 	  ^


ymir1: fatal error:
compilation terminated.
Variable mutability
The decorators are used to determine the behavior to adopt with the
variable. The keyword ref and dmut will be discussed in
another chapter (cf. Aliases and
References). For
the moment, we will be focusing on the keyword mut. This keyword
is used to define a mutable variable, whose value can be changed. A
variable declared without the mut keyword is declared immutable
by default, making its value definitive.
In another word, if a variable is declared immutable, then it is bound the a value, that the variable cannot change throughout the life of the variable. The idea behind default immutability is to avoid unwanted behavior or errors, by forcing the developpers to determine which variables are mutable with the use of a deliberately more verbose syntax, while making all the other variables immutable.
In the following source code a variable x of type i32 is
declared. This variable is immutable, (as the decorator mut is
not used). Then the line 7, which consist in trying to modify the
value of the variable x is not accepted by the language,
that's why the compiler does not accept to compile the program.
import std::io

def main () {
    let x = 2;
    println ("X is equal to : ", x);

    x = 3;
    println ("X is equal to : ", x);
}
For the given source file, the compiler generates the following
error. This error informs that the affectation is not allowed, due to
the nature of the variable x, which is not mutable. In Ymir,
variable mutability and, type mutability ensure, through static
checks, that when one declares that a variable has no write access to
a value, there is no way to get write access to the value through this
variable. Although this can sometimes be frustrating for the user. We
will see in a following chapter that sometimes setting a variable to
immutable is not always sufficient, but there are some other ways to
ensure that the value of a variable never changes.
Error : left operand of type i32 is immutable
 --> main.yr:(7,2)
    ┃
 7  ┃ 	x = 3;
    ┃ 	^


ymir1: fatal error:
compilation terminated.
The above example can be modified to make the variable x
mutable. This modification implies the use of the keyword mut,
which — placed ahead of a variable declaration — makes it
mutable. Thanks to that modification, the following source code is an
acceptable program, and thus will be accepted by the compiler.
import std::io

def main () {
    let mut x = 2;
    println ("X is equal to : ", x);

    x = 3;
    println ("X is equal to : ", x);
}
Result:
X is equal to : 2
X is equal to : 3
In reality, mutability is not related to variables, but to types. This language proposes a complex type mutability system, whose understanding requires the comprehension of data types beforehand. In the following sections, we will, for that reason, present the type system, (and the different types of data that can be created in Ymir — cf. chapter Data types), before coming back to the data mutability, — and have a full overview of the mutability system in chapter Aliases and references.
Initial value
A variable is always declared with a value. The objective is to ensure that any data in the program came from somewhere, and are not initialized from a random memory state of the machine executing the program (as we can have in C language).
One can argue, that static verification can be used to ensure that a variable is set before being used, and argue that forcing an initial value to a variable is not the best way to achieve data validity. If at this point, this is more a matter of opinion than of sound scientific reasoning, we think that scattering the initialization of a variable, makes programs more difficult to read. More, immutable variables would be mutable for one affectation, making the behavior of a program even more difficult to grasp.
In the following table, is presented two examples of source code, with the same behavior. On the left, a valid source code accepted by the Ymir language, and on the right, a source code that is not accepted based on the arguments we put forward.
| A | B |
|---|---|
|
|
One can note from the left
program, that an if expression has a value. Value computed by
the result of the expression (in that case the value 42 of type
i32). In point of fact, every expression can have a value in
Ymir, removing the limitation, introduced by the forcing of an initial
value to variables.
Global variables
Even if global variables have a rather bad reputation for many justified reasons, we choose to let the possibility to define them, since in spite of all, they allow some programmation paradigms that would be undoable otherwise.
Global variables are defined as any local variable, except that the
keyword let is replaced by the keyword static. The
following source code presents an utilization of an immutable global
variable. This example is just a showcase, as the use of an
enumeration (cf.
Enum)
would probably be more appropriate in this specific case.
import std::io

static pi = 3.14159265359

def main () {
    println ("Pi value is : ", pi);
}
All information presented on local variables are relevant to the case of global variables. Here, we are refering to static typing, mutability behavior, and default value initialization. No limitation exists on the value that can be stored inside a global variable, nor there exists on the nature of the initialization. Call of functions, conditional expressions, class initializations, etc., nothing was left out.
Global variables are initialized before the start of the program,
before the call of the main function. To illustrate that, the
following source code, creates a global variable of type i32
initialized from the value of the function foo. This function
foo by making a call of the function println, prints a
message to the console, and the main function also does it.
import std::io;

static __GLOBAL__ = foo ();

/**
  * This function print the message "foo", and returns the value 42
  */
def foo ()-> i32 {
  println ("foo");
  42
}

def main () {
    println ("__GLOBAL__ = ", __GLOBAL__);
}
Result:
foo
__GLOBAL__ = 42
Initialization order
There is no warranty on the order of initialization of global variables. This is probably, the first limitation that we can point out on the Ymir languages. Contribution, to allow such warranty would be very welcomed, but seems unlikely to be possible when global variables come from multiple modules (cf. Modules).
For the moment, because it is impossible to certify the good initialization of a global variable, before the start of the program, it is not allowed to initialize a global variable from the value of another global variable. However, this verification is very limited, as the value of a global variable can be used inside a function, and this same function used to initialize the value of another global variable. In the following source code, this behavior is illustrated.
static __A__ = 42;
static __B__ = __A__;
static __C__ = foo ();

def foo () -> i32 {
    __A__
}
The compiler will unfortunetaly be able to see only the dependent
initialization of __B__, and will let the initialization of
__C__ from the function foo occur. Even if in that
specific case, the dependency appears very clearly, it may not be that
clear when the function foo come from an external module, that
only provides its prototype.
Error : the global var main::__B__ cannot be initialized from the value of main::__A__
 --> main.yr:(2,8)
 2  ┃ static __B__ = __A__;
    ╋        ^^^^^
    ┃ Note :
    ┃  --> main.yr:(1,8)
    ┃  1  ┃ static __A__ = 42;
    ┃     ╋        ^^^^^
    ┃ Note :
    ┃  --> main.yr:(2,16)
    ┃  2  ┃ static __B__ = __A__;
    ┃     ╋                ^^^^^
    ┗━━━━━┻━


ymir1: fatal error:
compilation terminated.
Shadowing and scope
Lifetime
The lifetime of a variable is defined by a scope. Regrouping expressions separated by semi-colons between curly brackets, a scope is a semantic component well known in programming languages. It has some particularities in Ymir, but these particularities will be presented in forthcoming chapters (cf. Functions, Scope guards) and are not of interest to us at this point.
import std::io;

def main () {
    {
        let x = 12;
    } // x does not exists past this scope end
    println (x);
}
When a variable is declared inside a scope and is never used during
its lifetime the compiler returns an error. To avoid this error, the
variable can be named _. If it may seem useless to declare a
variable that is not used, it can be useful sometimes (for example
when declaring function parameters of an overriden function, cf.
Class
inheritence).
A variable whose name is _, is anonymus, then there is no way to
retreive the value of this variable.
import std::io;

def main () {
    let _ = 12; // declare a anonymus variable
}
Shadowing
Two variables with the same name cannot be declared in colliding
scopes, i.e. if a variable is declared with the name of a living
variable in the current scope, the program is not acceptable, and the
compiler returns a shadowing error. The following source code
illustrates this point, where two variables are declared in the same
scope with the same name x.
def main () {
    let x = 1;
    let x = 2;
    {
        let x = 3;
    }
}
The compiler returns the following error. Even the last variable in the scope opened at line 4 is not authorized. Many errors can be avoided, by simply removing this possibility. Possibility, in our opinion, that is not likely to bring anything of any benefit.
Error : declaration of x shadows another declaration
 --> main.yr:(3,9)
 3  ┃     let x = 2;
    ╋         ^
    ┃ Note :
    ┃  --> main.yr:(2,9)
    ┃  2  ┃     let x = 1;
    ┃     ╋         ^
    ┗━━━━━┻━

Error : declaration of x shadows another declaration
 --> main.yr:(5,13)
 5  ┃         let x = 3;
    ╋             ^
    ┃ Note :
    ┃  --> main.yr:(2,9)
    ┃  2  ┃     let x = 1;
    ┃     ╋         ^
    ┗━━━━━┻━


ymir1: fatal error:
compilation terminated.
Global variables do not create variable shadowing problems on local variables. A global variable is a global symbol, and is accessible through its parent module definition (cf. Modules). Local variables on the other hand, are only accessible for the function in which they are declared. Symbol access gives the priority to local variables, behavior illustrated in the following example.
mod Main; // declaration of a module named Main

import std::io;

static pi = 3.14159265359

def main ()
    throws &AssertError
{
    {
        let pi = 3;
        assert (pi == 3); // using local pi
    } // by closing the scope, local pi does not exist anymore

    // because local pi does no longer exists
    // global pi is accessible
    assert (pi == 3.14159265359);

    // global pi can also be accessed from its parent module
    assert (Main::pi == 3.14159265359);
}
Primitives types
In Ymir language, each value has a certain type of data, which indicates how the program must behave and how it should operate with the value. Ymir is a statically typed language, which means that all types of all values must be known at compile time. Usually, the compiler is able to infer the data types from the values, and it is not necessary to specify them when declaring a variable. But sometimes, when it comes to the mutability of a variable or the inheritance of a class for example, the inference can be wrong and the behavior not adapted to what you might want to do.
Therefore, the type may be added when declaring a variable, as in the following code.
let mut x : [mut i32] = [1, 2];
let mut y = [1, 2];
To understand the difference between the type of x and the type
of y, we invite you to read the chapter
Aliases and References.
Each type has type attributes. Theses attributes are accessed using
the double colon operator :: on a type expression.
let a = i32::init; // i32 (0)
All primitive types have common attributes that are listed in the
table below. Attributes can be surrounded by the token _, to avoid some
ambiguity for some types (cf.
Enumeration). For
example, the attribute typeid is equivalent to __typeid__, or
_typeid.
| Name | Meaning |
|---|---|
init | The initial value of the type |
typeid | The name of the type stored in a value of type [c32] |
typeinfo | A structure of type TypeInfo, containing information about the type |
All the information about TypeInfo are presented in chapter Dynamic
types.
typeof and sizeof
- The keyword
typeofretreives the type of a value at compilation time. This type can be used in any context, to retreive type information. For example, in a variable declaration, a function parameter, or return type, structure fields, etc..
import std::io;

def bar () -> i32 {
    42
}

def foo () -> typeof (bar ()) {
    bar ()
}

def main () {
    let x : typeof (foo ()) = foo ();

    println (typeof (x)::typeid, " (", x, ")");
}
Results:
i32 (42)
- The keyword
sizeofretreive the size of a type in bytes at compilation time. It is applicable only on types, not on value, but the type of a value can be retreive using thetypeofkeyword. This size is given in a value of typeusize(this scalar type is presented below).
import std::io;

def main () {
    let x : usize = sizeof (i32);
    println (x, " ", sizeof (typeof (x)));
}
Results: (on a x86-64 arch)
4 8
Scalar types
Scalar types represent all types containing a single value. Ymir has five primitive scalar types: integers, floating point, characters, booleans, and pointers. They can have different sizes for different purposes.
Integer types
An integer is a number without decimal points. There are different
types of integers in Ymir, the signed one and the unsigned
one. Signed and unsigned refers to the possibility for a number to be
negative. Signed integer types begin with the letter i, while
unsigned integers begin with the letter u. The following table
lists all the different types of integers, and sorts them by memory
size.
| size | signed | unsigned |
|---|---|---|
| 8 bits | i8 | u8 |
| 16 bits | i16 | u16 |
| 32 bits | i32 | u32 |
| 64 bits | i64 | u64 |
| arch | isize | usize |
The usize and isize types are architecture dependent, and have the
size of a pointer, depending on the architecture targeted.
Each type of signed integer can store values ranging from -(2
n - 1) to 2 n - 1 - 1, where n is the size
of the integer in memory. Unsigned types, on the other hand, can store
numbers ranging from 0 to 2 n - 1. For example, type
i8, can store values from -128 to 127, and type u8 can
store values from 0 to 255.
An integer literal can be written using two forms, decimal 9_234
and hexadecimal 0x897A. The _ token, is simply ignored in
a literal integer.
To make sure a literal value has the right type, a prefix can be added
at the end of it. For example, to get a i8 with the value 7,
the right literal is written 7i8. By default, if no prefix is added
at the end of the literal, the language defines its type as a
i32.
As indicated above, each type has attributes, the following table lists the integer-specific attributes:
| Name | Meaning |
|---|---|
max | The maximal value |
min | The minimal value |
An overflow check is performed on literals at compilation time, and an error is returned by the compiler if the type of integer choosed to encode the literal is not large enough to contain the value. For example:
def main () {
    let x : i8 = 934i8;
}
Because a i8 can only store value ranging from -127 to 128, the
value 934 would not fit. For that reason the compiler returns the
following error.
Error : overflow capacity for type i8 = 943
 --> main.yr:(12,18)
    ┃
12  ┃     let x : i8 = 943i8;
    ┃                  ^^^

ymir1: fatal error:
compilation terminated.
WARNING However, if the value cannot be known at compile time, the
overflow is not checked and can lead to strange behavior. For example,
if one try to add 1 to a variable of type i16 that contains
the value 32767, the result will be -32768. Contribution:
Provide a dynamic way to verify the overflow of arithmetic operation
(at least in debug mode).
Floating-point types
Floating-point types, refer to numbers with a decimal
part. Ymir provides two types of floating point numbers, f32
and f64, which have a size of 32 bits and 64 bits respectively.
Floating point literals are written as decimal followed by a point and
then again followed by another decimal literal. One can omit the first
literal if it is a 0 or the second one for the same reason. For
example 7. is the same as 7.0 and .6 is exaclty the
same as 0.6. However at least on of the two decimal literals
must be written down, . is not a valid floating point literal.
The prefix f can be written at the end of a floating point
literal to specify that a f32 is wanted, instead of a f64
as it is by default.
def main () {
    let x = 1.0;
    let y : f32 = 1.0f;
}
The following table lists the attributes specific to floating point types.
| Name | Meaning |
|---|---|
init | The initial value - nan (Not a Number) |
max | The maximal finite value that this type can encode |
min | The minimal finite value that this type can encode |
nan | The value Not a Number |
dig | The number of decimal digit of precision |
inf | The value positive infinity |
epsilon | The smallest increment to the value 1 |
mant_dig | Number of bits in the mantissa |
max_10_exp | The maximum int value such that $$10^{max_10_exp}$$ is representable |
max_exp | The maximum int value such that $$2^{max_exp-1}$$ is representable |
min_10_exp | The minimum int value such that $$10^{min_10_exp}$$ is representable as a normalized value |
min_exp | The minimum int value such that $$2^{min_exp-1}$$ is representable as a normalized value |
Boolean type
A boolean is a very simple type that can take two values, either true or false. For example:
def main () {
    let b = true;
    let f : bool = false;
}
The following table lists the attributes specific to boolean type.
| Name | Meaning |
|---|---|
init | The initial value - false |
Character type
The c8 and c32 are the types used to encode the
characters. The c32 character has a size of four bytes and can
store any unicode value. Literal characters can have two forms, and
are always surrounded by the token '. The first form is the
character itself for example 'r', and the second is the unicode
value in the integer form \u{12} or \u{0xB}.
As with literal integers, it is necessary to add a prefix
to define the type of a literal. The prefix used to specify the type
of a literal character is c8, if nothing is specified, the
character type will be c32.
def main () {
    let x = '☺';
    let y = '\u{0x263A}';
}
If the loaded literal is too long to be stored in the character type, an error will be returned by the compiler. For example :
def main () {
    let x = '☺'c8;
}
The error will be the following. This error means that at least 3
c8 (or bytes) are need to store the value, so it doesn't fit
into one c8 :
Error : malformed literal, number of c8 is 3
 --> main.yr:(2,10)
    |
 2  | 	let x = '☺'c8;
    | 	        ^

ymir1: fatal error:
compilation terminated.
The following table lists the attributes specific to character types.
| Name | Meaning |
|---|---|
init | The initial value - \u{0} |
Pointers
Pointer are values that stores an address of memory. They can be used to store the location of a data in memory. In Ymir, pointers are considered low level programming and are mainly used in the std, and runtime to interface with machine level semantics. One can perfectly write any program without needing pointers, and for that reason we recomand to not use them.
Pointers are defined using the token & on types, or on
values. They are aliasable types, as they borrow memory (cf. Aliasable
and
References).
import std::io;

def main ()
    throws &SegFault, &AssertError
{
    let mut i = 12;
    let p : &i32 = &i; // creation of a pointer on i
    i = 42;
    assert (*p == 42); // dereference the pointer and access the value
}
Pointers are unsafe, and dereferencing a pointer can result in undefined
behavior depending on where it points. It can also sometimes raise a
segmentation fault. In Ymir, segmentation fault are recovered,
and an exception is thrown. Error handling is presented in chaper
Error
Handling.
WARNING, Note that the segmentation fault may not occur even if
the pointer is not properly set. The easiest way to avoid undefined
behavior is to not use pointers and use std verified functions, or
other semantically verified elements (cf Aliasable and
References).
The following table lists the attributes specific to pointer types.
| Name | Meaning |
|---|---|
inner | The type of the inner value - for example : i32 for &i32 |
Compound types
Unlike scalar types, the compound can contain multiple values. There are three types of compounds: the tuple, the range and the arrays.
Tuple
A tuple is a set of values of different types. Tuples have a fixed arity. The arity of a tuple is defined at compilation time, and represent the number of values contained inside the tuple. Each element of a tuple has a type, and a given order. Tuples are built between parentheses, by a comma-separated list of values. A tuple of one value can be defined, by putting a coma after the first value. This way the compiler can understand the desire of creating a tuple, and do not confuse it with a normal expression between parentheses.
def main () {
    let t : (i32, c32, f64) = (1, 'r', 3.14);  // three value tuple
    let t2 : (i32,) = (1,); // single value tuple
    let t3 : i32 = (1); // single value of type i32
}
In the above example, the tuple t, is a single element, and can be
used as a function parameter or as a return value of a function. It
can also be destructured, to retrieve the values of its component
elements. There are three ways of tuple destructuring.
- the dot operator
., followed by an integer value, whose value is known at compilation time. This value can be computed by a complex expression, as long as the compiler is able to retreive the value at compilation time (cf. Compilation time execution).
import std::io;

def main () {
    let t = (1, 'r', 3.14);
    let z : i32 = t._0;
    let y : c32 = t. (0 + 1);
    println (t.2);
}
- the tuple destructuring syntax. This syntax, close to variable
declaration, creates new variables that contains parts of the tuple
that is destructured. In the following example, one can note that the
tuple destructuring syntax allows to extract only some of the tuple
values. The type of the variable
eis the tuple(c32, f64), and its values are('r', 3.14), when the variablefcontains the value1of typei32.
def main () {
    let t = (1, 'r', 3.14);
    let (x, y, z) = t;

    let (f, e...) = t;
    println (f, " ", e.0);
}
- the keyword
expand. this keyword is a compile-time rewrite, that expands the values of a tuple into a list of values. This list is then used to create other tuples, call functions, etc. The following example shows the use of the keywordexpandto call a function taking two parameters, with the value of a tuple containing two values.
import std::io

def add (a : i32, b : i32) -> i32
    a + b


def main () {
    let x = (1, 2);
    println (add (expand x));
    // ^^^^^^^^^^^^^^^^^^^^^^
    // Will be rewritten into :
    // println (add (x.0, x.1));

    let j : (i32, i32, i32) = (1, expand x);
    // ^^^^^^^^^^^^^^^^^^^^^^^^^^^^^^^^^^^^^
    // rewritten into : (1, x.0, x.1)
}
There is two other ways to destructurate a tuple. These ways are presented in forthcoming chapters. The following table lists the attributes specific to tuple types.
| Name | Meaning |
|---|---|
arity | The number of elements contained in the tuple (in a u32) |
init | a tuple, where each element values are set to init |
Ranges
Ranges are types that contain values defining an interval. A range is
named r!T, where T is the type of the range limits. They
are created by the token .. and .... A range consists of
four values, which are stored in the fields shown in the following
table. These fields can be accessed using the dot operator ..
| name | type | value |
|---|---|---|
| fst | T | the first bound |
| scd | T | the second bound |
| step | mut T | the step of the interval |
| contain | bool | Is the scd bound contained in the interval ? |
def main () {
    let range : r!(i32) = 1 .. 8;
    let c_range : r!(i32) = 1 ... 8;
}
The step_by function takes a range as a parameter and returns a new
range, with a modified step. This function is a core function, thus
there is nothing to import.
def main () {
    let range = (1 .. 8).step_by (2);
}
The Control flows section shows a use of these types.
Arrays
An array is a collection of values of the same type, stored in
contiguous memory. Unlike tuples, the size of an array is unknown at
compile time, and in Ymir, they are similar to slices, and will be
refered as such. Slices are defined with a syntax close to the one of
tuple, but with brackets instead of parentheses, for example [1, 2, 3]. The type of a slice is also defined using the brackets, for
example [i32], meaning a slice containing i32 values.
String literals, enclosed between double quotes are a special case of
slice literals. There is no string type in Ymir, but only slices
type. Because of this, string values are typed [c32] or
[c8] depending on the type of values contained in the
slice. String literals can be prefixed with the keyword s8 or
s32 to define the encoding system used. By default, when no
prefix is specified a string literal have a type [c32].
import std::io;

def main () {
    let x = [1, 2, 3]; // a [i32] slice
    let y = "Hello World !!"; // a [c32] slice
    let z = "Hello World !!"s8; // a [c8] slice
}
Warning: The length of a [c8] literals can seem incorrect
due to the encoding system. For example, the slice "☺"s8 have a
length of 3. To summarize, [c8] slices are utf-8 encoded
string literals, when [c32] are encoded in utf-32.
A slice is a two-word object, the first word is the length of the slice, and the second is a pointer to the data stored in the slice. A slice is an aliasable type, its mutability is a bit more complicated than the mutability of scalar types (except pointers), because it borrows memory which is not automatically copied when an assignment is made. This section will not discuss the mutability of internal types or aliasable types. This is discussed in the chapter Aliases and References.
The field len records the length of the slice and can be
retrieved with the dot operator .. The length of the slice is
stored in a usize field.
import std::io

def main () {
   let x = [1, 2, 3];
   println ("The value of x : ", x);
   println ("The length of x : ", x.len);
}
Similarly, the ptr field, gives access to the pointer of the
slice and its types depend on the inner type of the slice, and is
never mutable. Pointer type are absolutely not important for a
Ymir program, and we suspect that you will never have use of
them. They are defined to allow low level programming paradigms, and
are used in the std and runtime.
To access the elements of an array, the [] operator is used. It
takes either an integer value or a range value as parameter. If a
range value is given, a second slice that borrows a section of the
first is created. For now, the step of the range does not affect the
borrowing of the array. Contribution can be made here. On the other
hand if an integer value i is given as parameter, the value at
the index i is returned.
import std::io;

def main ()
    throws &OutOfArray
{
    let x = [1, 2, 3];
    let y = x [0 .. 2];
    let z = x [0];

    println (x, " ", y, " ", z);
}
The length of a slice is unknown at compilation time, and access can
be made with dynamic integers whose values are also unknown at
compilation time. For that reason, it may happen that the parameters
used go beyond the slice length. With this in mind, slice access is
considered unsafe, and can throw an exception of type
&OutOfArray. The exception system, and error handling is
detailed in the chapter Error
Handling.
Slices can be concatenated, to form another slice. The concatenation is made using the operator tilde on two operands. To work properly and be accepted by the language, the two slice used as operands must share the same type (but not necessarily mutability level, the mutability of the operand with the lowest mutability level is choosed for the result of the operation cf. Aliases and References).
import std::io

def foo () -> [i32] {
    [8, 7, 6]
}

def main ()  {
    println ([1, 2, 3] ~ foo ());
}
Results:
[1, 2, 3, 8, 7, 6]
The tilde token was chosen to avoid some ambiguity. In some languages
such as Java, the concatenation is made using the token + that
sometimes creates some ambiguity when concatenating strings, and other
elements such as integers. For example, the expression "foo" + 1 + 2, is ambiguous.
One can note however, that since concatenation only works on slices of
the same type, the following expression "foo" ~ 2, is invalid as
"foo" is of type [c32], and 2 of type i32.
Another syntax can be used to create slices. This syntax called slice allocation, allocates a slice on the heap and set the same value to every element of the slice.
import std::io
import std::random;

def main () {
    let a : [i32] = [0 ; new 100u64]; // this avoids the write of 100 zeros
                                      // but the result is the same

    let b = [12 ; new uniform (10, 100)];
    //                ^^^^^^^ generates a random value between 10 and 100
    println (a, " ", b);
}
The following table lists the attributes specific to slice types.
| Name | Meaning |
|---|---|
inner | the inner type |
init | an empty slice (with len == 0us) |
Static Arrays
Unlike the slice, static arrays are stored in the stack rather than on
the heap. To be possible, their size must be known at compilation
time. The syntax used to create a static array is close to the syntax
of a slice allocation, but the keyword new omitted.
import std::io

/**
  * Takes an array of size twelve as parameter
  */
def foo (a : [i32 ; 12]) {
    println (a);
}

def main ()
    throws &OutOfArray
{
    let mut a : [mut i32 ; 12] = [0 ; 12];

    for i in 0 .. 12
        a [i] = i

    let b = [1; 12];

    foo (a);
    foo (b);
}
A static array can be transformed into a slice using the alias,
copy and dcopy keywords. The chapter Aliases and
references
explains the difference between these keywords.
import std::io

def main () {
    let x : [i32; 12] = [0; 12];

    let a : [i32] = alias x;
    let b = copy x;

    println (a, " ", b);
}
One can argue that slice literals should be of static array type. We made the choice to create slices from array literals rather than static arrays to avoid verbosity, as we claim that slices are way more commonly used than arrays with a static size. We are for the moment considering the possibility to prefix slice literals, to define static array literals, but the question is not yet decided.
The following table lists the attributes specific to array types.
| Name | Meaning |
|---|---|
inner | the inner type |
len | the len of the array (usize value) |
init | an array where each element is set to the init value of the inner type |
Option
The option typed values are values that may be set or not. They are
defined using the token ? on types or values. Further
information on option type are given in the chapter Error
handling,
as they are completely related to error management system.
import std::io;

def main () {
    let i : i32? = (12)?; // an option type containing the value 12
    let j : i32? = (i32?)::err; // an option value containing no value
}
The value of an option type can be retreived using functions in the
std, or pattern matching. In this chapter, we only focus on the
unwrap function, pattern matching being left for a future
chapter (cf. Pattern
matchin). The
function unwrap from the module std::conv, get the value
contained inside an option type. If no value is contained inside the
option, the function throws an error of type &CastFailure.
import std::io;
import std::conv;

def foo (b : bool)-> (i32)? {
    if b {
        19? // return the value 19, wrapped into an option
    } else {
        (i32?)::__err__ // return an empty value
    }
}


def main ()
    throws &CastFailure
{
    let x = foo (true);
    println (x.unwrap () + 23);
}
The following table lists the attributes specific to option types.
| Name | Meaning |
|---|---|
err | An empty option value |
Cast
Some value can be transformed to create value of another type. This
operation is done with the cast keywords, whose syntax is
presented in the code block below.
cast_expression := 'cast' '!' ('{' type '}' | type) expression
In the following example, a cast of a value of type i32 to a
value of type i64 is made. As said earlier, implicit casting is
not allowed. The mutability of the casted value is always lower or
equal to the mutability of the original value (for obvious reason).
Warning cast can cause loss of precision, or even sign problems.
let a = 0;
let b : i64 = cast!i64 (a);
The following table list the authorized casts of the primitive types :
| From | To |
|---|---|
i8 i16 i32 i64 isize | i8 i16 i32 i64 u8 u16 u32 u64 isize usize |
u8 u16 u32 u64 usize | i8 i16 i32 i64 u8 u16 u32 u64 isize usize c8 c32 |
f32 f64 | f32 f64 |
c8 | c8 c32 u8 |
c32 | c8 c32 u32 |
&(X) for X = any type | &(void) |
Cast if a very basic type transformation, and must be used with precaution for basic operations. We will see in a forthecoming chapter (cf. Dynamic conversion) a complex system of conversion, provided by the standard library. This conversion system can be used to transform value of very different type and encoding.
Functions
Function is a widely accepted concept for dividing a program into
small parts. A Ymir program starts with the main function that
you have already seen in previous chapters. All functions are declared
using the keyword def followed by a identifier, and a list of
parameters. A function is called by using its identifier followed by a
list of parameters separated by commas between parentheses.
import std::io

/**
 * The main function is the entry point of the program
 * It can have no parameters, and return an i32, or void
 */
def main () {
    foo ();
}


/**
 * Declaration of a function named 'foo' with no parameters
 */
def foo () {
    println ("Foo");

    bar ();
}


/**
 * Declaration of a function named 'bar' with one parameter 'x' of type 'i32'
*/
def bar (x : i32) {
    println ("Bar ", x);
}
The grammar of a function is defined in the following code block.
function := template_function | simple_function
simple_function := 'def' identifier parameters ('->' type)? expression
template_function := 'def' ('if' expression) identifier templates parameters ('->' type)? expression

parameters := '(' (var_decl (',' var_decl)*)? ')'
var_decl := identifier ':' type ('=' expression)?

identifier := ('_')* [A-z] ([A-z0-9_])*
The order of declaration of the symbol has no impact on the
compilation. The symbols are defined by the compiler before being
validated, thus contrary to C-like languages, even if the foo
function is defined after the main function (in the first example of
this chapter), it's symbol is accessible, and hence callable by the
main function. Further information about symbol declarations, and
accesses are presented in chapter
Modules.
Parameters
The parameters of a function are declared after its identifier between
parentheses. The syntax of declaration of a parameter is similar to
the syntax of declaration of a variable, except that the keyword
let is omitted. However, unlike variable declaration, a
parameter must have a type, and its value is optional.
import std::io

/**
 * Declaration of a function 'foo' with one parameter 'x' of type 'i32'
 */
def foo (x : i32) {
    println ("The value of x is : ", x);
}

/**
 * Declaration of a function 'bar' with two parameters 'x' and 'y' whose respective types are 'i32' and 'i32'
 */
def bar (x : i32, y : i32) {
    println ("The value of x + y : ", x + y);
}

def main () {
    foo (5); // Call the function 'foo' with 'x' set to '5'
    bar (3, 4); // Call the function 'bar' with 'x' set to '3' and 'y' set to '4'
}
Default value
A function parameter can have a value, that is used by default when calling the function. Therefore it is optional to specify the value of a function parameter that have a default value, when calling it. To change the value of a parameter with a default value, the named expression syntax is used. This expression, whose grammar is presented in the following code block, consists in naming a value.
named_expression: Identifier '->' expression
The following source code presents an example of function with a parameter with a default value, and the usage of a named expression to call this function.
import std::io


/**
 * Function 'foo' can be called without specifying a value for parameter 'x'
 * '8' will be used as the default value for 'x'
 */
def foo (x : i32 = 8) {
    println ("The value of x is : ", x);
}

def main () {
    foo (); // call 'foo' with 'x' set to '8'
    foo (x-> 7); // call 'foo' with 'x' set to '7'
}
The named expression can also be used for parameters without any default value. Thanks to that named expression, it is possible to specify the parameter in any order.
import std::io


/**
 * Parameters with default values, does not need to be last parameters
 * This function can be called with only two parameters ('x' and 'z'), or using named expression syntax
 */
def foo (x : i32, y : i32 = 9, z : i32) {
    println (x, " ", y, " ", z);
}

def main () {
    // Call the 'foo' function with 'x' = 2, 'y' = 1 and 'z' = 8
    foo (8, y-> 1, x-> 2);
    foo (1, 8); // call the function 'foo' with 'x' = 1 and y = '9' and z = '8'
}
Results:
2 1 8
1 9 8
Any complex expression can be used, for the default value of a function parameter. The creation of an object, a call of a function, a code block, etc. The only limitation is that, you cannot refer to the other parameters of the function. Indeed, they are not considered declared in the scope of the default value.
def foo (x : i32) -> i32 { ... }
def bar (x : i32) -> i32 { ... }

/**
 * Declaration of a 'baz' function, where 'b' = bar(1) + foo(2), as a default value
 */
def baz (a : i32, b : i32 = {bar (1) + foo (2)}) {
 // ...
}

def main () {
    baz (12);
}
The symbols used in the default value of a parameters must be
accessible in the context of the function declaration. In the last
example, that means that the function baz must know the function
bar and the function foo, however, there is no need for the
function that calls it (here the function main) to know these
symbols. Further explanation on symbol declarations and accesses are
presented in chapter
Modules.
Recursive default value
Recursivity of default parameter is prohibited. To illustrate this point, the following code example will not be accepted by the compiler.
import std::io;

def foo (foo_a : i32 = bar ()) -> i32 {
                    // ^^^ here there is a recursive call
    foo_a
}

def bar (bar_a : i32 = foo ()) -> i32 {
                    // ^^^ recursivity problem

    println ("Bar ", bar_a);
    foo (foo_a-> bar_a + 11)
}

def main () {
    println ("Main ", bar ()); // no need to set bar_a
}
Errors:
Error : the call operator is not defined for main::bar and {}
 --> main.yr:(3,28)
 3  ┃ def foo (foo_a : i32 = bar ()) -> i32 {
    ╋                            ^^
    ┃ Note : candidate bar --> main.yr:(8,5) : main::bar (bar_a : i32)-> i32
    ┃ Note :
    ┃  --> main.yr:(3,10)
    ┃  3  ┃ def foo (foo_a : i32 = bar ()) -> i32 {
    ┃     ╋          ^^^^^
    ┃ Note :
    ┃  --> main.yr:(8,24)
    ┃  8  ┃ def bar (bar_a : i32 = foo ()) -> i32 {
    ┃     ╋                        ^^^
    ┃ Note :
    ┃  --> main.yr:(8,10)
    ┃  8  ┃ def bar (bar_a : i32 = foo ()) -> i32 {
    ┃     ╋          ^^^^^
    ┃ Note :
    ┃  --> main.yr:(3,24)
    ┃  3  ┃ def foo (foo_a : i32 = bar ()) -> i32 {
    ┃     ╋                        ^^^
    ┗━━━━━┻━
This recursivity problem can be easily resolved by setting a value to
the parameter bar_a when called in the default value of
foo_a.
def foo (foo_a : i32 = bar (bar_a-> 20)) -> i32 {
                    //      ^^^^^ resolve the recursive problem
    foo_a
}

// no need to do the same in bar, the recursivity does not exists anymore
Results:
Bar 20
Bar 31
Main 42
Main function parameters
The main function can have a parameter. This parameter is of
type [[c8]], and is the list of arguments passed to the program
in the command line when called.
import std::io;

def main (args : [[c8]]) {
    println (args);
}
Results:
$ ./a.out foo bar 1
[./a.out, foo, bar, 1]
The std provides an argument parser in std::args, that will not
be presented here, but worth mentioning.
Function body
The body of a function is an expression. Every expression in Ymir
are typed, but that does not mean that every expression have a value,
as they can be typed as void expression. The expression (body of the
function) is evaluated when the function is entered, and its value is
used as the value of the function. A simple add function can be
written as follows:
def add (x : i32, y : i32)-> i32
    x + y
Or by using a more complex expression, such as scope, which is an expression containing a list of expression. A scope is surrounded by the curly brackets, and was presented in the section regarding lifetime of local variables. The last expression in the list of expression of a scope, is taken as the value of the scope.
def add (x : i32, y : i32) -> i32 { // start of a block
    x + y // last expression of the block is the value of the block
} // end of a block

def main ()
    throws &AssertError
{
    let x = {
        let y = add (1, 2);
        y + 8
    };
    assert (x == 11)
}
The semi-colon token ; is a way of specifying that an expression
ends inside a scope, and that its value must be ignored. If the last
expression of a scope is terminated by a semi-colon, an empty
expression is added to the scope. This empty expression has no value,
giving to the scope an empty value of type void as well.
/**
 * The value of foo is '9'
 */
def foo () -> i32
    9


def main () {
    let x = {
         foo (); // Call foo, but its value is ignored
    } // The value of the scope is 'void'
}
Because it is impossible to declare a variable with a void type, that
contains no value, the above example is no accepted by the
language. The compiler returns the error depicted below. One can note,
that it is however possible the declare a variable without value, but
its type must be an empty tuple, defined by the literal ().
Error : cannot declare var of type void
 --> main.yr:(6,9)
    |
 6  |     let x = {
    |         ^

ymir1: fatal error:
compilation terminated.
Function return type
When the value of the body of a function is not of type void,
the function has as well a value with a type. This type must be
defined in the prototype of the function, to be visible from the other
function that can call it. This type declaration is made with the
single arrow token -> after the declarations of the parameter of
the function. The return type of a function can be omitted if the
value of its body is of type void, but must be specified
otherwise.
def foo (x : i32)-> i32
    x + 1

def bar (x : i32, y : i32) -> i32 {
    let z = x + y;
    println ("The value of z : ", z);
    foo (z)
}
It is not always convenient to define a body of a function in a way
that leads to return the right value, when many branches are
possible. To avoid verbosity, and return function prematuraly, the
keyword return, close a function and return the value of the
expression associated with it. This return statement can also be
used in a void function, if its expression is of type
void. The type of the value of the expression associated to the
return statement must be the same as the function return type
defined in its prototype.
def isDivisable (x : i32, z : i32) -> bool {
    if (z == 0) return false;

    (x % z) == 0
}
The compiler checks that every branches leads to a return statement or to a value of the right type. If a function body has a type different to the return type of the function, and it can happen that no return statement is encountered, then the compiler returns an error.
import std::io

def add_one (x : i32)-> i32 {
    x + 1; // the value of the block is void, due to the ';'
}

def main () {
    let x = add_one (5);
    println ("The value of x : ", x);
}
In the above source code, the function add_one has a body of type
void, when the function prototype claims that the function
returns a i32, and no return statement can be encountered inside
the function, thus the compiler returns the following error.
Error : incompatible types i32 and void
 --> main.yr:(3,29)
 3  ┃ def add_one (x : i32)-> i32 {
    ╋                             ^
    ┃ Note :
    ┃  --> main.yr:(5,1)
    ┃  5  ┃ }
    ┃     ╋ ^
    ┗━━━━━┻━


ymir1: fatal error:
compilation terminated.
Scope declaration
A scope is also the opening of a local module, in which declaration can be made. These declarations can be other functions, structures, classes, enumeration, etc. The declarations made inside a scope have no access to the local variables defined in the function. Such access is possible with the use of closures (cf. Function advanced), but this is not be presented inside this chapter.
def foo () {
    import std::io;	 // imporation is local to foo
    let x = 12;
    {
    def bar () -> i32 {
        println (x);
        12
    }
    println (x + bar ());
    }

    // bar is not accessible anymore
    bar (); // does not compile
}

def main () {
    foo ();

    bar ();
    println ("In the main function !");
}
In the above example, the bar function is available in the scope
opened at line 4, until its end at line 10. For that reason,
it is also not available inside the main function. Moreover, the
import statement made at line 2 (importing the println
function) is only available in the scope opened at line 1, and for
that reason not available in the main function. For these
reasons, the above example contains five errors, that are thrown by
the compiler.
Error : undefined symbol x
 --> main.yr:(6,15)
 6  ┃ 	    println (x);
    ╋ 	             ^

Error : undefined symbol bar
 --> main.yr:(9,15)
 9  ┃ 	println (x + bar ());
    ╋ 	             ^^^

Error : undefined symbol bar
 --> main.yr:(13,5)
13  ┃     bar (); // does not compile
    ╋     ^^^

Error : undefined symbol bar
 --> main.yr:(19,5)
19  ┃     bar ();
    ╋     ^^^

Error : undefined symbol println
 --> main.yr:(20,5)
20  ┃     println ("In the main function !");
    ╋     ^^^^^^^


ymir1: fatal error:
compilation terminated.
Functions are not modules, this way of defining is used to define private symbols only, in a future chapter we will see a way to define public symbols available for other functions, and foreign modules (cf. Modules).
Uniform call syntax
The uniform call syntax is a syntax that allows to call a function
with the dot operator .. The uniform call syntax places the
first parameter of the function at the left of the dot
operation, and the rest of the arguments of the function after the
right operand as a list of expressions separated by comas enclosed
inside parentheses.
ufc := expression '.' expression '(' (expression (',' expression)*)? ')'
This syntax is used to perform continuous data processing and to make the source code easier to read. This syntax is named uniform call syntax because it is similar to the the syntax used to call methods on class objects (cf. Objects).
import std::io

def plusOne (i : i32) -> i32
    i + 1

def plusTwo (i : i32) -> i32
    i + 2

def main () {
    let x = 12;
    x.plusOne ()
     .plusTwo ()
     .println ();
}
Results:
15
The uniform call syntax can also be useful to define equivalent of methods on structures. Because structures are presented in a future chapter, we do not present this possibility here.
Control flows
When writing a program, the ability to decide to execute part of the code conditionally, or to repeat part of the code, is a basic scheme that is necessary.
If expression
An if expression is a control flow allowing to branch into the
program code by making decisions based on conditions. An else can be
placed after an if expression, to execute a part of code, if the
condition of the if expression is not met. The syntax of the if
expression is presented in the following code block.
if_expression := 'if' expression expression ('else' expression)?
The following source code present a basic utilization of the if expression.
def main () {
    let x = 5;

    if x < 5 {
       println ("X is lower than 5");
    } else if (x == 5) { // parentheses are optional
      println ("X is exactly 5");
    } else {
      println ("X is higher than 5");
    }
}
The value of an if expression is computed by the block of code that
is executed when branching on the condition. Each branch of the
if expression must have a value of the same type, otherwise an
error is returned by the compiler. The value of an if, can of
course be of type void.
def main () {
    let condition = true;
    let x = if condition {
        5
    } else {
        7
    };
}
If there is a possibility for the program to enter none of the branch
of the if expression, then the value of the whole if expression is
of type void. For example, in the following source code, the
variable condition can be either true or false, leading to
the possibility for the if expression defined at line 5 to be
never entered, and to the possibility for that the value of x to
be never set.
def foo () -> bool { // ... } // return a bool value

def main () {
    let condition = foo ();
    let x = if condition { // the condition can be false
        5
    }; // and then the expression has no value
       // but the variable x cannot be of type void
}
Errors:
Error : incompatible types void and i32
 --> main.yr:(5,10)
 5  ┃ 	let x = if condition { // the condition can be false
    ╋ 	        ^^
    ┃ Note :
    ┃  --> main.yr:(6,3)
    ┃  6  ┃ 		5
    ┃     ╋ 		^
    ┗━━━━━┻━


ymir1: fatal error:
compilation terminated.
Loops
In Ymir, there are three kinds of loops: loop, while and for.
Infinite repetitions
The keyword loop is used to specify that a scope must be
repeated endlessly. The syntax of the loop expression is the
following:
loop_expression := 'loop' expression
In the following example, the program will never exit, and will print,
an infinite number of times, the string "I will be printed an infinite number of times".
def main () {
    loop { // the loop will never exit
         println ("I will be printed an infinite number of times");
    }
}
A loop can be used to repeat an action until it succeeds, e.g. waiting
for the end of a thread, or waiting for incoming network connections,
etc. The keyword break is used to stop a loop. A break
statement is associated with a value, which is following the
keyword. The value of a loop is defined by the value given by the
break statement. Every break statement in a loop must share the
same type. A loop can evidently be of type void.
import std::io

def main () {
    let mut counter = 0;

    let result = loop {
        counter += 1;
        if counter == 10 {
            break counter + 1; // stop the loop and set its value to 'counter + 1'
        }
    };
    println ("Result : ", result);}
Results:
Result : 11
Loop while condition is met
The keyword while creates a loop, which repeats until a
condition is no longer satisfied. As for the loop, it can be broken
with the keyword break. Unlike loop the value of a while loop
is always of type void, because it is impossible to ensure that
the while is entered at all. The break statement must follow that
rule, and break only with values of type void.
Contribution:
It is planned to add the possibility to write an else after a while
loop to give a value to the while loop when it is not entered.
The grammar of the while loop is presented, in the following code block.
while_expression := 'while' expression expression
The following example, present an utilization of a while loop, where
the loop iterates 10 times, while the value of i is lower than
10.
import std::io

def main () {
    let mut i = 0;
    while i < 10 {
        i += 1;
    };

    println ("I is : ", i);
}
Results:
I is : 10
Iterate over a value
The last type of loop is the for loop defined with the keyword
for. Like for the while loop the value of a for loop is
always void as it is impossible to garantee that the loop is
entered even once. The for loop iterates over an iterable
type. Primitive iterable types are ranges, tuple, slices and static
arrays.
for_expression := 'for' ('(' var_decls ')' | var_decls) 'in' expression expression

var_decls := var_decl (',' var_decl)
var_decl := (decorator)* identifier (':' type)?

decorator := 'ref' | 'mut' | 'dmut'
1) Iteration over a range. In the following example, the for loop is used to iterate over three ranges. The first loop at line 4, iterates between 0 and 8 (not included), by a step of 2. The second loop iterate between the value 10 and 0 (not included) with a step of -1. The third loop iterates between the value 1 and 6 (included this time).
import std::io

def main () {
    for i in (0 .. 8).step_by (2) {
        println (i);
    }

    for i in 10 .. 0 {
        println (i);
    }

    for i in 1 ... 6 {
        println (i);
    }
}
2) iteration over slices and static arrays. Slices are iterable types. They can be iterated using one or two variables. When only one variable is used, it is associated with the values contained inside the slice. When two variable are used, the first variable is associated to the current iteration index, and the second variable to the values contained inside the slice. Static array iteration works the same.
import std::io;

def main () {
    let a = [10, 11, 12];
    for i in a {
        print (i, " ");
    }

    println ("");
    for i, j in a {
        print (i, "-> ", j, " ");
    }
    println ("");
}
Results:
10 11 12
0-> 10 1-> 11 2-> 12
Contribution: the iteration by reference over mutable slice, and mutable static arrays is currently under development.
3) iteration over tuples. Tuple are iterable types. But unlike slice, or range the for loop is evaluated at compilation time. The tuple can be iterated using only one variable, that is associated to the values contained inside the tuple.
import std::io

def main () {
    let x = (1, 'r');
    for i in x {
        println (i);
    }

    // Is equivalent to
    println (x.0);
    println (x.1);
}
One may note that the type of the variable i in the for loop
of the above example changes from one iteration to another, being of
type i32 at first iteration and then of type c32. For that
reason, the for loop is not really dynamic, but flattened at
compilation time. This does not change anything from a user
perspective, but is worth mentioning, to avoid miscomprehension of
static type system, there is no hidden dynamicity here.
Assertion
The expression assert is an expression that verify the validity of a condition and throws an exception if the condition is false. Error are presented in the chapter Error Handling, thus no detail are given in this section.
def foo (i : i32) throws &AssertError
{
    assert (i < 10, "i must be lower than 10")
}

def main ()
    throws &AssertError
{
    foo (11);
}
Operator priority
The following table present the precedence of the operators, and literals. This table presents the priority of the operators, but does not specify how the operators are used, and their specific syntax. For example, there are unary operators, and binary operators, that require respectively one and two operands, but that is not specified in the table.
| Priority | Description | Operators | Comments |
|---|---|---|---|
| 0 | Assignement operators | = /= -= += *= %= ~= <<= >>= | |
| 1 | Logical Or | || | |
| 2 | Logical And | && | |
| 3 | Comparison operators | < > <= >= != == of is in !of !is !in | Cannot be chained |
| 4 | Range operators | .. ... | |
| 5 | Bitshift operators | << >> | |
| 6 | Bit operators | | ^ & | Warning there is no priority over these operators (or and and) |
| 7 | Additive operators | + ~ - | ~ is the concatenation operator |
| 8 | Multiplicative operators | * / % | |
| 9 | Power operator | ^^ | |
| 10 | Unary operators | - & * ! | Always prefixed |
| 11 | Option operator | ? | Always postfixed |
| 12 | Keyword and Scope operators | { if while assert break do for match let return fn dg loop throw __version __pragma with atomic | This operators have a specific syntax that must be closed, to be completed |
| 13 | Postfix operators | . ( [ :. #[ #( #{ | ( [ #{ #[ #( must be closed by a balanced ], ) or } to be completed |
| 14 | Path operator | :: | |
| 15 | Literal operators | ( ! [ | cast move | In that case ( [ | start a new expression, move and | start a lambda literal, ( a tuple, or a 0 priority expression, [ a slice or array literal, ! a template call |
| 16 | Decorated expression | ref const mut dmut cte | |
| 17 | Anything else | A variable, a literal, etc. |
Alias and References
The alias and reference is one of the most important characteristics of the Ymir language, which allows it to give guarantees on the mutability of the data, and the explicit movement of the memory. It is important to understand how memory works in Ymir, in order to understand the error message you might get when you try to move data from one variable to another.
Ymir is a high level programming language, thus there is no need to worry about memory management (memory leaks), the language using a garbage collector. However, in terms of mutability and access rights, the language provides an expressive system for managing memory movements.
Standard and Aliasable types
In Ymir, there are two types, standard types and aliasable types. A value whose type is a standard type, can be copied without the need of explicitly inform the compiler. The standard types are all primitive scalar types. On the other hand, aliasable types are types that have borrowed data, which will not be copied unless it is explicitly written into the code, to avoid performance loss.
To understand how data is represented in a program, you need to know the difference between heap and stack. The stack is a space allocated by the program when a function is entered, which is released when the function is exited. On the other hand, the heap is a space that is allocated when certain instructions in the program require it, such as allocating a new slice, allocating a new object instance, and so on.
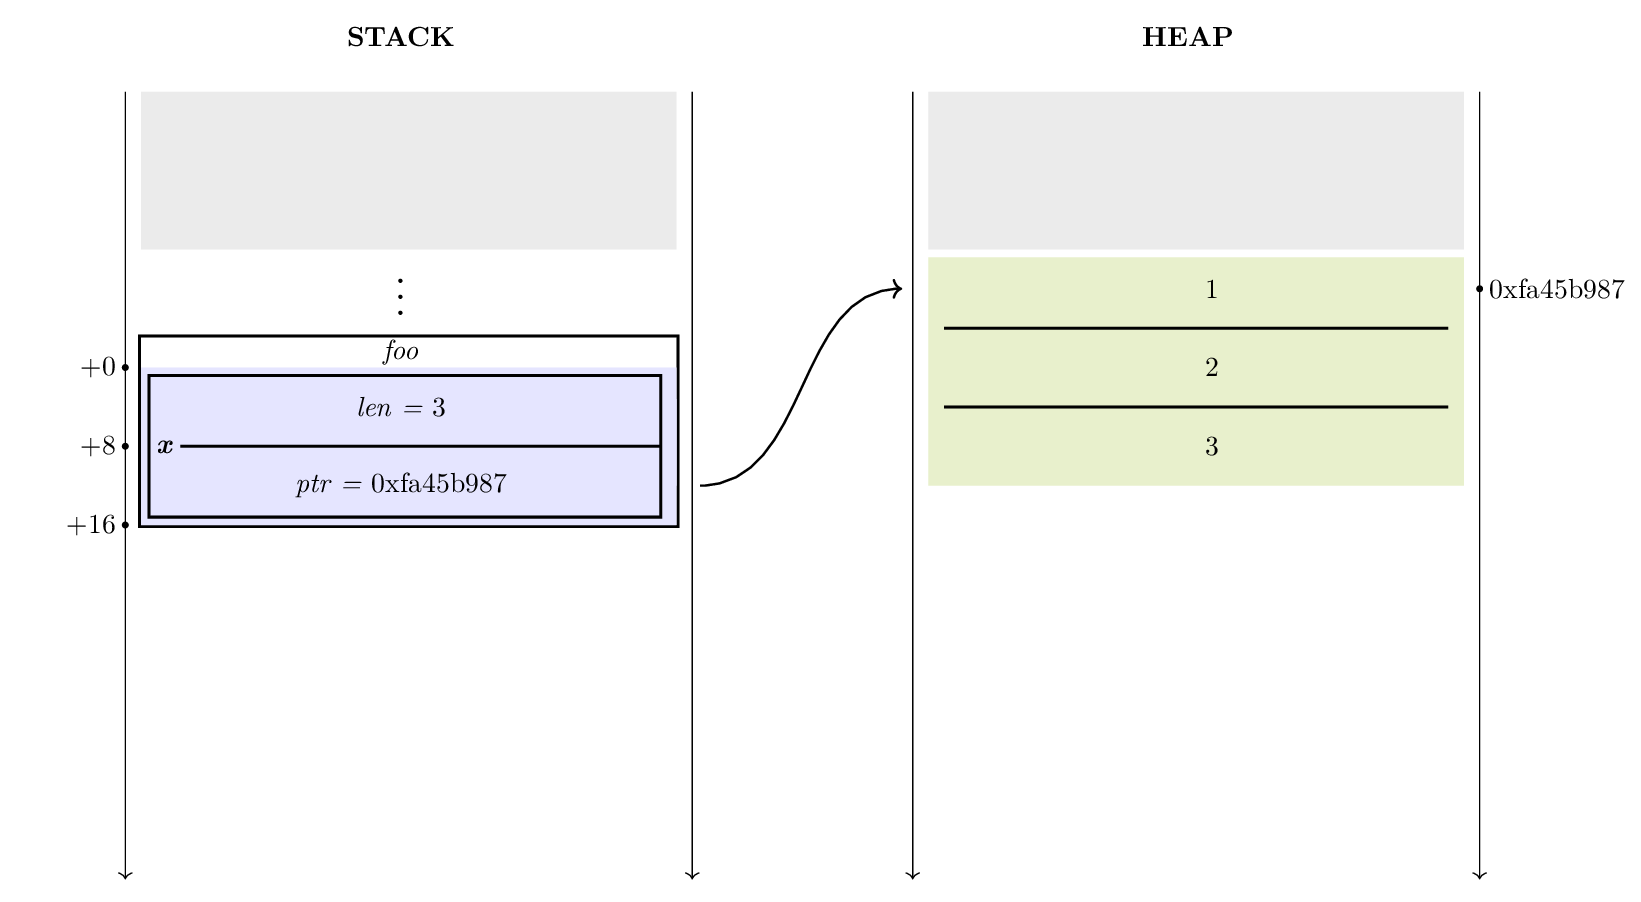
When a slice is allocated, all its data is stored in the heap, and the address of this data is stored in the stack, where the variables are located. The following figure shows the data representation for this program:
def foo () {
    let x = [1, 2, 3];
}
Mutability level
We define the level of mutability as the deepest level of the type that is mutable. An example of a mutability level is shown in the following table:
| Type | Level |
|---|---|
| mut [i32] | 1 |
| [i32] | 0 |
| mut [mut i32] | 2 |
| dmut [[[i32]]] | 4 |
This is mainly used to ensure that the borrowed data is not changed by another variable in a foreign part of the program. The users have full control over the data they have created. The example below shows how the mutability level is used to ensure that the content of a table is never changed.
import std::io

def main ()
    throws &OutOfArray
{
    let mut x = [1, 2, 3];
    x = [2, 3, 4];

    x [0] = 8;
}
The type of x in the above example is mut [i32]. The
mutability of the internal part of the slice (i32 value) is not
specified. The compiler, for security reasons, infered it as
immutable. The line 5 of the previous example is accepted, because
the variable x is mutable, however, the value pointed by the
slice contained in x is not. For that reason the line 9 is
not accepted and the compiler returns the following error.
Error : left operand of type i32 is immutable
 --> main.yr:(7,7)
 7  ┃     x [0] = 8;
    ╋       ^


ymir1: fatal error:
compilation terminated.
If the mutability level defines the write permission of every data, it
is assumed that every parts of the code that have access to a give
value have read permission on it. For that reason, in the previous
example, even if writting into x [0] is not permitted, reading
its value is allowed.
Deep mutability
Earlier we introduced the keyword dmut, this keyword is used to
avoid a very verbose type statement, and defines that every subtype
are mutable. This keyword is applicable to all types, but will only
have a different effect from the mut decorator on aliasable
types. The following table gives an example of an slice type, using
the keyword dmut :
| Type | Verbose equivalent |
|---|---|
| dmut [i32] | mut [mut i32] |
| dmut [[[i32]]] | mut [mut [mut [mut i32]]] |
If we come back to our previous example, and change the type of the
variable x, and use the keyword dmut. The variable x
now borrows mutable datas, that can be modified, thus the expression
at line 9 is accepted.
import std::io

def main ()
    throws &OutOfArray
{
    let dmut x = [1, 2, 3];
    x = [2, 3, 4];

    x [0] = 8;
}
Const keyword
The const keyword is the perfect opposite of the dmut
keyword. This keyword has no interest when defining types directly
(because they are immutable by default), but coupled with the keyword
typeof, it can transform a mutable type into a immutable type.
import std::io;

def main () {
    let mut x = 12;
    println (typeof (x)::typeid);
    println ((const typeof (x))::typeid);
}
Results:
mut i32
i32
String literal
Strings literal, unlike slice literals, are in the text segment of the
program (read-only part of a program). This means that the type of a
literal string is [c32] (or [c8] if the suffix s8 is
specified), while the type of a literal array (of i32 for example)
is mut [mut i32]. For that reason, it impossible to borrow the
data into a deeply mutable variable.
import std::io

def main () {
    let dmut x = "Try to make me mutable !?";
}
The compiler returns an error. This error means that the mutability
level of the right operand is 1, here mut [c32], (the reference
of the array is mutable but not its content), and the code try to put
the reference inside a variable of mutability level 2, that is to
say of type mut [mut c32]. If this was allowed the variable x
would have the possibility to change data that has been marked as
immutable at some point of the program, so the compiler does not allow
it, and returns the following error.
Error : discard the constant qualifier is prohibited, left operand mutability level is 2 but must be at most 1
 --> main.yr:(4,11)
 4  ┃ 	let dmut x = "Try to make me mutable !?";
    ╋ 	         ^
    ┃ Note :
    ┃  --> main.yr:(4,15)
    ┃  4  ┃ 	let dmut x = "Try to make me mutable !?";
    ┃     ╋ 	             ^
    ┗━━━━━┻━


ymir1: fatal error:
compilation terminated.
Memory borrowing
When you want to make a copy of a value whose type is aliasable, you
must tell the compiler how you want to make the copy. There are four
ways to move or reference memory, which are provided with the four
keywords ref, alias, copy and dcopy. The following chapters
presents these keywords, and the semantic associated to them.
Reference
The keyword**ref** is a keyword that is placed before the
declaration of a variable. It is used to refer to a value, which is
usually borrowed from another variable. They are performing similar
operation as
Pointers,
with the difference that they does not need to be dereferenced (this
is done automatically), and pointer arithmetics is not possible with
references. In Ymir references are always set, and are always set
from another variable, hence they are way safer than pointers, and
must be prefered to them when possible.
def foo () {
    let x = [1, 2, 3];
    let ref y = ref x;
    //          ^^^
    // Try to remove the keyword ref.
}
The above program can be represented in memory as shown in the following figure.
<img src="https://gnu-ymir.github.io/Documentations/en/advanced/memory_x__ref_y_foo.png" alt="drawing" height="500", style="display: block; margin-left: auto; margin-right: auto;">
In this figure, one can note that y, is a pointer to x, which
can be used as if it was directly x. This means that y
must have the same mutability properties (or lower) as x. And
that if x is mutable, changing the value of y would also
change x.
A first example of reference is presented in the following source
code. In this example, a mutable variable x contains a value of
type i32. This value is placed on the stack, as it is not a
aliasable type. Then a variable y is constructed as a reference
of the variable x. Modifying y in the following example, also
modifies x.
def main ()
    throws &AssertError
{
    let mut x = 12; // place a value of type i32 and value 12 on the stack
    let ref mut y = ref x; // create a reference of x
    y = 42; // modify the value pointed by the reference
    assert (x == 42);
}
A more complexe example is presented in the following source code. In
this example, a deeply mutable array x is created. This array is
a reference on borrowed data in the heap. A deeply mutable reference
y is the, made on that variable x, which is allowed
because x is also deeply mutable and the mutability level of
x and y are the same. When changing the value of y
(here the reference of the slice), it does not only change the
reference of y but also the reference of x.
def main () {
    let mut x : [mut i32] = [1, 2, 3];
    let ref mut y : [mut i32] = ref x;
    y = [7, 8, 9]; // modify the value pointed by the reference (in the stack)
    y [0] = 89; // modify the value on the heap
    assert (x == [89, 8, 9]);
}
Reference as function parameter
A parameter of a function can be a reference. As with the local variable, when a value is passed to it, you must tell the compiler that you understand that you are passing the value by reference, and accept the side effects it may have on your values.
import std::io

def foo (ref mut x : i32) {
    x = 123;
}

def main () {
    let mut x = 12;
    //  ^^^
    // Try to remove the mut
    foo (ref x);
    //   ^^^
    // Try to remove the ref
    println (x);
}
The following figure shows the memory status of the previous code:

The keyword ref is not always associated with a mutable variable, it
can be used to pass a complex type to a function more efficiently,
when you don't want to make a complete copy, which would be much less
efficient. In this case, you should always specify that you pass the
variable by reference, to distinguish it from the function that passes
the variable directly by value. In practice, due to the existence of
aliasable types, which will be discussed in the next chapter, you will
never gain anything by doing this.
import std::io

def foo ( x : i32) {
//       ^
// Try to add mut here
    println ("By value : ", x);
}

def foo (ref x : i32) {
    println ("By reference : ", x);
}

def main () {
    let x = 89;
    foo (x);
    foo (ref x);
}
Results:
By value : 89
By reference : 89
If you have done the exercise, and added the keyword mut to the
signature of the first function foo, you should get the following
error:
Error : a parameter cannot be mutable, if it is not a reference
 --> main.yr:(3,15)
 3  ┃ def foo (mut  x : i32) {
    ╋               ^
This error means that the type of x is not aliasable, so if it is not
a reference, marking it as mutable will have no effect on the program,
so the compiler does not allow it.
Reference as a value
A reference is not a type, it is only a kind of variable, you cannot store references in subtypes (for example, you cannot make an array of references, or a tuple containing a reference to a value). This means that with the following code, you should will get an error.
def main () {
    let x = 12;
    let y = (10, ref x);
}
The following error means that the source code intended to create
a reference on a variable, but the compiler will not make it, as it
has no interest and will be immediately dereferenced to be stored in
the tuple value.
Warning : the creation of ref has no effect on the left operand
 --> main.yr:(3,22)
 3  ┃     let y = (10, ref x);
    ╋                      ^


ymir1: fatal error:
compilation terminated.
Reference as function return
You may be skeptical about the interest of returning a reference to a variable, and we agree with you. That is why, it is impossible to return a reference to a variable as a function return value.
import std::io

def foo () -> ref i32 {
    let x = 12;
    ref x
}

def main () {
    let ref y = ref foo (); // x would no longer exists
    println (y); // and a seg fault would be raised, when using the reference
}
With the above source code, the compiler return this fairly straightforward error.
Error : cannot return a reference type
 --> main.yr:(3,19)
 3  ┃ def foo () -> ref i32 {
    ╋                   ^^^
Alias
All types that containing a pointer to data in the heap (or the stack) are aliasable types. An aliasable type cannot be implicitly copied, nor can it be implicitly referenced, for performance and security reasons respectively. There are mainly three aliasable types, arrays (or slices, there is no difference in Ymir), pointers, and objects. Structures and tuples containing aliasable types are also aliasable.
The keyword alias is used to inform the compiler that the used
understand that the data borrowed by a variable (or a value) will
borrowed by another values.
import std::io

def main () {
    let mut x : [mut i32] = [1, 2, 3];
    let mut y : [mut i32] = alias x; // allow y to borrow the value of x
    //                      ^^^^^
    // Try to remove the alias
    println (y);
}
This source code can be represented in memory by the following figure.
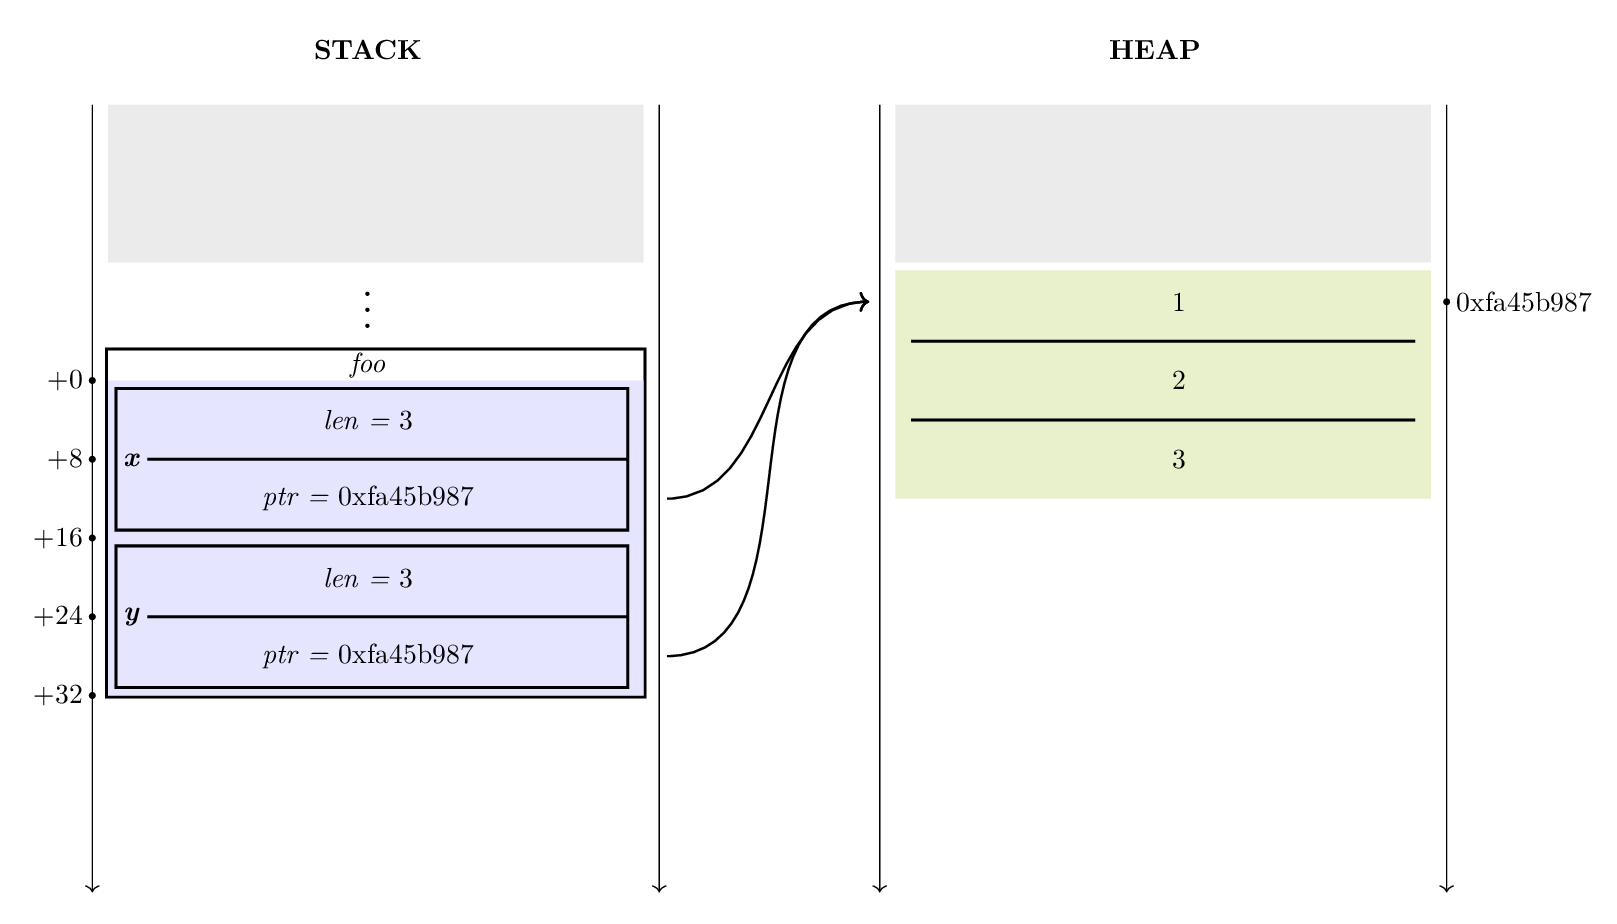
The alias keyword is only mandatory when the variable that will borrow the data is mutable and may impact the value. It is obvious that one cannot borrow immutable data from a variable that is mutable. For example, the compiler must return an error on the following code.
import std::io

def main () {
    let x = [1, 2, 3];
    let mut y : [mut i32] = alias x; // try to borrow immutable data in deeply mutable variable y
    //                      ^^^^^
    // Try to remove the alias
    println (y);
}
Errors:
Error : discard the constant qualifier is prohibited, left operand mutability level is 2 but must be at most 1
 --> main.yr:(5,13)
 5  ┃     let mut y : [mut i32] = alias x; // try to borrow immutable data in deeply mutable variable y
    ╋             ^
    ┃ Note :
    ┃  --> main.yr:(5,29)
    ┃  5  ┃     let mut y : [mut i32] = alias x; // try to borrow immutable data in deeply mutable variable y
    ┃     ╋                             ^^^^^
    ┗━━━━━┻━

Error : undefined symbol y
 --> main.yr:(8,14)
 8  ┃     println (y);
    ╋              ^


ymir1: fatal error:
compilation terminated.
However, if the variable that will borrow the data is not mutable,
there is no need to add the keyword alias, and the compiler will
create an implicit alias, which will have no consequences.
import std::io

def main () {
    let x = [1, 2, 3];
    let y = x; // implicit alias is allowed, 'y' is immutable
    println (y);
}
In the last example, y can be mutable, as long as its internal
values are immutable, i.e. its type is mut [i32], you can change the
value of y, but not the values it borrows. There is no problem,
the values of x will not be changed, no matter what is done with
y.
import std::io

def main () {
    let x = [1, 2, 3];
    let mut y = x;
    // y [0] = 9;
    // Try to add the above line

    y = [7, 8, 9];
    println (y);
}
You may have noticed that even though the literal is actually the
element that creates the data, we do not consider it to be the owner
of the data, so the keyword alias is implied when it is literal. We
consider the data to have an owner only once it has been assigned to a
variable.
There are other kinds of alias that are implicitly allowed, such
as code blocks or function calls. Those are implicit because
the alias is already made within the value of these elements.
import std::io

def foo () -> dmut [i32] {
    let dmut x = [1, 2, 3];
    alias x // alias is done here and mandatory
}

def main ()
    throws &AssertError
{
    let x = foo (); // no need to alias, it must have been done in the function
    assert (x == [1, 2, 3]);
}
Alias a function parameter
As you have noticed, the keyword alias, unlike the keyword ref,
does not characterize a variable. The type of a variable will indicate
whether the type should be passed by alias or not, so there is no
change in the definition of the function. When the type of a parameter
is an aliasable type, this parameter can be mutable without being a
reference.
import std::io

// The function foo will be allowed to modify the internal values of y
def foo (mut y : [mut i32])
    throws &OutOfArray
{
    y [0] = y [1];
    y = [8, 3, 4]; // has no impact on the x of main,
    // y is a reference to the data borrowed not to the variable x itself
}

def main ()
    throws &OutOfArray, &AssertError
{
    let dmut x = [1, 2, 3];
    foo (alias x);
    //   ^^^^^
    // Try to remove the alias
    assert (x == [2, 2, 3]);
}
As with the variable, if the function parameter cannot affect the values that are borrowed, the alias keyword is not required.
import std::io

def foo (x : [i32]) {
    println (x); // just reads the borrowed data, but doesn't modify them
}

def main () {
    let dmut x = [1, 2, 3];
    foo (x); // no need to alias
}
Alias in uniform call syntax
We have seen in the function chapter, the uniform call syntax. This
syntax is used to call a function using the dot operator ., by
putting the first parameter of the function on the left of the
operation. When the first parameter is of an aliasable type, the first
argument must be aliased explicitely, leading to a strange and verbose
syntax.
let dmut a = [1, 2, 3];
(alias a).foo (12); // same a foo (alias a, 12);
To avoid verbosity, we added the operator :., to use the
uniform call syntax with an aliasable first parameter.
let dmut a = [1, 2, 3];
a:.foo (12); // same as foo (alias a, 12);
This operator is very usefull when dealing with classes, where the uniform call syntax is mandatory, as we will see in chapter Class.
Special case of struct and tuple
In the chapter Structure you will learn how to create a structure containing several fields of different types. You have already learned how to make tuples. These types are sometimes aliasable, depending on the internal type they contain. If a tuple, or a structure, has a field whose type is aliasable, then the tuple or structure is also aliasable.
The table below presents some examples of aliasable tuples :
| Type | Aliasable | Reason |
|---|---|---|
| (i32, i32) | false | i32 is not aliasable |
| ([i32],) | true | [i32] is a slice, and hence aliasable |
| ([i32], f64) | true | [i32] is a slice, and hence aliasable |
| (([i32], i32), f64) | true | [i32] is a slice, and hence aliasable |
In the introduction of this chapter we presented the notion of Mutability level. One can note that mutability level is not suitable for tuple, as aliasable tuple are trees of type and not simply a list. However, this does not change much, the compiler just check the mutability level of the inner types of the tuple, recursively.
Copy data to make them mutable
Sometimes it is not possible to allow data to be borrowed by foreign
functions or variables. This can be due to the facts that data are
immutable for example. To solve this problem, Ymir provides two
keywords, copy and dcopy.
Copy
The copy keyword makes a copy of the first level of a value,
whose type is aliasable. This copy transform an immutable type into a
mutable one, by increasing its mutability level by one. The following
table shows some examples of the types of copied values :
| Type | Type of copied value |
|---|---|
| [i32] | mut [mut i32] |
| mut [i32] | mut [mut i32] |
| mut [[i32]] | mut [mut [i32]] |
An example of what can be achieved by copy keyword is shown in
the following code. The representation of the memory is also shown in
the figure underneath. In this example, the variable x is copied
and the result value is placed in the variable y. In this
example, each variable are borrowing different data placed on the
heap, whose values are equivalent.
import std::io

def main ()
    throws &AssertError, &OutOfArray
{
    let x = [1, 2, 3];
    let dmut y = copy x; // create a copy of x
    assert (x == y); // y and x have the same value, but at different location

    y [0] = 9;
    assert (x == [1, 2, 3]); // modifying y does not affect x
    assert (y == [9, 2, 3]); // but still affects y
}
We can see from the figure below, that the variable y points to
data at a different location, from the data pointed by x. This
implies a new memory allocation, and a memory copy, that cost some cpu
time, and memory place. For that reason, copies are never hidden by
the language, and are made only when the keyword copy is placed
in the source code.
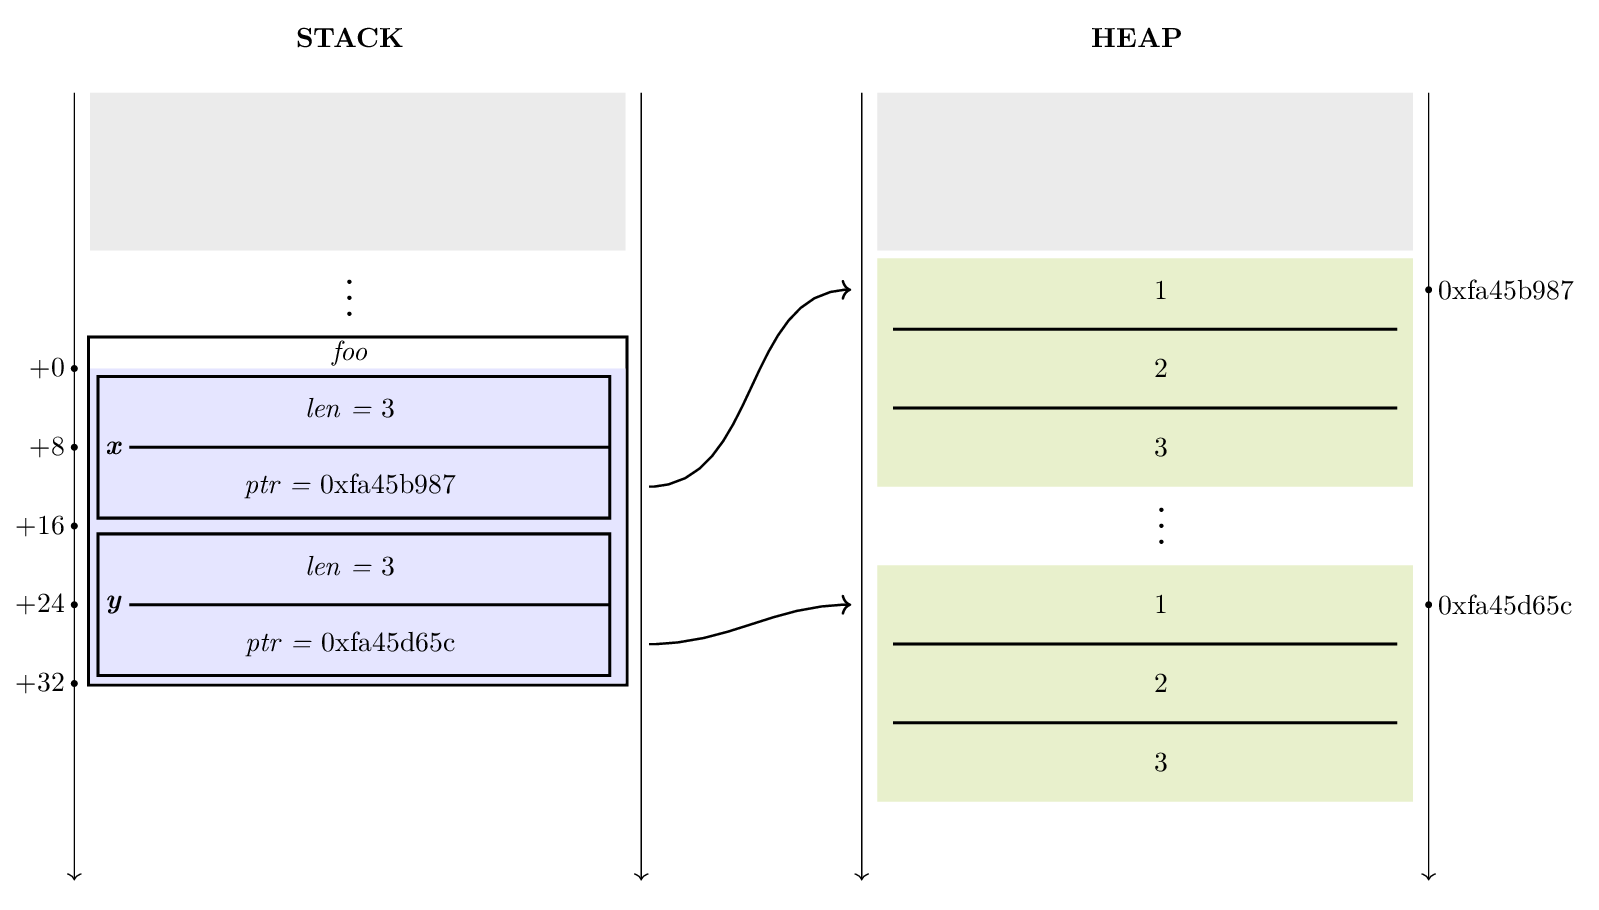
Exercise : Modify x that is initialised with an imutable string literal :
import std::io

def main ()
    throws &OutOfArray
{
    let x = "hello !";
    x [0] = 'H'; // Make this line work
    assert (x == "Hello !");
}
import std::io
def main ()
throws &OutOfArray, &AssertError
{
let dmut x = copy "hello !";
x [0] = 'H'; // Well done
assert (x == "Hello !");
}
Deep copy
The deep copy will make a copy of the value and all internal values, it must be used in special cases because it is much less efficient than the simple copy, which copies only one level of the data. There is nothing complex to understand in deep copy, it simply creates a value, deeply mutable, which is an exact copy.
import std::io

def main () {
    let x = [[1], [2, 3], [4]];
    let dmut y = dcopy x;
    let mut z : [mut [i32]] = copy x;
    println (x, " ", y, " ", z);
}
The structure of the copy respect the structure of the initial value that has been copied, meaning that even recursive values can be copied without any worries. To make recursive values, we need to use objects, that are described in the chapter Objects, and traits described in the chapter Traits to make the objects deeply copiable. To avoid the scattering of the information, we will assume that you will have already read these chapters and came back here to understand the deep copy on objects.
In the following example, the object A contains a field of type
A. The initialization of this field is made using the either
self or another object in the constructor defined at line
1 and 2. Thus the state of the memory in the main
function, at line 1 can be described by the figure depicted just
underneath the source code.
import std::io;

class A {

    let _i : i32;
    let dmut _a : &A;

    pub self (i : i32, dmut a : &A) with _a = alias a, _i = i {
        self._a._a = alias self;
    }

    pub self (i : i32) with _a = alias self, _i = i {}

    impl Copiable, Streamable; // to make A deep copiable, and printable
}

def main () {
    let dmut a = A::new (1);
    let dmut b = A::new (2, alias a);

    println (a);
    println (b);
}
Results:
main::A(1, main::A(2, main::A(...)))
main::A(2, main::A(1, main::A(...)))
Memory state at line 20 :
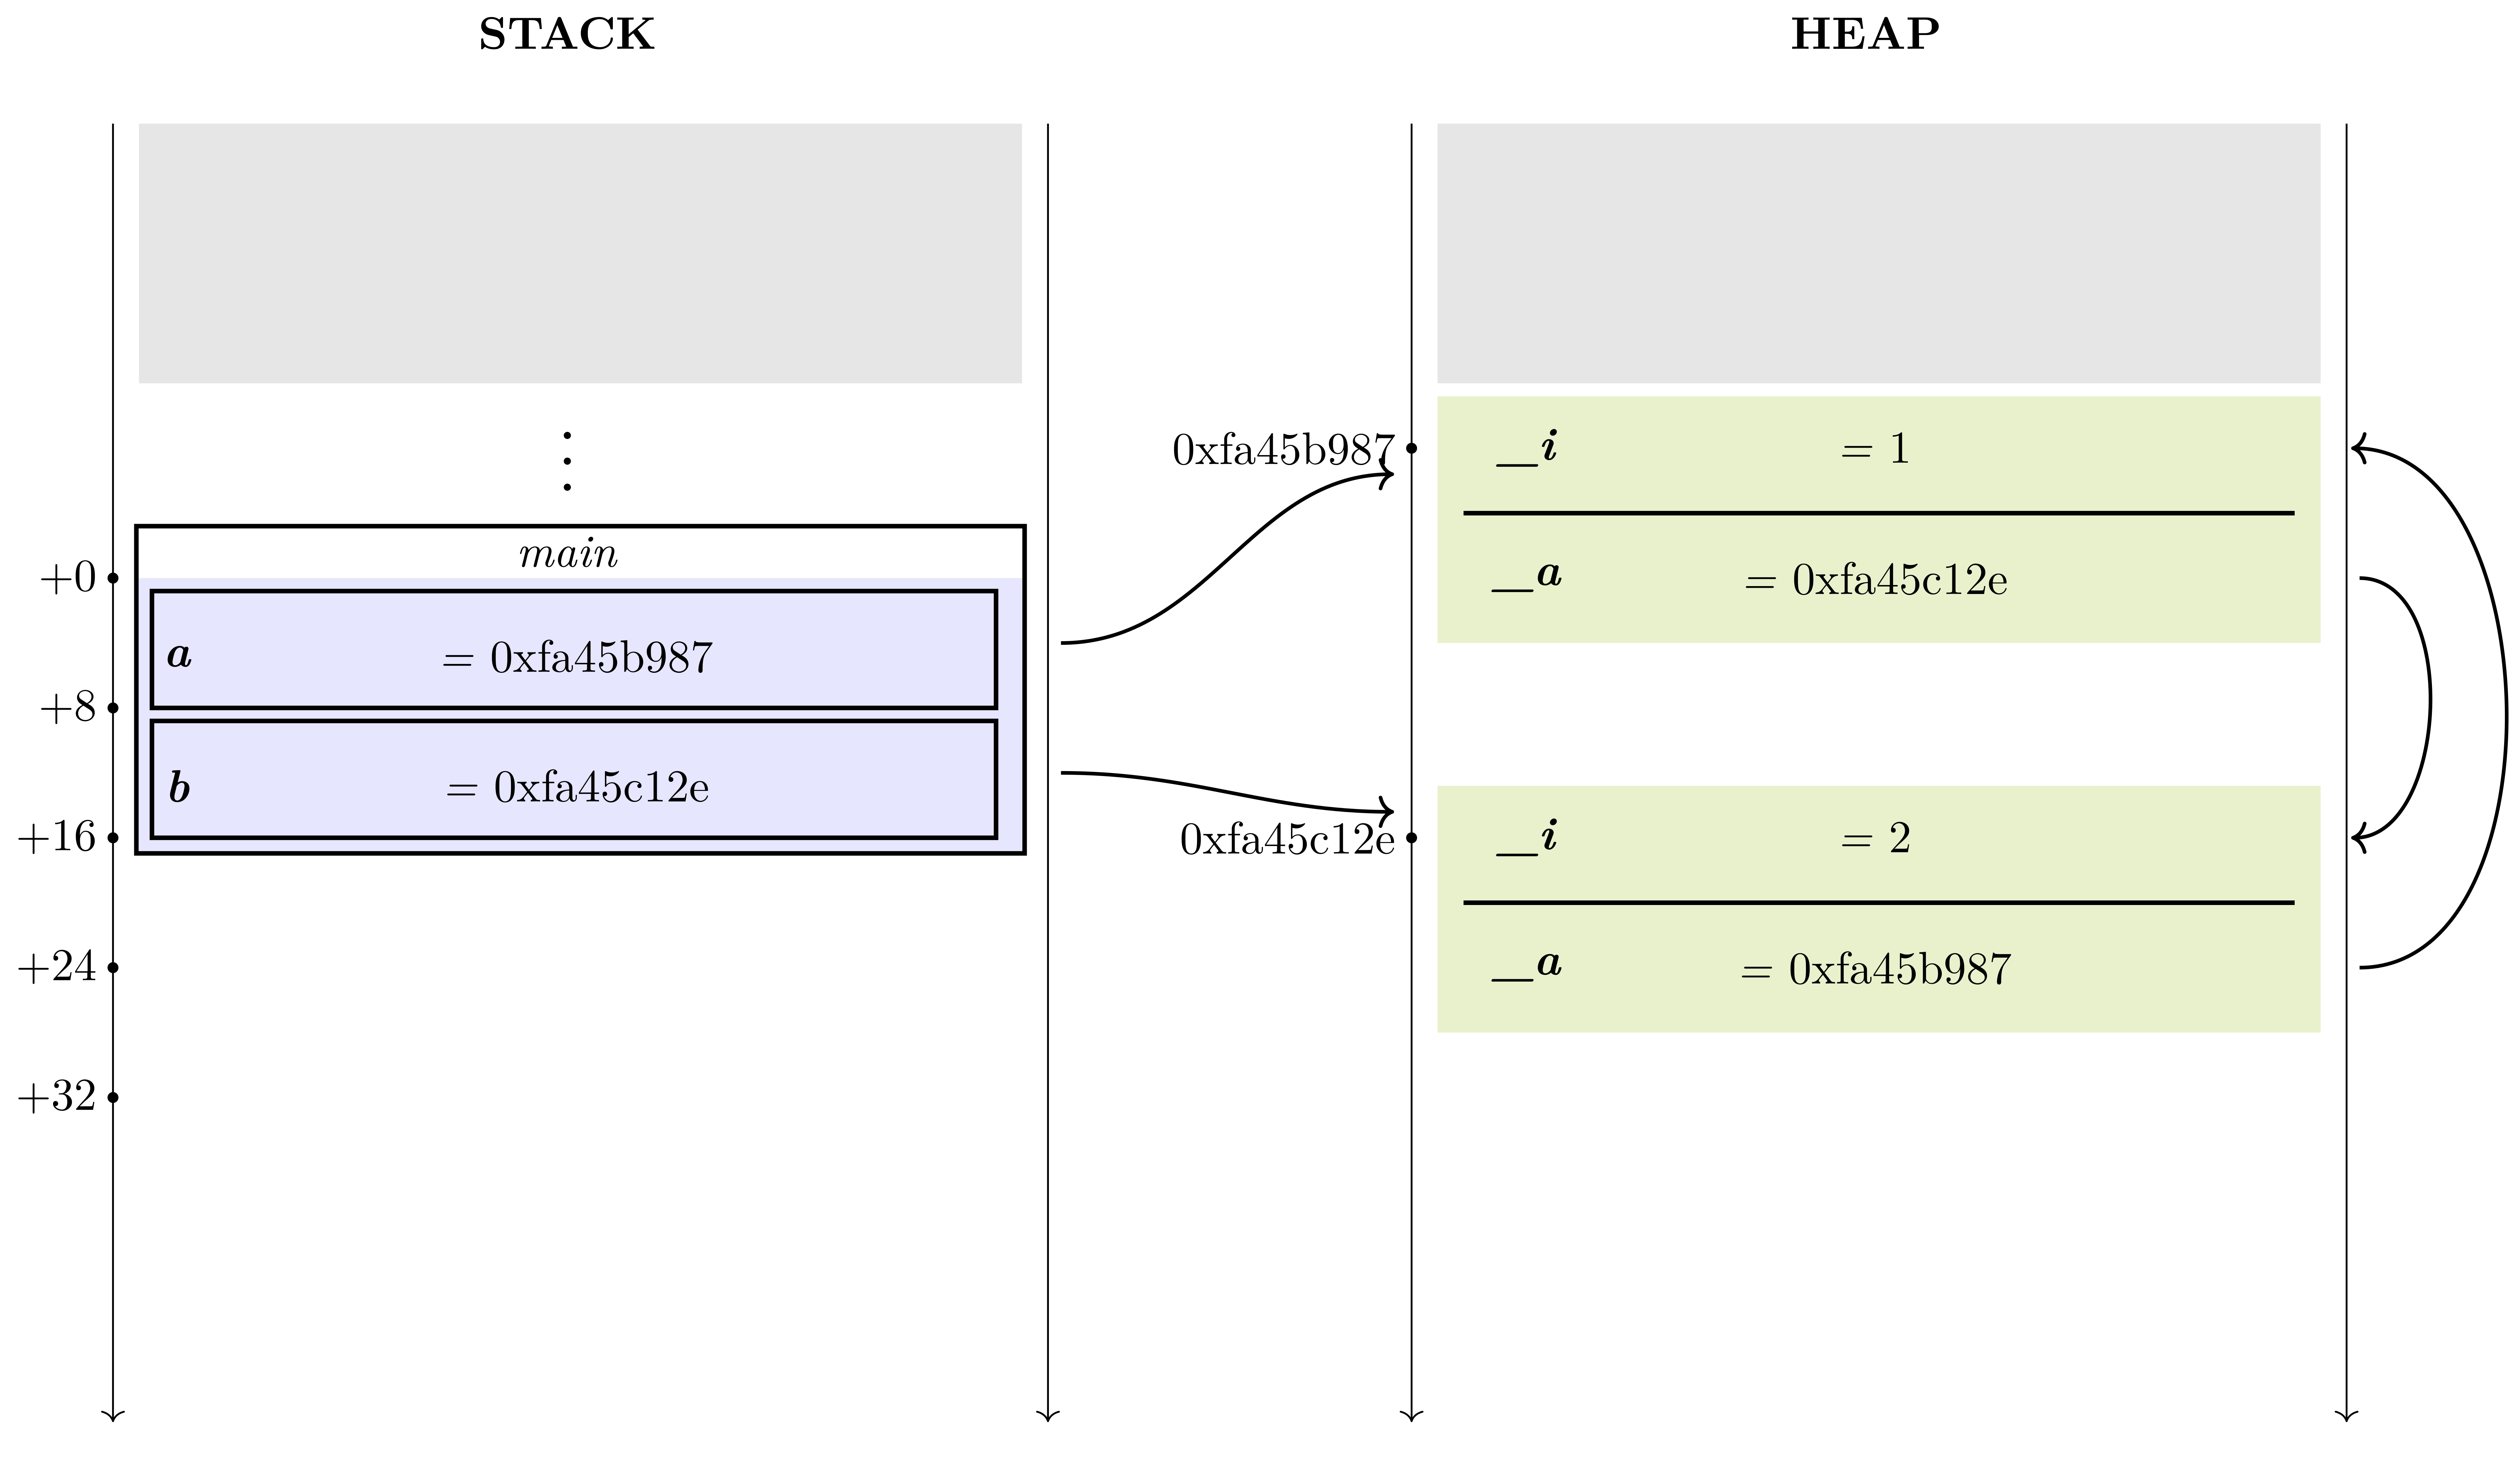
Now let's add a deep copy of the value contained inside the variable
a into a variable c. This deep copy copies the values of
the object inside a, and the object inside the field _a,
the copy is recursive, and correctly keeps the structure.
let c = dcopy a;
The following figure represents the memory state of the program after the deep copy.
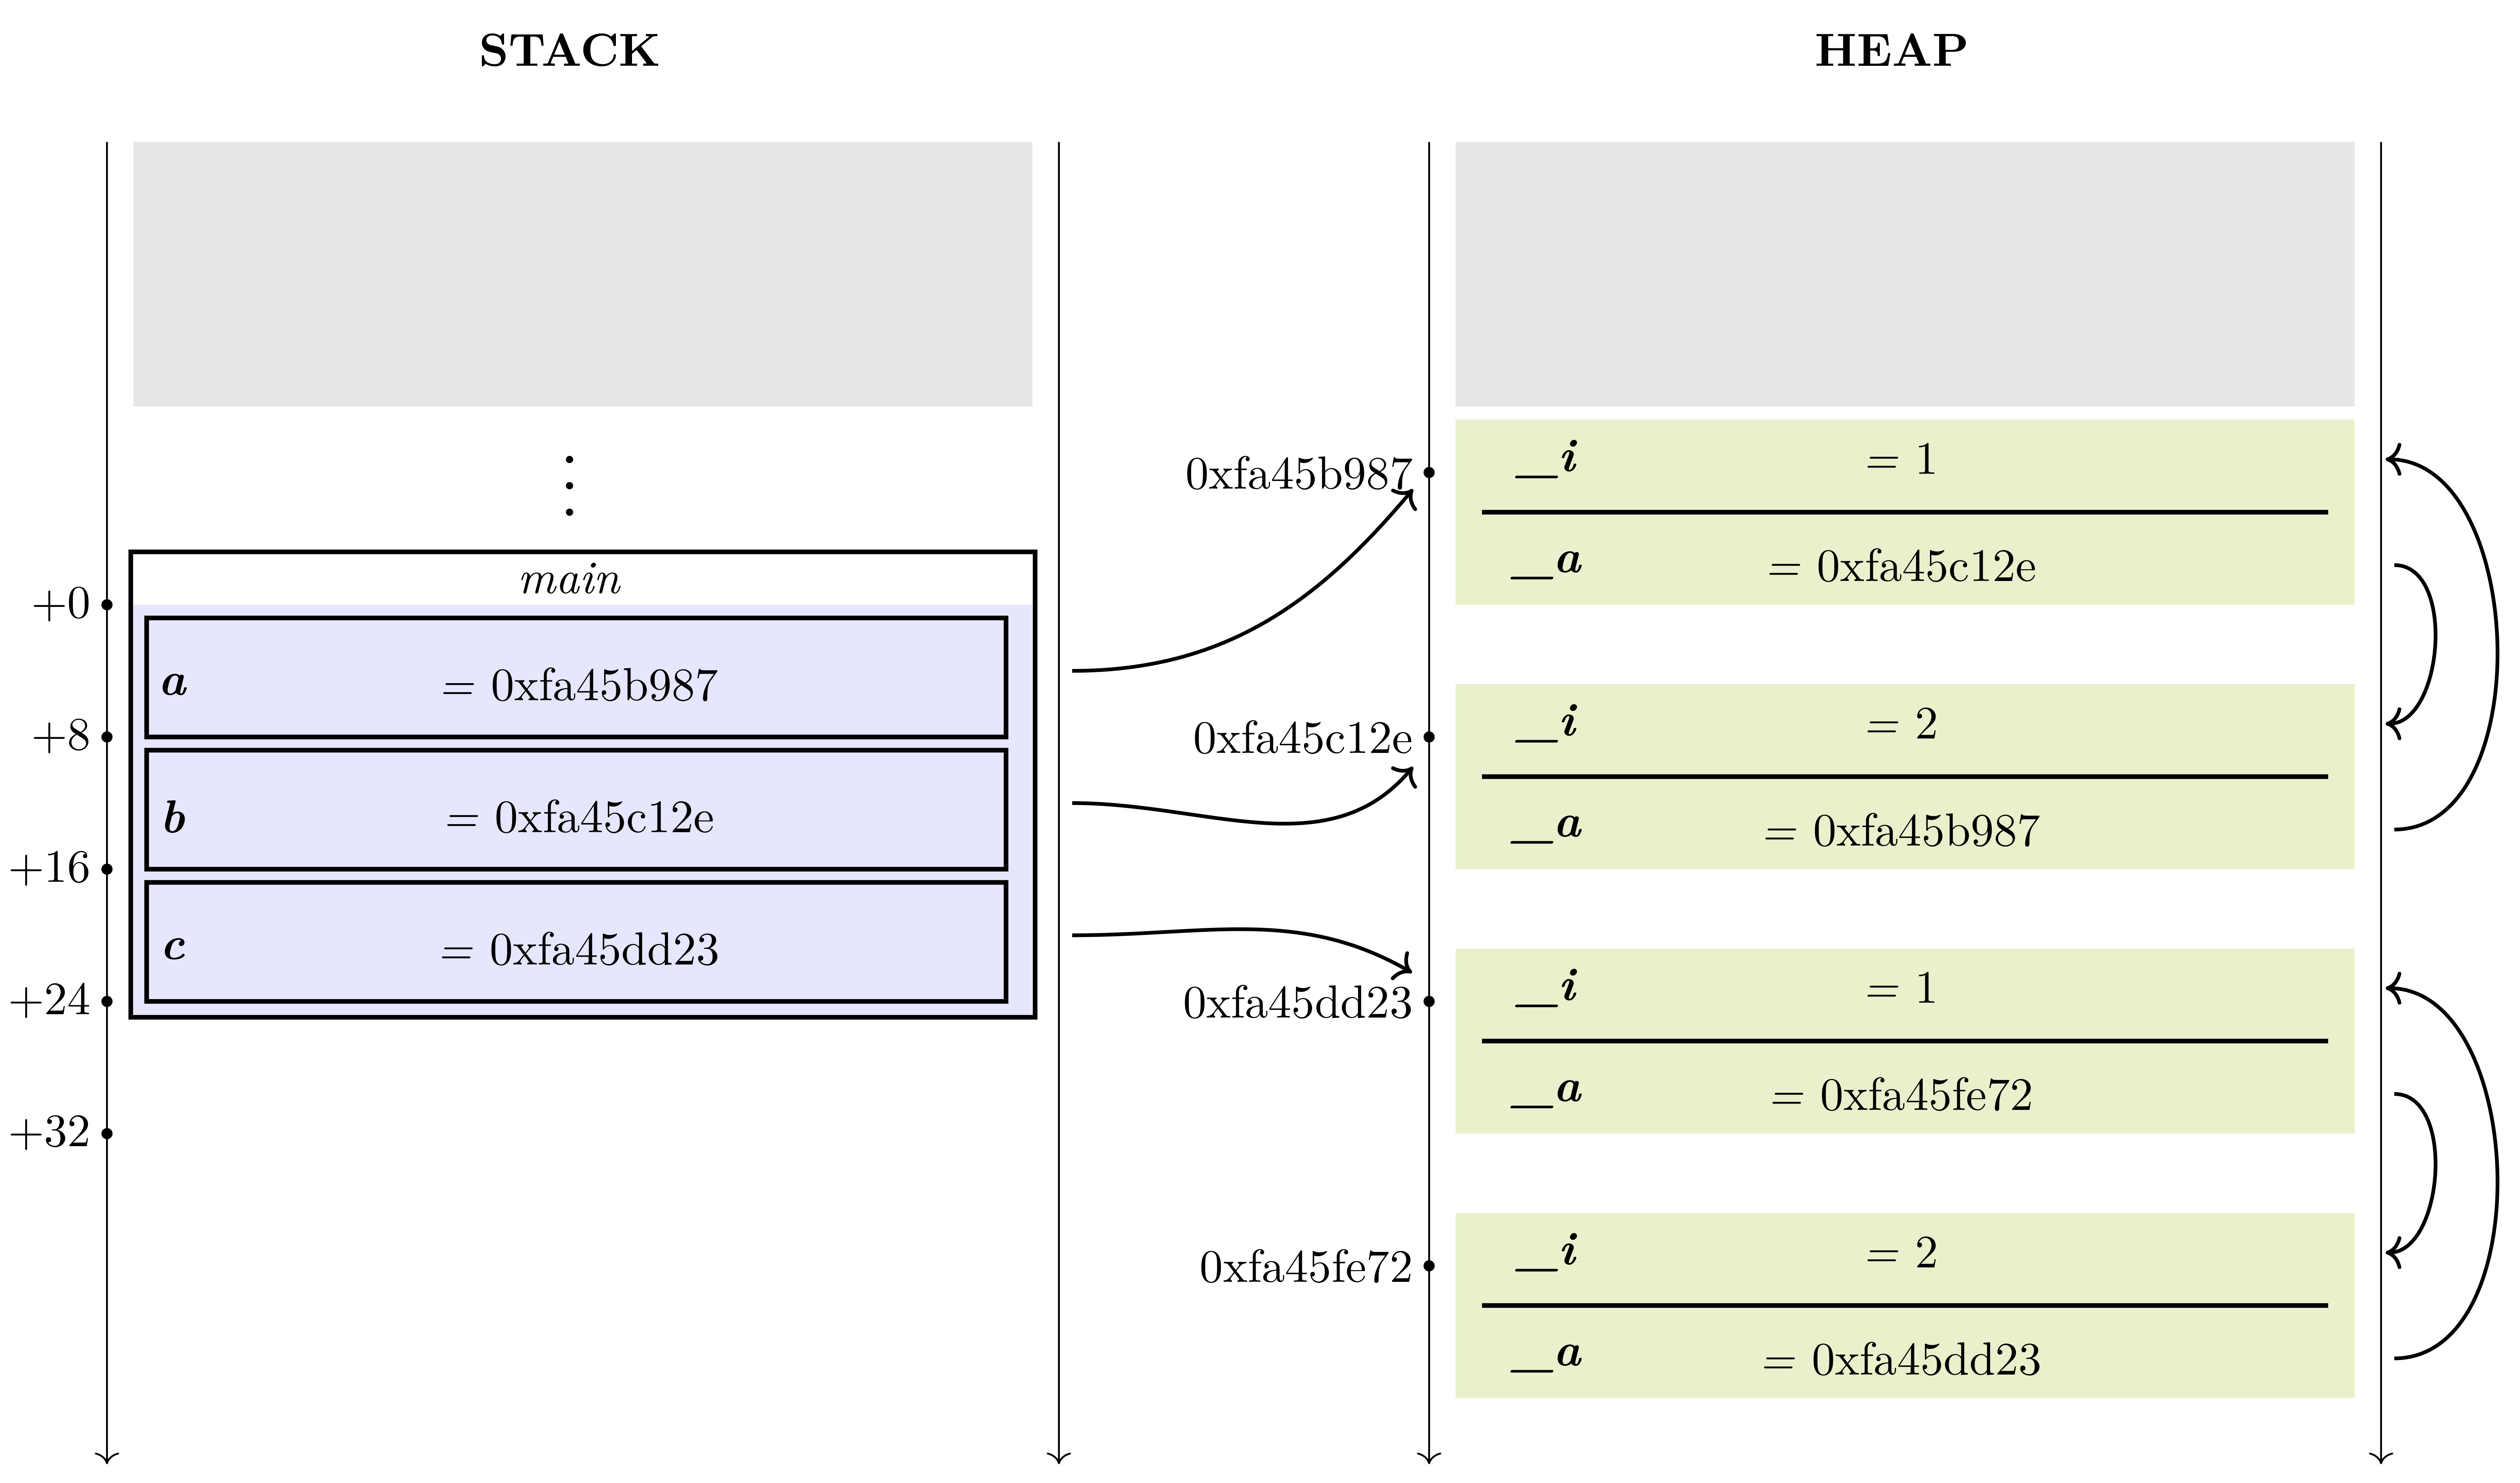
Best practice
The copy is never hidden in the source code that is available to the user. However, many codes that we are using on a daily basis, are provided by libraries. In libraries, only the prototypes of the functions are presented to the user, and therefore if a copy is made inside a function, the copy is hidden from the user. We cannot guarantee that such copy are not made (at least for the moment), so we propose a best practice advice to avoid hidden copies inside libraries.
This advice is simple, never take a immutable parameter in a function, if you have to make a copy of it inside the function. For example, let say we have a function that sorts a slice. This function should preferably take a mutable slice as input and modify it directly.
def good (dmut slc : [i32])-> dmut [i32] {
    // perform the sort on slc
    alias slc
}

def bad (slc : [i32])-> dmut [i32] {
    let dmut res = copy slc;
    // perform the sort on res
    alias res}
This way, the function calling the sort function has the choice of
making the copy or not. In the following example, the user has the
choice when calling the function good, but never when calling
the function bad, making the copy hidden. One can note from the
following example, that the copy is never hidden when calling
good, and that it is also possible to make no copy at all.
def main () {
    let dmut slc = [9, 3, 7];
    let dmut aux = good (copy slc); // slc is unchanged, and aux is sorted
    let dmut slc2 = good (alias slc); // slc is sorted, and slc2 points the data of slc

    good (slc); // impossible, implicit alias is not allowed

    bad (slc); // here there is not need for alias, nor copy,
               // the data of slc won't be modified in bad
               // the copy is alway made and hidden
}
From the above example, the compiler returns an error, when trying to
call the function good without aliasing nor copying at line
6. This error prevents from copying values implicitely without
writting it down, nor making aliasing of the values and giving the
write permission to foreign functions without informing the compiler
of our agreement. All the other calls are valid, the wish of the user
being totally explicit.
Error : the call operator is not defined for main::good and {mut [mut i32]}
 --> main.yr:(17,7)
17  ┃ 	good (slc); // impossible, implicit alias is not allowed
    ╋ 	     ^   ^
    ┃ Note : candidate good --> main.yr:(1,5) : main::good (slc : mut [mut i32])-> mut [mut i32]
    ┃     ┃ Error : discard the constant qualifier is prohibited, left operand mutability level is 2 but must be at most 1
    ┃     ┃  --> main.yr:(17,8)
    ┃     ┃ 17  ┃ 	good (slc); // impossible, implicit alias is not allowed
    ┃     ┃     ╋ 	      ^^^
    ┃     ┃     ┃ Note : implicit alias of type mut [mut i32] is not allowed, it will implicitly discard constant qualifier
    ┃     ┃     ┃  --> main.yr:(17,8)
    ┃     ┃     ┃ 17  ┃ 	good (slc); // impossible, implicit alias is not allowed
    ┃     ┃     ┃     ╋ 	      ^^^
    ┃     ┃     ┗━━━━━┻━
    ┃     ┃ Note : for parameter slc --> main.yr:(1,16) of main::good (slc : mut [mut i32])-> mut [mut i32]
    ┃     ┗━━━━━━
    ┗━━━━━┻━


ymir1: fatal error:
compilation terminated.
Contribution: Maybe it is possible to complitely avoid hidden copies ? (I don't have any clue for the moment).
Pure values
A pure value is a value that cannot change. In other word it is a value, that ensure that there is no variable in the program that has a mutable access to it. Pure values are different to const values, in the sense that const values just give the guarantee that the current access is not mutable, however they does not guarantee that there is no other variable in the program with mutable access.
The different guarantees on values can be listed as follows :
- No guarantee, the value is mutable
mut - Guarantee that the value is no writable in the current context
const - Guarantee that the value is completely immutable in every context
pure
Limitation of const values
To understand the limitation of const values, the following
program has two variable defined in the function main. The first
one a has a mutable access to the value, and the variable
b has a const access to the same value. Because the variable
a modifies the value, the value pointed by b is also
modified even if it was const. Thus, it is important to
understand that const is only referering to the permission of
the variable b.
import std::io;

def main () {
    let dmut a = [1, 2, 3];
    let b = a;

    a [0] = 98;

    println (b);
}
Results:
[98, 2, 3]
We have seen in a previous chapter that the keywords copy and
dcopy can be used to remove this limitation, and ensure that the
value of b is the same as the value of a, but that
modifying the value of a does not modify the value of
b. This mechanism is the base of the one provided by pure
values.
import std::io;

def main ()
    throws &OutOfArray
{
    let dmut a = [1, 2, 3];
    let b = dcopy a;

    a [0] = 98;

    println (b);
}
Results:
[1, 2, 3]
Now let's add a third variable to the equation, and let's name it
c. In this variable we want to store the value of b, and
ensure that the variable is never modified. If the initialization of
the variable b is made in an obscure way (for example in a
function that is not readable, here the foo function), then the
only way to ensure that the value of c is never modified, is to
make a copy of it inside the value of c. If the memory movement
are easy in the following example, it may not be the case in complex
program with many variable and memory movement.
import std::io;

def foo (a : [i32])-> [i32] {
    a
}

def main ()
    throws &OutOfArray
{
    let dmut a = [1, 2, 3];
    let b = foo (a);

    let c = dcopy b;
    let d = b;

    a [0] = 98;

    println (c);
    println (d);
}
Results:
[1, 2, 3]
[98, 2, 3]
Purity and the pure keyword
In the above example, both variable b and d have no
guarantees, and there values are indeed modified. The pure
keyword can be added to their definitions. In that case, the compiler
checks the initialization of the values that are used, and ensure that
they came from a deep copy, or another pure value.
def foo (a : [i32]) -> [i32] {
    a
}

def main ()
    throws &OutOfArray
{
    let dmut a = [1, 2, 3];

    let pure b = foo (a);
}
Error : discard the constant qualifier is prohibited
 --> main.yr:(10,11)
10  ┃ 	let pure b = foo (a);
    ╋ 	         ^
    ┃ Note : implicit pure of type [i32] is not allowed, it will implicitly discard constant qualifier
    ┃  --> main.yr:(10,19)
    ┃ 10  ┃ 	let pure b = foo (a);
    ┃     ╋ 	                 ^
    ┗━━━━━┻━


ymir1: fatal error:
compilation terminated.
To avoid the above error, there is two possibilities. Either we
add a dcopy on the function call of foo, or we add
pure to the return type of foo and make a deep copy of the
value of a in this function. The function bar of the
following example perform the second possibility.
import std::io;

def foo (a : [i32])-> [i32] {
    a
}

def bar (a : [i32])-> pure [i32] {
    return dcopy a;
}

def main ()
    throws &OutOfArray
{
    let dmut a = [1, 2, 3];
    let pure b = dcopy foo (a);

    let pure c = bar (a);

    let pure d = b;
    let pure e = c;

    a [0] = 98;

    println (d);
    println (e);
}
Results:
[1, 2, 3]
[1, 2, 3]
One can note that not copy are needed to move the value contained
in the variable c into the variable e. This is due to the
fact that c is pure, so the guarantee of purity is already
made. Thanks to the pure mechanism some copies can be avoided.
Modules
When creating a large project, it is very important to organize your code. Ymir offers a system of modules, which is used to manage different parts of the code that have different purposes. Each source file in Ymir is a module.
File hierarchy
Lets have a look at the following file hierarchy :
.
├── main.yr
└── extern_modules
    ├── bar.yr
    └── foo.yr

1 directory, 3 files
In this file hierarchy there are three files, which contain modules, the
first module in the file main.yr will be named main. The second
one in the extern_modules/bar.yr file will be named extern_modules::bar,
and the third one in the extern_modules/foo.yr file will be named
extern_modules::foo.
To be properly importable, the module must be defined from the
relative path of the compilation, i.e. if the file is located in
$(pwd)/relative/path/to/file, its module name must be
relative::path::to::file.
The name of a module is defined by the first line of the source code,
by keyword mod. If this line is not given by the user, the path of
the module will only be the file name, so you will not always be able
to import the module, depending on its relative path. You can consider
this line mandatory for the moment.
For example, in the file foo.yr, the first line must look like :
mod extern_modules::foo
And, it will therefore be importable everywhere, for example in the
main module, when writing the import declaration :
import extern_modules::foo
The syntax of the import statement is the following :
import_statement := 'import' path (',' path)* (';')?
path := Identifier ('::' Identifier)* ('::' '_')?
Sub modules
Sub modules are local modules, declared inside a global modules, are
inside another sub module. Unlike global module, the access to the
symbols defined inside them is not implicit. For that reason they have
to be explicitely mentionned when trying to access to their
symbols. This mention is done with the double colon binary operator
::, where the first operand is the name of the module, and the
second the name of the symbol to access.
mod main
import std::io;

mod InnerModule {

    pub def foo () {
        println ("Foo");
    }

}

def main () {
    InnerModule::foo (); // access of the function declared in InnerModule
}
The access operator ::, can also be used to access to symbols
declared inside global modules. This will be discussed after talking
about privacy of symbols.
Privacy
All symbols defined in a module are private by default. The privacy of a given symbol s refer to the possibility for foreign modules, and symbols to access to this given symbol s. When a symbol s is declared private in a module s, then only the other symbols of the module m have access to it. Module privacy can be seen as a tree, where a global module is a root, and module symbols are the branches and leaves of the tree. In such a tree, symbols have access to their parent, siblings, and the siblings of their parents.
In the following figure an example of a module tree is presented, where a global module named A, has three symbols, 2 sub modules A::X and A::Y, and a function A::foo. In this tree, we assume that every symbols are declared private. For that reason, the function A::foo has access to A, A::X, A::Y, but not to A::X::bar, nor A::Y::baz. The symbol A::X::bar, has access to every symbols (A, A::X, A::Y, A::foo), except A::Y::baz.
Global modules are always tree roots, for that reason they don't have
parents. For example, the module extern_modules::foo, does not
have access to the symbols declared inside the module
extern_modules, (if they are privates).
The keyword pub flag a symbol as public, and accessible by
foreign modules. This keyword can be used as a block, or for only one
symbol. Its syntax grammar is presented in the following code block.
pub :=   'pub' '{' symbol* '}'
       | 'pub' symbol
Example
- Module
extern_modules/foo.yr
mod extern_modules::foo;

/**
 * foo is public, it can be accessed from foreign modules
 */
pub def foo () {}

/**
 * The bar function is private by default
 * Thus only usable in this module
 */
def bar () {}
- Module
main.yr
/**
 * This importation will give access to all the symbols in the module
 * 'extern_modules::foo' that have been declared 'public'
 */
import extern_modules::foo

def main () {
    foo (); // foo is public we can call it
    bar (); // however, bar is private thus not accessible
}
Errors:
Error : undefined symbol bar
 --> main.yr:(7,5)
 7  ┃     bar (); // however, bar is private thus not accessible
    ╋     ^^^
    ┃ Note : bar --> extern_modules/foo.yr:(8,5) : extern_modules::foo::bar is private within this context
    ┗━━━━━━


ymir1: fatal error:
compilation terminated.
Symbol conflict resolution
When two external global modules declare two symbols with the same
name, it may be impossible to know which symbol the user is refereing
to. In this case, the double colon operator :: can be used with
the name of the module declaring the symbol to resolve the
ambiguity. To give an example of symbol conflict, let's say that we
have two module extern_modules::foo and extern_modules::bar
declaring a function with the same signature foo.
- Module
extern_modules/bar.yr
mod extern_modules::bar
import std::io

pub def foo () {
    println ("Bar");
}
- Module
extern_modules/foo.yr
mod extern_modules::foo
import std::io

pub def foo () {
    println ("Foo");
}
In the main module, both modules extern_modules::bar and
extern_modules::foo, are imported. The main function presented below
refers to the symbol foo. In that case, there is no way to tell
which function will be used, extern_modules::foo::foo or
extern_modules::bar::foo. The compiler returns an error. One can
note that this errors occurs only because the signature of the two
function foo are the same (taking no parameters), and they are both
public. If there was a difference in their prototypes, for example if
the function in the module extern_modules::bar would take a value of
type i32 as parameter, the conflict would be resolved by itself, as
the call expression will be different.
- Module
main.yr
import extern_modules::bar, extern_modules::foo

def main () {
    foo ();
}
Errors:
Error : {extern_modules::bar::foo ()-> void, extern_modules::foo::foo ()-> void, mod extern_modules::foo} x 3 called with {} work with both
 --> main.yr:(4,6)
 4  ┃ 	foo ();
    ╋ 	    ^
    ┃ Note : candidate foo --> extern_modules/bar.yr:(4,9) : extern_modules::bar::foo ()-> void
    ┃ Note : candidate foo --> extern_modules/foo.yr:(4,9) : extern_modules::foo::foo ()-> void
    ┗━━━━━━


ymir1: fatal error:
compilation terminated.
.page-inner {
width: 95%;
}
In the above error, we can see that three modules are presented. The
two functions foo — in extern_modules::bar, and
extern_modules::foo — and the extern_modules::foo module
itself. Obviously, it is not possible to use the call operator
() on a module, that is why it is not presented as a possible
canditate in the notes of the error.
The conflict problem can be resolved by changing the calling
expression, and using the double colon operator ::. In the
following example, the full name of the module is used. This is not
always necessary, as bar::foo is sufficient to refer to
extern_modules::bar::foo, and foo::foo for function
foo in extern_modules::foo.
import extern_modules::bar, extern_modules::foo

def main () {
    extern_modules::bar::foo ();
    extern_modules::foo::foo ();

    foo::foo ();
    bar::foo ();
}
Results:
Bar
Foo
Foo
Bar
Public importation
As for all declaration, importation are private. It means that the
importation is not recursive. For example, if the module
extern_modules::foo imports the module extern_modules::bar, and the
module main import the module extern_modules::foo, all the public
symbols declared in extern_modules::bar will not be accessible in the
module main.
You can of course, make a pub importation, to make the symbols of
the module extern_modules::bar visible for the module main.
- Module
extern_modules/bar.yr
mod extern_modules::bar
import std::io

pub def bar () {
    println ("Bar");
}
- Module
extern_modules/foo.yr
mod extern_modules::foo

pub import extern_modules::bar
- Module
main.yr
mod main
import extern_modules::foo;

def main () {
    bar ();
}
In the example above, the function bar defined in the module
extern_modules::bar, is imported (because the function is public
is public) by the module extern_modules::foo. This importation
is public, thus when the module main imports the module
extern_modules::foo, it also imports the module
extern_modules::bar, and has access to the function bar.
Best practice
Public importation must be used with caution, to avoid polluting other
modules. A good practice, is to define some modules only to make
public importations. These modules should be named _. For
example, with our previous file hierarchy, a file
extern_modules/_.yr would be added, and no public imports made
in the modules extern_modules::foo, nor in the module
extern_modules::bar.
mod extern_modules::_;

pub import extern_modules::foo;
pub import extern_modules::bar;
These modules are not automatically generated by Ymir — even if it seems trivial —, to allow importing only a subset of the modules contained in a sub directory. These importation modules are optional and left to the choice of the user.
Include directory
You can use the -I option, to add a path to the include
directory. This path will be used as if it was the current $(pwd). In
other words, if you add the I -path/to/modules option, and you have a
file in path/to/modules/relative/to/my/file, the name of the module
must be relative::to::my::file.
gyc -I ~/libs/ main.yr
This is how the standard library is included in the build, and how you
can access modules in std:: that are not located in $(pwd)/std/.
Compilation of modules
All modules must be compiled, the import declaration is just a
directive of for symbols access, but does not compile the imported
symbols. For example, in the following example, there are two modules,
one declaring a function foo, and the other importing it and
calling it.
- Module
main.yr
mod main
import extern_modules::foo;

def main () {
    foo ();
}
- Module
extern_modules/foo.yr
mod extern_modules::foo

pub def foo () {}
By compiling only the main function, the compiler returns a link
error. This error means that the symbol foo declared in the module
extern_modules::foo was not found during the symbol linkage.
$ gyc main.yr
/tmp/ccCOeXDq.o: In function `_Y4mainFZv':
main.yr:(.text+0x3e): undefined reference to `_Y14extern_modules3foo3fooFZv'
collect2: error: ld returned 1 exit status
To avoid this error, and create a valid executable, where all symbols
can be found, the module extern_modules::foo has to be compiled
as well. GYC is able to manage object files (containing pre compiled
symbols), and compiled libraries. The way GYC manage these kind of
objects is similar to all compiler of the GCC suite, and is not
presented in this documentation (cf. GCC options for linking).
$ gyc main.yr extern_modules/foo.yr
User defined types
There are four different custom types:
- Structure
- Enumeration
- Aka
- Class
The following chapters present the structure, enumeration and aka.
Structure
Structure is a common design used in many languages to define users' custom types. They contains multiple values of different types, accessible by identifiers. Structures are similar to tuples, in terms of memory management (located in the stack). Unlike tuples, structures are named, and all their internal fields are named as well.
The complete grammar of structure definition is presented in the following code block. One can note the possibility to add templates to the definition of the structure. These templates will only be discussed in the chapter Templates, and are not of interest to us at the moment.
struct_type := 'struct' ('|' var_decl)* '->' identifier (templates)?
var_decl := ('mut'?) identifier ':' type ('=' expression)?
identifier := ('_')* [A-z] ([A-z0-9_])*
The fields of the structure are defined using the same syntax as the
declaration of function parameters, i.e. the same syntax as variable
declaration but with the keyword let omitted. The following
source code presents a definition of a structure Point with two
fields x and y of type i32. The two fields of this
structure are immutable, and have no default values.
import std::io

struct
| x : i32
| y : i32
 -> Point;

def main () {
    let point = Point (1, 2); // initialize the value of the structure
    println (point); // structures are printable
}
Results:
main::Point(1, 2)
It is possible to declare a structure with no fields. Note, however, that such structure has a size of 1 byte in memory.
Contribution this is a limitation observed in gcc, maybe this can be corrected ?
import std::io;

struct -> Unit;

def main () {
    let x = Unit ();
    println (x, " of size ", sizeof (x));
}
Results:
main::Unit() of size 1
Structure construction
The construction of a structure is made using the same syntax as a
function call, that is to say using its identifier and a list of
parameters inside parentheses and separated by comas. Like function
calls, structure can have default values assigneted to fields. The
value of these fields can be changed using the named expression
syntax, which is constructed with the arrow operator ->. Field
without default value can also be constructed using the named
expression syntax. In that case, the order of field construction is
not important.
import std::io

struct
| x : i32 = 0
| y : i32
 -> Point;

def main () {
    let point = Point (y-> 12, x-> 98);
    println (point);

    let point2 = Point (1);
    println (point2);
}
Results:
main::Point(98, 12)
main::Point(0, 1)
Field access
The fields of a structure are always public, and accessible using the
dot binary operator ., where the left operand is a value whose
type is a structure, and the right operand is the identifier of the
field.
import std::io

struct
| x : i32
| y : i32
 -> Point;

def main ()
    throws &AssertError
{
    let point = Point (1, 2);
    assert (point.x == 1 && point.y == 2);
}
Structure mutability
The mutability of a field of a structure is defined in the structure
declaration. As with any variable declaration, the fields of a
structure are by default immutable. By adding the keyword mut
before the identifier of a field, the field becomes mutable. However,
the mutability is transitive in Ymir, meaning that a immutable value
of a struct type, cannot be modified even if its field are marked
mutable. Consequently, for a field to be really mutable, it must be
marked as such, and be a field of a mutable value.
import std::io

struct
| x : i32
| mut y : i32
 -> Point;

def main () {
    let mut p1 = Point (1, 2);
    p1.y = 98; // y is mutable
                  // and p1 is mutable no problem

    p1.x = 34; // x is not mutable, this won't compile

    let p2 = Point (1, 2);
    p2.y = 98; // p2 is not mutable, this won't compile
}
Errors:
Error : left operand of type i32 is immutable
 --> main.yr:(13,4)
13  ┃ 	p1.x = 34; // x is not mutable, this won't compile
    ╋ 	  ^

Error : left operand of type i32 is immutable
 --> main.yr:(16,4)
16  ┃ 	p2.y = 98; // p2 is not mutable, this won't compile
    ╋ 	  ^


ymir1: fatal error:
compilation terminated.
Memory borrowing of structure
By default structure data are located in the value that contains them, i.e. in the stack inside a variable, on the heap inside a slice, etc. They are copied by value, at assignement or function call. This copy is static, and does not require allocation, so it is allowed implicitely.
import std::io

struct
| mut x : i32
| mut y : i32
 -> Point;

def main ()
    throws &AssertError
{
    let p = Point (1, 2);
    let mut p2 = p; // make a copy of the structure
    p2.y = 12;

    assert (p.y == 2);
    assert (p2.y == 12);
}
Structure may contain aliasable values, such as slice. In that case,
the copy is no longer allowed implicitely (if the structure is
mutable, and the field containing the aliasable value is also
mutable, and the element that will borrow the data is also
mutable). To resolve the problem, the keywords dcopy, and alias
presented in Aliases and
References
can be used.
import std::io

struct
| mut y : [mut [mut i32]]
 -> Point;

def main ()
    throws &OutOfArray
{
    let mut a = Point ([[1, 23, 3], [4, 5, 6]]);
    let mut b = dcopy a;
    let mut c = alias a;

    b.y [0][0] = 9; // only change the value of 'b'
    c.y [0][1] = 2; // change the value of 'a' and 'c'

    println (a);
    println (b);
    println (c);
}
Results:
main::Point([[1, 2, 3], [4, 5, 6]])
main::Point([[9, 23, 3], [4, 5, 6]])
main::Point([[1, 2, 3], [4, 5, 6]])
It is impossible to make a simple copy of a structure with the keyword
copy, the mutability level being set once and for all in the
structure definition. For example, if a structure S contains a field
whose type is mut [mut [i32]], every value of type S have a
field of type mut [mut [i32]]. For that reason, by making a
first level copy, the mutability level would not be respected.
Packed and Union
This part only concerns advanced programming paradigms, and is close to the machine level. It is unlikely that you will ever need it, unless you try to optimize your code at a binary level.
Packed
The size of a structure is calculated by the compiler, which decides
the alignment of the different fields. This is why the size of a
structure containing an i64 and a c8 is 16 bytes, not 9
bytes. There is no guarantee about the size or the order of the fields
in the generated program. To force the compiler to remove the
optimized alignment, the special modifier packed can be
used.
import std::io

struct @packed
| x : i64
| c : c8
 -> Packed;

struct
| x : i64
| c : c8
 -> Unpacked;


def main () {
    println ("Size of packed : ", sizeof Packed);
    println ("Size of unpacked : ", sizeof Unpacked);
}
Results:
Size of packed : 9
Size of unpacked : 16
Union
The union special modifier , on the other hand, informs the
compiler that all fields in the structure must share the same memory
location. In the following example, the union modifier is used
on a structure containing two fields. The largest field of the
structure is the field y of type f64. The size of this
field is 8 bytes, thus the structure has a size of 8 bytes as
well. All the fields are aligned at the beginning of the strucures,
meaning that the field x, and y shares the same address in
memory.
struct @union
| x : i32
| y : f64
 -> Dummy;
The construction of a structure with union modifier requires
only one argument. This argument must be passed as a named
expression with the arrow operator ->.
import std::io

struct @union
| x : i32
| y : f32
 -> Dummy;

def main ()
    throws &AssertError
{
    let x = Dummy (y-> 12.0f);

    // Comparison of pointer is only possible on pointer of the same type
    // Any pointer can be casted into a pointer of &void (the contrary is not possible)
    // is operator, checks if two pointer are equals
    assert (cast!(&void) (&(x.x)) is cast!(&void) (&(x.y)));

    // The value of x depends on the value of y
    assert (x.x == 1094713344);
    assert (x.y == 12.0f);
}
Structure specific attributes
Structures have type specific attributes, as any types, accessible with
the double colon binary operator ::. The table below presents
these specific attributes. These attributes are accessible using a
type of struct, and not a value. A example, under the table presents
usage of struct specific attributes.
| Name | Meaning |
|---|---|
init | The initial value of the type |
typeid | The name of the type stored in a value of type [c32] |
typeinfo | A structure of type TypeInfo, containing information about the type |
All the information about TypeInfo are presented in chapter Dynamic types.
mod main;

import std::io;

struct
| x : i32
| y : i32 = 9
 -> Point;

def main ()
    throws &AssertError
{
    let x = Point::init;

    // the structure is declared in the main module, thus its name is main::Point
    assert (Point::typeid == "main::Point");

    assert (x.x == i32::init && x.y == 9);
}
Enumeration
Enumerations are user-defined types that enumerates a list of
values. The keyword enum is used to define an enumeration type. The
type of the fields can be inferred from the value associated to the
fields. This type can be forced using the type operator :, after
the keyword enum. All the fields of an enumeration shares the
same type.
The complete grammar of an enumeration is presented in the following source block. As for struct declaration, templates can be used, but this functionnality will only be discussed in the Templates chapter.
enum_type := 'enum' (':' type)? (inner_value)+ '->' identifier (templates)?;
inner_value := '|' identifier '=' expression
identifier := ('_')* [A-z] ([A-z0-9_])*
In the following source code, an example of an enumeration of type
[c32] is presented. This enumeration lists the names of the
days.
import std::io

enum
| MONDAY = "Mon"
| TUESDAY = "Tue"
| WEDNESDAY = "Wed"
| THURSDAY = "Thu"
| FRIDAY = "Fri"
| SATURDAY = "Sat"
| SUNDAY = "Sun"
 -> Day;

def foo (day : Day) {
    println (day);
}

def main () {
    let d = Day::MONDAY;
    foo (d);
}
Value access
The values of an enumeration are accessible using the double colon
binary operator ::. In practice, access a value of the
enumeration will past the content value of the field at the caller
location. The value - result of the expression - is of the type of the
enumeration (for example the type Day in the example below).
Value types
An example of enumeration access is presented in the following source
code. In this example, implicit casting is perform from a Day to
a [c32], when calling the function foo, at line
23. This implicit cast is allowed.
import std::io

enum : [c32] // the type is optional
| MONDAY = "Mon"
| TUESDAY = "Tue"
| WEDNESDAY = "Wed"
| THURSDAY = "Thu"
| FRIDAY = "Fri"
| SATURDAY = "Sat"
| SUNDAY = "Sun"
 -> Day;

def foo (day : [c32]) {
    println (day);
}

def bar (day : Day) {
    println (day);
}

def main () {
    // the internal type Day is of type [c32], so it can be implicitely casted into [c32]
    foo (Day::MONDAY);

    bar (Day::MONDAY);

    // However, it is impossible to transform a [c32] into a Day implicitely
    bar ("Mon")
}
However, the contrary is not allowed, because the source code tries to
cast a [c32] into a Day at line 28, the compiler
returns an error. The error is presented in the code block below. Such
cast is forbidden, to avoid enumeration value to contain a value that
is actually not defined in the list of the field of the
enumeration. For example, if this was accepted, the string
"NotADay" would be castable into a Day (note: the value
of the string being possibly unknown at compilation time).
Error : the call operator is not defined for main::bar and {mut [c32]}
 --> main.yr:(28,9)
28  ┃     bar ("Mon")
    ╋         ^     ^
    ┃ Note : candidate bar --> main.yr:(17,5) : main::bar (day : main::Day([c32]))-> void
    ┃     ┃ Error : incompatible types main::Day and mut [c32]
    ┃     ┃  --> main.yr:(28,10)
    ┃     ┃ 28  ┃     bar ("Mon")
    ┃     ┃     ╋          ^
    ┃     ┃ Note : for parameter day --> main.yr:(17,10) of main::bar (day : main::Day([c32]))-> void
    ┃     ┗━━━━━━
    ┗━━━━━┻━


ymir1: fatal error:
compilation terminated.
Value constructions
Enumeration values can be more complex than literals. Any kind of
value can be used, for example call functions, condition block, scope
guards, etc. In the following example, an enumeration creating
structure from function call is presented. The type of the enumeration
is Ipv4Addr.
import std::io

struct
| a : i32
| b : i32
| c : i32
| d : i32
 -> Ipv4Addr;

enum
| LOCALHOST = localhost ()
| BROADCAST = broadcast ()
 -> KnownAddr;

def localhost ()-> Ipv4Addr {
    println ("Call localhost");
    Ipv4Addr (127, 0, 0, 1)
}

def broadcast ()-> Ipv4Addr {
    println ("Call broadcast");
    Ipv4Addr (255, 255, 255, 255)
}

def main ()
    throws &AssertError
{
    let addr = KnownAddr::LOCALHOST; // will call localhost here

    assert (KnownAddr::LOCALHOST.a == 127); // a second time here
    assert (KnownAddr::BROADCAST.d == 255); // call broadcast here
    assert (addr.a == 127);
}
The enumeration value of a field is constructed at each access, this means for example that when enumeration values are constructed using function call, the function is called each time the enumeration field is accessed. Thus the result of the execution of the compiled source code above is the following:
Call localhost
Call localhost
Call broadcast
Value context
If the value of the enumeration seems to be passed at the caller location, they don't share the context of the caller. In other words, the fields of an enumeration have access to the symbol accessible from the enumeration context, and not from the caller context. An example, of enumeration trying to access symbols is presented in the source code bellow.
import std::io

static __GLOB__ = true;

enum
| FOO = (if (x) { 42 } else { 11 })
| BAR = (if (__GLOB__) { 42 } else { 11 })
 -> ErrorEnum;

def main () {
    let x = false;

    println (ErrorEnum::FOO);
}
From the above example, the compiler returns an error. In this error,
the compiler informs that the variable x is not defined from the
context of the enumeration. Even if the variable is declared inside
the main function, it is not accessible from the enumeration
context. The global variable __GLOB__ is accessible from the
enumeration context, and thus accessing it is not an issue.
Note :
 --> main.yr:(6,3)
 6  ┃ | FOO = (if (x) { 42 } else { 11 })
    ╋   ^^^
    ┃ Error : undefined symbol x
    ┃  --> main.yr:(6,14)
    ┃  6  ┃ | FOO = (if (x) { 42 } else { 11 })
    ┃     ╋              ^
    ┗━━━━━┻━

Note :
 --> main.yr:(13,11)
13  ┃ 	println (ErrorEnum::FOO);
    ╋ 	         ^^^^^^^^^
    ┃ Error : the type main::ErrorEnum is not complete due to previous errors
    ┃  --> main.yr:(8,5)
    ┃  8  ┃  -> ErrorEnum;
    ┃     ╋     ^^^^^^^^^
    ┃     ┃ Note :
    ┃     ┃  --> main.yr:(13,11)
    ┃     ┃ 13  ┃ 	println (ErrorEnum::FOO);
    ┃     ┃     ╋ 	         ^^^^^^^^^
    ┃     ┗━━━━━┻━
    ┗━━━━━┻━


ymir1: fatal error:
compilation terminated.
Enumeration specific attributes
As for any type, enumeration have specific type attributes. The table below lists the enumeration type specific attributes.
| Name | Meaning |
|---|---|
members | A slice containing all the values of the enumeration |
member_names | A slice of [c32], containing all the names of the fields of the enumeration (same order than members) |
typeid | The type identifier of the enumeration type in a [c32] typed value |
typeinfo | The typeinfo of the inner type of the enumeration (cf. Dynamic types) |
inner | The inner type of the enumeration |
One may note that the operator to access specific attributes and field
is the same (double colon binary operator ::), and therefore
that if an enumeration have a field named as a specific attributes
there is a conflict. To avoid conflict, the priority is given to the
fields of the enumeration, and specific attributes can be accessed
using their identifier surrounded by _ tokens. For example,
accessing the members specific attributes can be made using the
identifier __members__. An example of the principle is presented in
the following source code. The specific attribute surrounding is
applicable to all types, but can be really usefull here.
mod main;

enum
| typeid       = 1
| typeinfo     = 2
| members      = 3
| member_names = 4
| inner        = 5
 -> AnnoyingEnum;

def main ()
    throws &AssertError
{
    assert (AnnoyingEnum::typeid == 1);
    assert (AnnoyingEnum::__typeid == AnnoyingEnum::__typeid__);
    assert (AnnoyingEnum::__typeid == "main::AnnoyingEnum");
}
AKA
An aka create a symbol that is an alias for another
expression. Everything can be used to create an alias, not necessarily
a value, or a type. The keyword aka was choosed to avoid
confusion with alias, that has a completely different meaning in
Ymir.
The grammar of akas is presented in the following code block.
aka_decl := 'aka' Identifier (templates)? = expression (';')?
Aka as a value
Aka can be used as a single value enumeration. As for enumeration values, akas are constructed at each access, and are for that reason closer to enumeration, than to global variable. In addition, akas are only defined during compilation time, and are not defined inside the executable, library, etc. generated by the compiler, contrary to global variables.
An example of an aka is presented in the source code below. In that
example, the aka refers to the call of the foo function, that is
called each time the aka is used.
import std::io

aka CallFoo = foo ()

def foo () -> i32 {
    println ("Foo");
    42
}

def main () {
    println (CallFoo);
    println (CallFoo);
}
Results:
Foo
42
Foo
42
Because akas are not global variable, they don't have an address, and are always immutable. They don't really have a type, and simply stick their content, at the location of the caller. However, like enumeration values, their context is the one of their declaration, not the context of the caller. For that reason by compiling the following example, the compiler returns an error.
import std::io

aka FOO = x // x is not defined in this context

def main () {
    let x = 12; // this x is local, and not accessible from FOO
    println (FOO); // does not work
}
Error:
Error : undefined type x
 --> main.yr:(3,11)
 3  ┃ aka FOO = x
    ╋           ^
Aka as a type
Akas do not always referes to values, but can also refer to type. The symbol access rules are the same as value akas.
import std::io

aka MyTuple = (i32, i32)

def foo (a : MyTuple) {
    println ("x: ", a.0, ", y: ", a.1);
}

def main () {
    let x = (1, 2);
    foo (x);
}
Results:
x: 1, y: 2
Akas type are not real type, meaning that the definition of foo in the previous example, is strictly equivalent to
def foo (a : (i32, i32)) {
    println ("x: ", a.0, ", y: ", a.1);
}
Aka as symbols
Akas are not confined to type, and values. They can create symbols to refer to other symbols. For example modules, functions, structures, etc.
import std::io

aka IO = std::io

def println (a : i32) {
    IO::println ("My println : ", a);
}

def main () {
    IO::println (12);
    println (12);
}
Results:
12
My println : 12
Contribution : enable aka on import, with the syntax : import path aka name. This is already possible, as we can see in the
previous example, but needs two lines.
Objects
Ymir is a object oriented language, with polymorph types. In this chapter, we assume that you are familiar with object oriented programming paradigm (if not, you will benefit from reading information on that paradigm first cf. object oriented programming.).
In Ymir, object instances are dynamically allocated on the
heap. Indeed, because object types are polymorph, their size cannot be
known at compile time, and consequently cannot be placed in the
stack. To illustrate this point, the following figure presents the UML
definition of a class A, and an heir class B. The class
A contains a field x, of type i32, thus of size
4 bytes. The class B, contains another field y of size
4, leading to a class B of size 8.
Because we want to following source code to be accepted (basic
principle of polymorphism), the size of A, cannot be statically
set to 4 bytes, (nor to 8, the class B can come from a
totally different part of the source code - from a library for example
-, and unknown when using the type A, without talking of the
huge loss of memory if only A values are used).
def foo (a : &(A)) // ...

def main () {
    let b : &B = // ...
    foo (b); // calling foo with a B, heir of A
}
For that reason, object instances are aliasable types, and only
contains a pointer to the values of the class. You may have notice the
syntax &(A), in the above example. If this syntax is similar to
pointer, this is because objects are basically pointers. However,
unlike basic pointers, these cannot be used in pointer arithmetics,
cannot be null, and does not need to be dereferenced to access
the value. In other words, these are reference, more than pointers.
Yes, unlike other object oriented language such as java or D,
object instances cannot be null. This is a really important part
of the object system in Ymir guaranteeing that every objects are
pointing to a valid value, and that value is correctly initialized
(constructor was called).
We will see in the coming chapters, that removing the possibility of
null objects does not remove any capacity on the language, while
adding strong safety, the number one error of java programs
being NullPointerException (cf. Which Java exceptions are the
most
frequent?,
The Top 10 Exception Types in Production Java Applications – Based on
1B
Events).
Class
An object is an instance of a class. A class is declared using the
keyword class, followed by the identifier of the class. The
complete grammar of a class definition is presented in the following
code block.
class_decl := simple_class_decl | template_class_decl

simple_class_decl := 'class' (modifiers)? Identifier ('over' type)? '{' class_content '}'
template_class_decl := 'class' ('if' expression)? (modifiers)? Identifier templates ('over' type)? '{' class_content '}'
class_content :=   field
                 | method
                 | constructor
                 | impl
                 | destructor
modifiers := '@' ('{' modifier (',' modifier)* '}') | (modifier)
modifier := 'final' | 'abstract'
As many symbols, the class can be a template symbols. Templates are not presented in this chapter, and are left for a future chapter (cf. Templates).
Fields
A class can contain fields. A field is declared as a variable, using
the keyword let. A field can have a default value, in that case the
type is optional, however if the value is not set, the field must have
a type. Multiple fields can be declared within the same let,
with coma separating them.
class Point4D {
    let _x : i32;
    let _y = 0;
    let _z : i32, _w = 0;
}
Field privacy
All fields are protected by default, i.e. only the class defining them
and its heirs have access to them. The keyword pub can be used
to make the fields public, and accessible from outside the class
definition. The keyword prv, on the other hand, can be use to
make the field totally hidden from outside the class. Unlike
prot, prv fields are not accessible by the heirs of a
class.
A good practice is to enclose the privacy of the fields in their name
definition. For example, a public field is named x, without any
_ token. A protected fields always starts with a single
underscore, _y, and private fields are surrounded by two
underscores before and after the identifier. This is just a convention,
the name has no impact on the privacy.
class A {
    pub  let x = 12;
    prot let _y : i32;
    prv  let __z__ : i32;
}
Constructor
To be instancible, a class must declare at least one constructor. The
constructor is always named self, and takes parameters to build the
object. The object is accessible within the constructor body through
the variable self.
Field construction
The constructor must set the value to all the fields of the
class, with the keyword with. Fields with default values are not
necessarily set by this with statement, but can be
redefined. The with statement has the effect of the initial value of
the fields, meaning that the value of immutable fields is set by them.
class Point {
    let _x : i32;
    let _y = 0;

    /**
     * _y is already initialized
     * it is not mandatory to add it in the with initialization
     */
    pub self () with _x = 12 {}

    /**
     * But it can be redefined
     */
    pub self (x : i32, y : i32) with _x = x, _y = y {}
}
Field value is set only once. For example, if a class has a field
_x with a default value, calling a function foo. And the
constructor use the with statement to set the value of the field
from the return value of the bar function, the function
foo is never called.
def foo () -> i32 {
    println ("Foo");
    42
}

def bar () -> i32 {
    println ("bar")
    33
}

class A {
    let _x = foo ();

    pub self () with _x = bar () {} // foo is not called, bar is call instead
}
The point behind with field construction, is to ensure that all
fields have a value, when entering the constructor body. This way,
when instruction are made inside the constructor body, such as
printing the value of the fields, their value is already set, and the
object instance is already valid.
class A {
    let _x : i32;

    pub self () with _x = 42 {
        println (self._x); // access the field _x, of the current object instance
    }
}
Create an object instance
Class are used to create object instance, by calling a
constructor. This call is made using the double colon binary operator
::, with the left operand being the name of the class to
instantiate, and the right operand the keyword new. After the
keyword new a list of argument is presented, this list is the
list of argument to pass to the constructor. The constructor with the
best affinity is choosed and called on a allocated instance of the
class. Constructor affinity is computed as function affinity (based on
type mutability, and type compatibility – cf. Aliases and
References).
import std::io

class A {

    pub self (x : i32) {
        println ("Int : ", x);
    }

    pub self (x : f32) {
        println ("Float : ", x);
    }

}

def main () {
    let _ = A::new (12);
    let _ = A::new (12.f);
}
Results
Int : 12
Float : 12.000000
Named constructor
A name can be added to the constructor. This name is an Identifier,
and follows the keyword self. A named constructor can be called
by its name when constructing a class. This way two constructor can
share the same prototype, and be called from their name. A named
constructor is not ignored when constructing a class with the
new keyword, its named is just not considered.
In the following example, a class A contains two constructors,
foo and bar, these constructors have one parameter of type
i32.
import std::io

class A {
    let _x : i32;

    pub self foo (x : i32) with _x = x {
        println ("Foo ", self._x);
    }

    pub self bar (x : i32) with _x = x {
        println ("Bar ", self._x);
    }
}

def main () {
    let _ = A::foo (12);
    let _ = A::bar (12);

    let _ = A::new (12);
}
The last object construction at line 19 is not possible, the call
working with both foo and bar. The other constructions
work fine, that is why the compiler returns only the following error.
Error : {self foo (x : i32)-> mut &(mut main::A), self bar (x : i32)-> mut &(mut main::A)} x 2 called with {i32} work with both
 --> main.yr:(19,17)
19  ┃ 	let _ = A::new (12);
    ╋ 	               ^
    ┃ Note : candidate self --> main.yr:(6,6) : self foo (x : i32)-> mut &(mut main::A)
    ┃ Note : candidate self --> main.yr:(10,6) : self bar (x : i32)-> mut &(mut main::A)
    ┗━━━━━━


ymir1: fatal error:
compilation terminated.
Construction redirection
To avoid redondent code, a constructor can call another constructor in
the with statement. This call redirection is performed by using
the self keyword. In that case, because the fields are already
constructed by the called constructor, they must not be reconstructed.
import std::io;

class A {
    let _x : i32;

    pub self () with self (12) {
        println ("Scd ", self._x);
    }

    pub self (x : i32) with _x = x {
        println ("Fst ", self._x);
    }

}


def main () {
    let _ = A::new (); // construct an instance of the class A
                       // from the constructor at line 6
}
Results:
Fst 12
Scd 12
Contribution: Redirection to named constructor does not work for the moment. This is not complicated, but has to be done.
Constructor privacy
As fields, the privacy of the constructor is protected by default. The
keyword prv and pub can be used to change it.
Destructors
Object instances are destroyed by the garbage collector. Meaning that
there is no way to determine when or even if an object instance will
be destroyed. But lets say that such operation effectively happen
(which is quite probable, let's no lie either), then a last function
can be called just before the object instance is destroyed and
irrecoverable. The destructor is called __dtor, and takes the
parameter mut self. There is only one destructor per class, this
destructor is optional and always public.
import std::io;
static mut I = 0;
class A {
let _x : i32;
pub self () with _x = I {
I += 1;
}
__dtor (mut self) {
println ("Destroying me ! ", self._x);
}
}
def foo () {
let _ = A::new ();
} // the object instance is irrecoverable at the end of the function
def main () {
loop {
foo ();
}
}
Results:
Destroying me ! 765
Destroying me ! 1022
Destroying me ! 764
Destroying me ! 1023
Destroying me ! 763
Destroying me ! 1024
Destroying me ! 762
Destroying me ! 1025
Destroying me ! 761
Destroying me ! 1026
...
One can note from the result, that the order of destruction is totally unpredictible. Rely on class destructor is not the best practice. We will see in a future chapter disposable objects, that are destroyed in a more certain way. Destructors are a last resort to free unmanaged memory, if this was forgotten (for example, file handles, network socket, etc. if not manually disposed).
Mutability
Objects are aliasable types. The data being allocated on the heap, and not copied - for efficiency reasons - on affectations (cf. Aliases and References).
Object mutability
The type of an object instance is a reference to a class type. This
reference can mutable, and the data pointed data as well. In the
following example, a variable a containing an object instance of
the class A is created. This variable contains a mutable
reference, but the data borrowed by the reference are not mutable.
class A {
pub let mut x : i32;
pub self (x : i32) with x = x {}
}
def main () {
let mut a : &(A)= A::new (12);
a = A::new (42); // ok the reference if mutable
a.x = 33; // the borrowed data are not mutable
}
Because the data borrowed by a are not mutable, the
compiler returns an error.
Error : left operand of type i32 is immutable
--> main.yr:(15,3)
15 ┃ a.x = 33; // the borrowed data are not mutable
╋ ^
ymir1: fatal error:
compilation terminated.
This error can be avoided, by making the borrowed data mutable as
well. Either by using the dmut modifier, or by writing mut &(mut A).
def main () {
let dmut a = A::new (12);
a.x = 42; // no problem a is mutable, and its borrowed data as well.
println (a.x);
}
Because classes are aliasable types, the keyword alias has to be
used when trying to make a mutable affectation. Information about
aliasable types is presented in chapter
Aliases,
and is not rediscussed here.
def main ()
throws &AssertError
{
let dmut a = A::new (12);
let dmut b = alias a;
b.x = 42;
assert (a.x == 42);
}
Field mutability
Field mutability is set once and for all, in the definition of the class. The information about field mutability presented in the chapter about structure is applicable to classes.
However, unlike structures, classes are not copiable by default, but have to implement a specific traits. Trait and implementation is presented in a future chapter, and copy is discussed in there chapter. (cf. Traits).
class A {
pub let mut x : i32;
pub let y : i32;
pub self (x : i32, y : i32) with x = x, y = y {}
}
def main () {
let dmut a = A::new (0, 1);
a.x = 43;
a.y = 89;
}
Errors:
Error : left operand of type i32 is immutable
--> main.yr:(14,3)
14 ┃ a.y = 89;
╋ ^
ymir1: fatal error:
compilation terminated.
Methods
Methods are functions associated to object instances. Methods are described inside a class definition. Information about function presented in chapter Functions are applicable to methods. The grammar of a method is presented in the following code block.
method := simple_method | template_method
simple_method := 'def' Identifier method_params ('->' type)? expression
template_method := 'def' ('if' expression)? Identifier templates ('->' type)? expression
method_params := '(' ('mut')? 'self' (',' param_decl)* ')'
Methods are accessible using an object instance, of the dot binary
operator .. Once accessed, a method can be called using a list
of arguments separated by comas inside parentheses. The first
parameter of a method is the object instance, and is the left operand
of the dot operator, so it must not be repeated inside the
parentheses.
import std::io
class A {
let _a : i32;
pub self (a : i32) with _a = a {}
pub def foo (self, x : i32) -> i32 {
println ("Foo ", self._a);
x + self._a
}
}
def main () {
let a = A::new (29);
println (a.foo (13));
}
Results:
Foo 29
42
The access to the fields, and to the methods of the object instance
inside the body of a method is made using the first parameter of the
method, the variable self. Unlike some object oriented language,
such as Java, C++, Scala, D, etc. self is never
implicit, e.g. accessing to the field _a in the above example,
cannot be made by just writing _a, but must be accessed by
writing self._a. This is a conceptual choice, whose purpose is
to improve code readability and sharing, by avoiding useless and
preventable search for the source of the variables.
Privacy
Methods are protected by default. Meaning that only the class that
have defined them, and its heir class have acces to them. The keyword
pub and prv can be used to change the privacy of a
method. A public method is accessible everywhere, using an object
instance, and private methods are only accessible by the class that
have defined them. Unlike protected methods, private methods are not
accessible by heir classes. Privacy of methods is the same as privacy
of fields.
import std::io
class A {
pub self () {}
pub def foo (self) {
println ("Foo");
self.bar ();
}
prv def bar (self) {
println ("bar");
}
}
def main () {
let a = A::new ();
a.foo ();
a.bar ();
}
Because the method bar is private in the context of the
main function, the compiler returns the following error. One
can note, that the compiler tried to rewrite the expression into a
uniform call syntax (i.e. bar (a)), but failed, because the
function bar does not exists.
Error : undefined field bar for element &(main::A)
--> main.yr:(21,3)
21 ┃ a.bar ();
╋ ^^^^
┃ Note : bar --> main.yr:(12,10) : (const self) => main::A::bar ()-> void is private within this context
┃ Note : when using uniform function call syntax
┃ Error : undefined symbol bar
┃ --> main.yr:(21,4)
┃ 21 ┃ a.bar ();
┃ ╋ ^^^
┗━━━━━┻━
ymir1: fatal error:
compilation terminated.
Method mutability
The mutability of the object instance must be defined in the prototype
of the method. By default the object instance refered to by self
is immutable, meaning that the instance cannot be modified.
class A {
let mut _x : i32;
pub self (x : i32) with _x = x {}
pub def setX (self, x : i32) {
self._x = x;
}
}
Error:
Error : when validating main::A
--> main.yr:(1,7)
1 ┃ class A {
╋ ^
┃ Error : left operand of type i32 is immutable
┃ --> main.yr:(8,7)
┃ 8 ┃ self._x = x;
┃ ╋ ^
┗━━━━━┻━
ymir1: fatal error:
compilation terminated.
By using the keyword mut, the method can be applicable to
mutable instance. In that case the instance refered to by self
is mutable, and its mutable fields can be modified. Such methods can
be accessed only using mutable object instance - not only mutable
reference, the borrowed data located on the heap must be mutable. To
call such method, aliases is necessary and cannot be implicit.
class A {
let mut _x : i32;
pub self (x : i32) with _x = x {}
pub def setX (mut self, x : i32) {
self._x = x;
}
}
def main () {
let a = A::new (12);
a.setX (42);
let dmut b = A::new (12);
b.setX (42);
(alias b).setX (42);
}
The first call at line 14 is not possible, a having only
read access to the object instance it contains. The second error, the
call at line 17, is due to the fact that even b have write
permission to the object instance it contains, it cannot be passed to
the method implicitely, and have to be aliased, in order to certify
explicitely that the user is aware that the value of the object
contained in b will be modified by calling the method. The
errors returned by the compiler are the following.
Error : the call operator is not defined for (a).setX and {i32}
--> main.yr:(14,9)
14 ┃ a.setX (42);
╋ ^ ^
┃ Error : discard the constant qualifier is prohibited, left operand mutability level is 2 but must be at most 1
┃ --> main.yr:(14,9)
┃ 14 ┃ a.setX (42);
┃ ╋ ^
┃ ┃ Note : implicit alias of type &(main::A) is not allowed, it will implicitly discard constant qualifier
┃ ┃ --> main.yr:(14,2)
┃ ┃ 14 ┃ a.setX (42);
┃ ┃ ╋ ^
┃ ┗━━━━━┻━
┗━━━━━┻━
Error : the call operator is not defined for (b).setX and {i32}
--> main.yr:(17,9)
17 ┃ b.setX (42);
╋ ^ ^
┃ Error : discard the constant qualifier is prohibited, left operand mutability level is 2 but must be at most 1
┃ --> main.yr:(17,9)
┃ 17 ┃ b.setX (42);
┃ ╋ ^
┃ ┃ Note : implicit alias of type mut &(mut main::A) is not allowed, it will implicitly discard constant qualifier
┃ ┃ --> main.yr:(17,2)
┃ ┃ 17 ┃ b.setX (42);
┃ ┃ ╋ ^
┃ ┗━━━━━┻━
┗━━━━━┻━
ymir1: fatal error:
compilation terminated.
We have seen in the chapter about function, and more specifically
about uniform call syntax that the operator :. can be used to
pass a aliased value as the first parameter of a function. This
operator is also applicable for method calls, and is to be prefered to
the syntax (alias obj).method which is a bit verbose.
def main () {
let dmut a = A::new (12);
a:.setX (42); // same as (alias a).setX (42)
}
Method mutability is also applicable inside the body of a method. In
the example below, the method foo is mutable, and call another
mutable method bar, it also calls a immutable method
baz. Implicit aliasing is mandatory when calling the method
bar, but not when calling the method baz.
class A {
let _x : i32;
pub self (x : i32) with _x = x {}
pub def foo (mut self, x : i32) {
self:.bar (x); // :. is mandatory
self.baz (x);
}
pub def bar (mut self, x : i32) {
self._x = x;
}
pub def baz (self) {
println ("X : ", self._x);
}
}
Contribution: Calling a immutable method with explicit alias is
possible. Maybe that is not a good idea, and will lead to the use of
the operator :. all the time, and misleading read of the code.
Method mutability override
It is possible to define two methods with the same prototype, with the only exception that one of them is mutable and not the other. In that case the method with the best affinity is choosed when called. That is to say, the mutable method is called on explicitly aliased object instances, and the immutable method the rest of the time.
import std::io
class A {
pub self () {}
pub def foo (mut self) {
println ("Mutable");
}
pub def foo (self) {
println ("Const");
}
}
def main () {
let dmut a = A::new ();
a.foo ();
a:.foo ();
}
Results:
Const
Mutable
Inheritance
One of the most important point of the object oriented programming
paradigm is the possibility for a class to be derived from a base
class. This capability enables type polymorphism. In Ymir the
keyword over is used for class derivation, and overriding. A class
can have only one ancestor. We will see in the chapter about traits,
that multiple inheritance can be in some way achieved in another way.
class Shape {
}
/**
* A circle is a shape
*/
class Circle over Shape {
let _center : i32 = 0;
let _radius : i32 = 1;
}
Fields
The fields of an ancestor cannot be redeclared by an heir class. Even if they are hidden to the heir class (private fields). This choice was made to avoid miscomprehension, as two different variables would be named the same way.
import std::io;
class Shape {
let _x : i32 = 0;
pub self () {}
}
class Circle over Shape {
let _x : i32;
pub self () {
println (self._x);
}
}
Error:
Error : when validating main::Circle
--> main.yr:(9,7)
9 ┃ class Circle over Shape {
╋ ^^^^^^
┃ Error : declaration of _x shadows another declaration
┃ --> main.yr:(4,13)
┃ 4 ┃ prv let _x : i32 = 0;
┃ ╋ ^^
┃ ┃ Note :
┃ ┃ --> main.yr:(10,9)
┃ ┃ 10 ┃ let _x : i32;
┃ ┃ ╋ ^^
┃ ┗━━━━━┻━
┗━━━━━┻━
ymir1: fatal error:
compilation terminated.
Parent class construction
All object instances must be constructed. This means that when a class override a base class, the constructor of the base class must be called inside the constructor of the heir class. This call can be made implicitly if the constructor of the parent class takes no arguments. However, if no constructor in the parent class takes no arguments, then the call must be made explicitly. This explicit call is made inside the with statement.
class Shape {
let _x = 0;
pub self () {}
pub self (x : i32) with _x = x {}
}
class Circle over Shape {
let _radius : f32;
// Same as : with super ()
pub self () with _radius = 1.0f {}
// call the second parent constructor, at line 5
pub self (x : i32) with super (x), _radius = 1.0f {}
}
The call of the parent constructor is the first thing performed inside
a constructor. Meaning, that the construction of the fields of the
heir class are made afterward. To illustrate this point, the following
example presents a base class Foo with a constructor printing
foo, and a heir class Bar, calling the function bar*
(printing the value bar) to initialize its field _x.
import std::io;
def bar () -> i32 {
println( "Bar");
42
}
class Foo {
pub self () {
println ("Foo");
}
}
class Bar over Foo {
let _x : i32;
pub self () with _x = bar () {}
}
def main () {
let _ = Bar::new ();
}
Results:
Foo
Bar
However, because constructor redirection does not call parent constructor, and let that work to the called constructor, to which they are redirected, the following program has a different behavior. The arguments of the redirection are computed first, then the call to the parent constructor, and finally the construction of the fields of the heir class.
import std::io;
def bar () -> i32 {
println( "Bar");
29
}
def baz () -> i32 {
println( "Baz");
13
}
class Foo {
pub self () {
println ("Foo");
}
}
class Bar over Foo {
let _x : i32;
/**
* Call parent constructor at line 14, and then bar
*/
pub self (x : i32) with _x = bar () + x {}
/**
* Call baz first, then self at line 25
*/
pub self () with self (baz ()) {}
}
def main () {
let _ = Bar::new ();
}
Results:
Baz
Foo
Bar
The construction order is perfectly predictible, but should not
have an impact on the program behavior. So it is probably not a good
idea to rely on it.
Parent class destruction
In contrast to construction, the parent destructor is the last operation of the destruction of a heir class. The parent destructor is always called, there is no way to avoid it (aside exiting the program).
import std::io;
class Foo {
pub self () {}
__dtor (mut self) {
println ("Destroying Foo");
println ("====");
}
}
class Bar over Foo {
pub self () {}
__dtor (mut self) {
println ("====");
println ("Destroying Bar");
return {} // desperately trying to avoid parent destruction
}
}
def foo () {
let _ = Bar::new ();
}
def main () {
loop {
foo ();
}
}
Results:
====
Destroying Bar
Destroying Foo
====
====
Destroying Bar
Destroying Foo
====
====
Destroying Bar
Destroying Foo
====
...
Method overriding
The keyword over is used to override a method. Methods cannot be
implicitly overriden by omitting the over keyword and using the
def keyword. The signature of the method must be strictly identical
to the one of the ancestor method, including privacy, and argument
mutability. Of course, private methods cannot be overriden, because
hidden to heir classes, but protected and public methods can be
overriden. In the following example, a class Shape define the
method area. This method is public, and then can be overriden
by heir classes. The class Circle and Rectangle overrides
the methods.
import std::io
class Shape {
pub self () {}
pub def area (self) -> f64
0.0
}
class Circle over Shape {
let _radius : f64;
pub self (radius : f64) with _radius = radius {}
pub over area (self) -> f64 {
import std::math;
math::PI * (self._radius * self._radius)
}
}
class Square over Shape {
let _side : f64;
pub self (side : f64) with _side = side {}
pub over area (self) -> f64 {
self._side * self._side
}
}
def main () {
let mut s : &Shape = Circle::new (12.0);
println (s.area ());
s = Square::new (3.0);
println (s.area ());
}
Results:
452.389342
9.000000
Override mutable method
The mutability of the method must be respected in the heir class. This means that mutable method must be mutable in the heir, and immutable methods must be immutable in the heir.
class Foo {
pub self () {}
pub def foo (mut self)-> void {}
pub def bar (self)-> void {}
}
class Bar over Foo {
pub self () {}
pub over foo (self)-> void {}
pub over bar (mut self)-> void {}
}
Errors:
Error : when validating main::Bar
--> main.yr:(9,7)
9 ┃ class Bar over Foo {
╋ ^^^
┃ Error : the method (const self) => main::Bar::foo ()-> void marked as override does not override anything
┃ --> main.yr:(12,11)
┃ 12 ┃ pub over foo (self)-> void {}
┃ ╋ ^^^
┃ ┃ Note : candidate foo --> main.yr:(4,10) : (mut self) => main::Foo::foo ()-> void
┃ ┗━━━━━━
┃ Error : the method (mut self) => main::Bar::bar ()-> void marked as override does not override anything
┃ --> main.yr:(14,11)
┃ 14 ┃ pub over bar (mut self)-> void {}
┃ ╋ ^^^
┃ ┃ Note : candidate bar --> main.yr:(6,10) : (const self) => main::Foo::bar ()-> void
┃ ┗━━━━━━
┗━━━━━┻━
ymir1: fatal error:
compilation terminated.
Final methods
A base class can flag its method to avoid overriding. This flag is placed as a custom modifier before the name of the method.
class Foo {
pub self () {}
pub def @final foo (self) {}
}
class Bar over Foo {
pub self () {}
pub over foo (self) {}
}
Errors:
Error : when validating main::Bar
--> main.yr:(7,7)
7 ┃ class Bar over Foo {
╋ ^^^
┃ Error : cannot override final method (const self) => main::Foo::foo ()-> void
┃ --> main.yr:(10,14)
┃ 10 ┃ pub over foo (self) {}
┃ ╋ ^^^
┃ ┃ Note :
┃ ┃ --> main.yr:(4,20)
┃ ┃ 4 ┃ pub def @final foo (self) {}
┃ ┃ ╋ ^^^
┃ ┗━━━━━┻━
┗━━━━━┻━
ymir1: fatal error:
compilation terminated.
This flag can also be used on an overriden method inside a heir class to avoid further overriding.
class Foo {
pub self () {}
pub def foo (self) {}
}
class Bar over Foo {
pub self () {}
pub over @final foo (self) {}
}
class Baz over Bar {
pub self () {}
pub over foo (self) {}
}
Errors:
Error : when validating main::Baz
--> main.yr:(13,7)
13 ┃ class Baz over Bar {
╋ ^^^
┃ Error : cannot override final method (const self) => main::Bar::foo ()-> void
┃ --> main.yr:(16,14)
┃ 16 ┃ pub over foo (self) {}
┃ ╋ ^^^
┃ ┃ Note :
┃ ┃ --> main.yr:(10,21)
┃ ┃ 10 ┃ pub over @final foo (self) {}
┃ ┃ ╋ ^^^
┃ ┗━━━━━┻━
┗━━━━━┻━
ymir1: fatal error:
compilation terminated.
Abstract class
A class can be abstract, this means that the class cannot be instantiated even if it has a constructor. An abstract class can declare methods without body, these methods must be overriden by heir classes. An abstract must have a constructor to be heritable, this constructor being called by the heir classes. Not that an abstract class can have no public constructors, but that a class that have no public constructors is not necessarily abstract.
class @abstract Shape {
prot self () {} // need a constructor to be inheritable
pub def area (self)-> f64; // Method does not need a body
}
class Circle over Shape {
let _radius : f64;
pub self (radius : f64) with _radius = radius {}
pub over area (self) -> f64 {
import std::math;
math::PI * (self._radius * self._radius)
}
}
def main () {
let s : Shape = Circle::new (12);
println (s.area ());
}
Method with no body
A method of an abstract class can have a body, and thus behave as any method of any class. It can also have no body, but in that case heir class must override this method. Otherwise the class is incomplete. Abstract class can be heir class, in that case they don't need to override the methods without body.
class @abstract Foo {
pub self () {}
pub def foo (self);
}
class @abstract Bar over Foo {
pub self () {}
}
class Baz over Bar {
pub self () {}
}
Error:
Error : when validating main::Baz
--> main.yr:(11,7)
11 ┃ class Baz over Bar {
╋ ^^^
┃ Error : the class main::Baz is not abstract, but does not override the empty parent method (const self) => main::Foo::foo ()-> void
┃ --> main.yr:(11,7)
┃ 11 ┃ class Baz over Bar {
┃ ╋ ^^^
┃ ┃ Note :
┃ ┃ --> main.yr:(4,13)
┃ ┃ 4 ┃ pub def foo (self);
┃ ┃ ╋ ^^^
┃ ┗━━━━━┻━
┗━━━━━┻━
ymir1: fatal error:
compilation terminated.
Final class
Final classes declared with the custom attributes @final defines
classes that cannot have heirs. A final class, can be an heir class,
or a base class. If the class is a base class, strong optimization can
be made by the compiler, (no vtable required, and call of the methods
are direct and way faster). For that reason, it is a good practice to
flag classes for which we are certain they cannot be inheritable. This
optimization is also done on final methods (if they are not overriden,
i.e. final when define for the first time), thus this is a good
practice to flag methods for which we are certain they won't be
overriden. This optimization cannot be done if the class is not a base
class.
class @final Foo {
pub self () {}
pub def foo (self) {}
}
class Bar over Foo {
pub self () {}
}
Error:
Error : the base class main::Foo is marked as final
--> main.yr:(7,16)
7 ┃ class Bar over Foo {
╋ ^^^
ymir1: fatal error:
compilation terminated.
Contribution: It is possible to have an abstract and final class. I didn't find any use case for that, maybe that is completely useless, and must be prohibited.
Casting base class objects to heir class
In many languages (such as C++, D, Java, or Scala) polymorphism gives the possibility to cast an object of a base class into an object of an heir class. This is not possible in Ymir because this behavior is not safe. We will see in the chapter Pattern matching how to achieve a cast of an object into a heir class, in a safe way.
However, the std provides a safe shortcut that can be used to
achieve the cast. This shortcut is by using the template function
to of the module std::conv. This function throws a
CastFailure exception when the cast failed, (safe in Ymir
means that the error can be managed, and has to be managed in fact, as
we will see in the chapter on Error
handling). In
the following example, two objects are stored in the variable x
and y, whose type are &Foo. The first cast at line 18
works, because the variable x indeed contains an object of type
&Bar, however the cast at line 19 does not work, the
variable y stores an object of type &Foo.
import std::conv;
class Foo {
pub self () {}
}
class Bar over Foo {
pub self () {}
}
def main ()
throws &CastFailure // the possible errors are rethrown, so the program ends if there is an error
{
let x : &Foo = Bar::new ();
let y : &Foo = Foo::new ();
let _ : &Bar = x.to!(&Bar) (); // possibly throw a &CastFailure
let _ : &Bar = y.to!(&Bar) (); // here as well, (and actually throw it)
}
The following result happens because an error is thrown by the main
function, and then unmanaged by the program. The stacktrace is printed
because the program was compiled in debug mode. We can see in this
trace (at line 11) that the error was effectively thrown by the
conversion at line 19.
Unhandled exception
Exception in file "/home/emile/gcc/gcc-install/bin/../lib/gcc/x86_64-pc-linux-gnu/9.3.0/include/ymir/std/conv.yr", at line 820, in function "std::conv::to(&(main::Bar),&(main::Foo))::to", of type std::conv::CastFailure.
╭ Stack trace :
╞═ bt ╕ #1
│ ╘═> /lib/libgyruntime.so:??
╞═ bt ╕ #2
│ ╘═> /lib/libgyruntime.so:??
╞═ bt ╕ #3 in function std::conv::toNP94main3BarNP94main3Foo::to (...)
│ ╘═> /home/emile/gcc/gcc-install/bin/../lib/gcc/x86_64-pc-linux-gnu/9.3.0/include/ymir/std/conv.yr:820
╞═ bt ╕ #4 in function main (...)
│ ╘═> /home/emile/Documents/test/ymir/main.yr:19
╞═ bt ╕ #5
│ ╘═> /lib/libgyruntime.so:??
╞═ bt ╕ #6 in function main
│ ╘═> /home/emile/Documents/test/ymir/main.yr:12
╞═ bt ╕ #7
│ ╘═> /lib/x86_64-linux-gnu/libc.so.6:??
╞═ bt ═ #8 in function _start
╰
Aborted (core dumped)
Trait
Traits are used to define as their name suggest traits that can be
implemented by a class. To define them, the keyword trait is
used. A trait is not a type, and can only be implemented by class,
for that reason, a variable or a value cannot be of a trait type.
An example of a trait, is presented in the following source block. The
idea of this trait, is to ensure that every class, implementing it,
have a public method named print that can be called without
parameters.
trait Printable {
pub def print (self);
}
When a class implements a trait, all the method declared in the trait
are added in the definition of the class. If the class is not abstract
all the method of the traits must have a body. For example, if a non
abstract class implement the trait Printable, thus it must
override the method print to add a body to it.
import std::io
class Point {
// ... Constructors and attributes
impl Printable {
// Try to remove the following definition
pub over print (self) {
print ("Point {", self._x, ", ", self._y, "}");
}
}
}
A trait can provide a default behavior for the method it defines. The
body of the method is validated for each implementation. In the
following example, the method print defined in the trait
Printable, prints the typeid of the class that implement the
traits. One can note, that the behavior of this function is different
for each class that implements it, that is why it is only validated
when a class implement the trait.
mod main;
trait Printable {
pub def print (self) {
import std::io;
print (typeof (self)::typeid);
// Here we don't know the type yet
}
}
class Point {
// ... Constructors and attributes
impl Printable; // 'print' method prints ("main::Point")
}
class Line {
// ... Constructors and attributes
impl Printable; // 'print' method prints ("main::Line")
}
Warning: If a trait is never implemented by any class, and have methods with default behavior, then it is never validated. Thus errors can be present in this trait, but still pass the compilation. One can see the trait as a kind of template, this problem being present in template symbol as well (cf. Templates).
Inherit a Class implementing a Trait
The methods of a trait can be overriden by heir classes. In order to do this, heir classes must reimplement the trait, and override the methods.
Simple reimplementation
In the following example, the class Shape implements
the trait Printable, this trait has a method print with a
default behavior. The class Circle does not reimplement the
trait, thus when calling the method print of a Circle value, the
value main::Shape is printed on the stdout. On the other hand,
the class Rectange reimplement the traits, thus the value
main::Rectangle is printed.
mod main;
trait Printable {
pub def print (self) {
import std::io;
println (typeof (self)::typeid);
}
}
class @abstract Shape {
self () {}
impl Printable;
}
class Circle over Shape {
pub self () {}
}
class Rectangle over Shape {
pub self () {}
impl Printable; // reimplement the method print with typeof (self) being main::Rectangle
}
def main () {
let c = Circle::new ();
c.print ();
let r = Rectangle::new ();
r.print ();
}
Results:
main::Shape
main::Rectangle
Override implemented method
Implemented method cannot be overriden without reimplementing the
trait. In the following example, a class Shape implement the
trait Printable, and the class Circle inherits
Shape, and tries to override the method print.
mod main;
import std::io;
trait Printable {
pub def print (self);
}
class @abstract Shape {
self () {}
impl Printable {
pub over print (self) {
println ("main::Shape");
}
}
}
class Circle over Shape {
pub self () {}
pub over print (self) {}
}
Errors:
Error : when validating main::Circle
--> main.yr:(18,7)
18 ┃ class Circle over Shape {
╋ ^^^^^^
┃ Error : cannot override the trait method (const self) => main::Shape::print ()-> void outside the implementation of the trait
┃ --> main.yr:(21,14)
┃ 21 ┃ pub over print (self) {}
┃ ╋ ^^^^^
┃ ┃ Note :
┃ ┃ --> main.yr:(12,18)
┃ ┃ 12 ┃ pub over print (self) {
┃ ┃ ╋ ^^^^^
┃ ┗━━━━━┻━
┗━━━━━┻━
ymir1: fatal error:
compilation terminated.
To prevent the previous error, the class Circle have to
reimplement the trait Printable. When reimplementing a trait in
a heir class, the parent overriding is not taken into account, and the
method of the trait is used. In the following example, the class
Shape implement the trait Printable, that have a method
print with no default behavior. The class Circle tries to
reimplement the trait, but without overriding the print
method. This source code is rejected by the compiler, the class
Circle is not abstract, but has a method with no body.
mod main;
import std::io;
trait Printable {
pub def print (self);
}
class @abstract Shape {
self () {}
impl Printable {
pub over print (self) {
println ("main::Shape");
}
}
}
class Circle over Shape {
pub self () {}
impl Printable;
}
Errors:
Error : when validating main::Circle
--> main.yr:(18,7)
18 ┃ class Circle over Shape {
╋ ^^^^^^
┃ Error : the class main::Circle is not abstract, but does not override the empty parent method (const self) => main::Printable::print ()-> void
┃ --> main.yr:(18,7)
┃ 18 ┃ class Circle over Shape {
┃ ╋ ^^^^^^
┃ ┃ Note :
┃ ┃ --> main.yr:(5,10)
┃ ┃ 5 ┃ pub def print (self);
┃ ┃ ╋ ^^^^^
┃ ┗━━━━━┻━
┗━━━━━┻━
ymir1: fatal error:
compilation terminated.
To resolve that problem, the class Circle must add a body to the
method print. It can happen that a trait defines multiple
methods, and that only some have to be reimplemented by the heir
class. In that case, there is no magical solution, maybe a
contribution can enhance that, but every methods must be
reimplemented. In order to mimic the behavior of the parent
implementation, the super keyword can be used.
class Circle over Shape {
pub self () {}
impl Printable {
pub over print (self)-> void {
self::super.print (); // call the print method of the super class
}
}
}
Trait privacy
Trait implementation is always public. For that reason, privacy
specifier (pub, prot and prv) have no meaning on
implementation.
On the other hand, the trait methods implementation follows the same rule as the overriding of a parent method. That is to say, the privacy defined inside the trait must be the same as the privacy defined inside the implementation.
Trait usage
As said in the beginning of this chapter, traits do not define
types, thus they cannot be used to define the type of a variable. For
example, the following source code has no meaning, Printable
does not define a type.
mod main;
import std::io;
trait Printable {
pub def print (self);
}
def foo (a : Printable) {
a.print ();
}
Errors:
Error : expression used as a type
--> main.yr:(8,15)
8 ┃ def foo (a : Printable) {
╋ ^^^^^^^^^
ymir1: fatal error:
compilation terminated.
If the previous example, is not a valid ymir code, the behavior can
still be implemented in the language. Traits gain interest when
coupled with templates, and a template test can be used to check that
a class implement a trait. More complete information, and example
about templates, and traits specialization are presented in chapter
Templates,
but a brief example is presented in the following source code. In this
example, two classes U and V implement the trait
Printable. The function foo takes a parameter whose type
is not specified but must implement the trait Printable. Thus
the function is callable with both U or V as argument.
mod main;
import std::io;
trait Printable {
pub def print (self) {
println (typeof (self)::typeid);
}
}
class U {
pub self () {}
impl Printable;
}
class V {
pub self () {}
impl Printable;
}
/**
* Accept every type, that implements the trait Printable
*/
def foo {I impl Printable} (a : I) {
a.print ();
}
def main () {
foo (U::new ());
foo (V::new ());
}
Results:
main::U
main::V
Cast, and dynamic typing
An object instance of a heir class can be casted to an object instance
of an ancestor class. Unlike, casting of integer values,
(e.g. i32 to i64), because an object is an aliasable type,
the memory size of the object is not modified. Casting must respect
mutability of the object value. Moreover, this cast can be made
implicitely, as it does not create any problem in memory. In the
following example, the class Bar inherits from the class
Foo. A variable x is created, and is of type
&Bar. At line 1, an implicit cast is made of a &Bar
value to a &Foo value, the same cast is made but explicitely at
line 1.
import std::io;
class Foo {
pub self () {}
pub def foo (self) {
println ("Foo");
}
}
class Bar over Foo {
pub self () {}
pub over foo (self) {
println ("Bar");
}
}
def baz (f : &Foo) {
f.foo ();
}
def main () {
let x = Bar::new ();
baz (x);
let y = cast!{&Foo} (x);
y.foo ();
}
Results:
Bar
Bar
Dynamic typeinfo
One can note from the above example, that when a variable contains a
value of type &Foo, that does not necessarily mean that this is
a pure &Foo value, but it can be a &Bar. In object
oriented programming, this principle is denote polyphormism. In the
chapter Basic programming
concepts,
we have seen that every object has specific attributes. Object is no
exception to the rule. The following table lists the default specific
attributes of the object types.
| Name | Meaning |
|---|---|
typeid | The name of the type stored in a value of type [c32] |
typeinfo | A structure of type TypeInfo, containing information about the type |
These attributes are compile time executed, and thus are static. For
example, in the following source code, the typeid of the class
Bar is printed to stdout, followed by a line that does exactly
the same thing (literraly).
def main () {
println (Bar::typeid);
println ("main::Bar");
}
When it comes to dynamic typing, it can be interesting to get the
typeinfo of the type of the value that is actually stored inside the
variable (e.g. get the typeinfo of the Bar class, type of the
value contained inside a &Foo variable). To do that, the
specific attribute typeinfo of object is also accessible from
the value directly, and this time dynamically.
def main () {
let x = Bar::new ();
let y : &Foo = x;
println (y::typeinfo);
}
Results:
core::typeinfo::TypeInfo(13, 16, [core::typeinfo::TypeInfo(13, 16, [], main::Foo)], main::Bar)
The result presented above, gives the following information : 1)
we have a object, 2) its size is 16 bytes, 3) it has an ancestor
(object, size 16 bytes, no ancestor, named main::Foo), 4) its
name is main::Bar.
The TypeInfo returned by the typeinfo attributes (either
dynamically or statically), is a structure whose definition is the
following. The inner fields depend on the value of the
typeid field, for example, when dealing with an object it stores
the ancestor TypeInfo, and when dealing with slice, it stores
the TypeInfo of the type contained inside the slice.
pub struct
| typeid : TypeIDs
| size : usize
| inner : [TypeInfo]
| name : [c32]
-> TypeInfo;
pub enum : u32
| ARRAY = 1u32
| BOOL = 2u32
| CHAR = 3u32
| CLOSURE = 4u32
| FLOAT = 5u32
| FUNC_PTR = 6u32
| SIGNED_INT = 7u32
| UNSIGNED_INT = 8u32
| POINTER = 9u32
| SLICE = 10u32
| STRUCT = 11u32
| TUPLE = 12u32
| OBJECT = 13u32
| VOID = 14u32
-> TypeIDs;
The typeinfo of a class is stored in the text and is accessible from
the vtable of the object. One can note that Bar and Foo
have a size of 16 bytes, despite the fact that they store no
fields. This is due to two pointers that are stored inside every
objects, the first pointer is refering to the monitor of the object
(cf. Parallelism), and the second one points the the vtable of
the object.
Object
Ymir have a type named Object, that can used to cast any
object into that type. The reverse is impossible. We have seen that
the object are not inheriting from a global ancestor, and this is
really not the case. This cast unlike casting to parent class objects,
cannot be made implicitely. We can see the &(Object) type as the
&(void) type, that can store any pointer, but for
objects. Unlike &(void) (in which by the way we can't cast
objects), &Object stores one valuable information, it stores a
valid object value, with a vtable, a monitor, a typeinfo, and cannot
be null.
In the following example, a pattern matching is used to check the type
of the object that is returned by the foo function. This is
discussed in chapter Pattern
Matching.
def foo ()-> &Object {
cast!{&Object} (Foo::new ())
}
def main () {
match foo () {
Foo () => {
println ("I got a Foo !");
}
}
}
Results:
I got a Foo !
Some function of the standard library uses the Object type to
return values, when it is impossible statically to get more accurate
information about the type (e.g. [Packable]
(https://gnu-ymir.github.io/Documentations/en/traits/serialize.html).)
Functions
We have seen in the chapter Basic programming concepts how functions are written. Ymir can be used as a functional language, thus functions can also be considered as values. In this chapter we will see more advanced function systems, named function pointer and closure.
Function pointer
A function pointer is a value that contains a function. It can be used
for example, to pass a function, as an argument to other
functions. The type of a function pointer is written using the keyword
fn, and have nearly the same syntax as a function prototype, but
without a name, and without naming the parameters.
import std::io
def foo (f : fn (i32)-> i32) -> i32 {
f (41)
}
def addOne (x : i32)-> i32
x + 1
def main () {
let x = foo (&addOne);
println (x);
}
In the above example, we have specified that the function foo
takes a function pointer as first parameter. This function pointer, is
a function that takes an i32 value and return another i32 value.
In the main function, the ampersand (&) unary operator is used
to transform the function symbol addOne into a function
pointer. This function pointer is then passed to the function
foo, which calls it and return its value.
Results:
42
Function pointer using reference
We have seen that references is not a type, in the chapter Alias and
References. However,
function prototype sometimes takes reference value as parameter. This
must be replicated in the prototype of the function pointer. For that
reason, the ref keyword can be used in the prototype of a
function pointer type.
In the following example, the function mutAddOne change the
value of a reference variable x, and add one to it. The function
foo takes a function pointer as first parameter, and calls it on
a mutable local variable x by reference (it is important).
import std::io
def foo (f : fn (ref mut i32)-> void) -> i32 {
let mut x = 41;
f (ref x);
x
}
def mutAddOne (ref mut x : i32) {
x = x + 1;
}
def main () {
let x = foo (&mutAddOne);
println (x);
}
Results:
42
The prototype of the function pointer must be strictly respected, for
obvious reasons. And as for normal functions, alias and references
must be strictly respected as well. For example, in the follow
example, the function foo tries to call the function pointer
that takes a reference argument, using a simple value. And the
main function tries to call the foo function, with a
function pointer that does not take a reference parameter.
import std::io
def foo (f : fn (ref mut i32)-> void) -> i32 {
let mut x = 41;
f (x);
x
}
def mutAddOne (x : i32) {
println (x);
}
def main () {
let x = foo (&mutAddOne);
println (x);
}
We have two errors, first the compiler does not allow an implicit
referencing of the variable x at line 5, and second the
compiler does not allow an implicit cast of a value of type fn (i32)-> void to fn (ref mut i32)-> void.
Error : the call operator is not defined for &fn(ref mut i32)-> void and {mut i32}
--> main.yr:(5,7)
5 ┃ f (x);
╋ ^ ^
┃ Error : implicit referencing of type mut i32 is not allowed
┃ --> main.yr:(5,8)
┃ 5 ┃ f (x);
┃ ╋ ^
┃ Note : for parameter i32 --> main.yr:(3,26) of f
┗━━━━━━
Error : the call operator is not defined for main::foo and {&fn(i32)-> void}
--> main.yr:(14,17)
14 ┃ let x = foo (&mutAddOne);
╋ ^ ^
┃ Note : candidate foo --> main.yr:(3,5) : main::foo (f : &fn(ref mut i32)-> void)-> i32
┃ ┃ Error : incompatible types &fn(ref mut i32)-> void and &fn(i32)-> void
┃ ┃ --> main.yr:(14,18)
┃ ┃ 14 ┃ let x = foo (&mutAddOne);
┃ ┃ ╋ ^
┃ ┃ Note : for parameter f --> main.yr:(3,10) of main::foo (f : &fn(ref mut i32)-> void)-> i32
┃ ┗━━━━━━
┗━━━━━┻━
Error : undefined symbol x
--> main.yr:(15,14)
15 ┃ println (x);
╋ ^
ymir1: fatal error:
compilation terminated.
Lambda function
Lambda functions are anonymous functions that have the same behavior
as normal function, but don't have a name. They are declared using the
token | surrounding the parameters instead of parentheses in order
to dinstinguish them from tuple. The following code block presents the
syntax of the lambda functions.
lambda_func := '|' (var_decl (',' var_decl)*)? '|' ('->' type)? ('=>')? expression
var_decl := Identifier (':' type)?
The following example shows a simple usage of a lambda function. This
function declared at line 4, and stored in the variable x,
takes two parameters x and y of type i32, and return
their sum.
import std::io
def main () {
let x = |x : i32, y : i32|-> i32 {
x + y
};
println (x (1, 2));
}
As one can note, there is no conflict between the variable x
declared in the function main, and the first parameter of the
lambda function also named x. This is due to the fact that the
lambda function does not enclose the context of the function that have
created it. In other words, lambda functions behave as normal local
function, accessible only inside the function that have declared them
(cf. Scope
declaration).
In many cases the type of the parameters and return type can be
infered, and are therefore optional. The above example can then be
rewritten into the following example. In this next example, the lambda
function can be called with any values, as long as the binary addition
(+) operator is defined between the two values.
import std::io
def main () {
let x = |x, y| x + y;
println (x (1, 2));
// The types are not given, then you can also write
println (x (1.3, 2.9));
}
The token => can be added after the prototype of the lambda, to make
it a bit more readable. It is just syntaxic and has no impact on the
behavior of the lambda.
import std::io
def main () {
let x = |x, y| => x + y;
println (x (1, 2));
}
Lambda functions are directly function pointers, and then can be used
as such without needing the unary ampersand (&) operator. In the
following example, the function foo takes a function pointer as
first parameter, and two i32 values as second and third
parameters. This function calls the function pointer twice, and add
the result. A lambda function is used in the main function as
the first argument for the foo function.
import std::io
def foo (f : fn (i32, i32)-> i32, x : i32, y : i32) -> i32 {
f (x, y) + f (y, x)
}
def main () {
let x = (|x, y|=> x * y).foo (3, 7);
// uniform call syntax is used, but you can of course write it as follows :
// foo (|x, y| x*y, 3, 7);
println (x);
}
Results:
42
Lambda function that are not typed are special element, that does not really have a value at runtime, and are closer to compile time values (presented in a future chapter Compile time execution). When the whole type of a lambda cannot be infered by the compiler (types of the parameters, and the type of the return type), then the value cannot be passed to a mutable variable. Ymir allows to put an untyped lambda inside an immutable var, to ease its usage, but the lambda still does not have any value. For that reason, the second line of the following example is possible, but not the third.
def main () {
let x = |x| x + 1;
let mut y = x;
}
Errors:
Error : the type mut fn (any)-> any is not complete
--> main.yr:(2,10)
2 ┃ let x = |x| x + 1;
╋ ^
┃ Note :
┃ --> main.yr:(3,10)
┃ 3 ┃ let mut y = x;
┃ ╋ ^
┗━━━━━┻━
ymir1: fatal error:
compilation terminated.
The same problem happens when an uncomplete lambda function is used as
the value of a function. To resolve the problem, and because the
return type of a function is always complete when the function is
validated (or there were other previous errors), the keyword
return can be used. Thanks to that statement, the compiler has
additional knowledge, and can infer the type of the lambda function
from the return type of the function.
import std::io
def foo () -> fn (i32)-> i32 {
return |x| => x + 12 // the compiler tries to transform the lambda function into a function pointer fn (i32)-> i32
}
def main () {
let x = foo ();
println (x (30));
}
Contribution: Resolve that problem when it seems obvious, for example in the previous example, maybe the type of the block can be infered directly?
Closure
As said earlier, a lambda function behave like a local private
function, and thus has no access to the context of the function that
have declared it. In the following example, the lambda function
declared at line 5 tries to access the variable i declared
at line 4. This is impossible, the variable i exists in a
different context that the lambda function.
import std::io
def main () {
let i = 12;
let x = | | {
println (i);
};
x ();
}
Errors:
Error : undefined symbol i
--> main.yr:(6,12)
6 ┃ println (i);
╋ ^
Error : undefined symbol x
--> main.yr:(8,2)
8 ┃ x ();
╋ ^
ymir1: fatal error:
compilation terminated.
Closure are a function pointer that capture the environment of the function that has declared them. In Ymir there is only one kind of accepted closure, that is called the move closure.
Copy closure
A copy closure is a special kind of lambda function, that is declared
by using the keyword move in front of a lambda literal. The
closure as an immutable access to all the variable declared inside the
scope of the parent function. This closure is called a copy closure
because the access of the variable is made by copy (a first level copy
cf. Copy and Deep
copy).
Because closure captures a context in addition to a function pointer,
the simple function pointer type is no more sufficient, and a new type
is introduced. The syntax of the closure type is created with the
keyword dg instead of fn (dg stands for delegate). A
delegate is a function pointer with an environment, and is the general
case of a closure (we will see in next section, a case of delegate
that are not closure).
In the following example, the copy closure declared at line 9
enclosed the scope of the function foo, and thus has access to
the variable i. However, the enclosed variable is immutable (and
is a copy).
import std::io
def bar (f : dg (i32)-> i32) -> i32 {
f (12)
}
def foo () {
let i = 30;
let x = bar (move |x|=> x + i);
println (x);
}
def main () {
foo ();
}
The above source code in the context of the foo function, can be
illustrated by the following figure.
<img src="https://gnu-ymir.github.io/Documentations/en/functions/closure.png" alt="drawing" height="500", style="display: block; margin-left: auto; margin-right: auto;">
As one can note, the variable i enclosed in the closure is not
the same as the variable i of the main function. This has
two impact:
- a) copy closure can be returned safely from functions,
indeed even when the variable
idoes not exist anymore as the functionfoois exited, a copy of it is still accessible in the heap (note that this is the same for aliasable types, that are in the heap in any case). For example:
import std::io;
def foo ()-> dg ()-> i32 {
let i = 30;
return (move || => i + 12);
}
def main () {
let x = foo ();
println (x ()); // enclosed i does not exists, but thats not a problem
}
Results:
42
- b) the value of the enclosed
iis independant from the value of the variableiin thefoofunction, meaning that there is no way for thefoofunction to change the value of the variableiinside the closure after its creation. For example :
import std::io;
def main () {
let mut i = 30;
let x = move || => i + 12;
i = 11; // no impact on the closure of x
println (x ());
let y = move || => i + 12;
println (y ());
}
Results:
42
23
By using aliasable types, this limitation can be bypassed, for example
a slice can be used to enclosed the value of i, and access it from the
closure, without removing the guarantees of the copy closure, this
is illustrated in the following example. Warning: if you might be
tempted to use a pointer on the i variable, its highly not
recommended. Indeed, pointing to a local variable remove the guarantee
we introduced earlier in the point (a) - (in general using pointer -
not function pointer - to value is a bad idea, and should be
prohibited outside the std).
import std::io;
def main ()
throws &OutOfArray
{
let dmut i = [12];
let x = move || => {
i[0] + 12
} catch {
_ => {
0
}
};
i [0] = 30;
println (x ());
}
In the above example, the copy closure access to the first index of
the slice i. This is a unsafe operation, the slice can be empty,
this is why a catch is made. Information about catch is not presented
here, and will be discussed in a future chapter Error
handling. Here
because the slice is not empty when the closure is called, the access
works.
Results:
42
Method delegate
A method is a function pointer associated with a object instance, then they can be seen as delegate. The name closure is not used here, because nothing is really enclosed as in copy closure over function context, so the name delegate being a more global term is used. A delegate is a function operating on an object, for which we don't know the exact type.
A method can be transformed into a delegate using the unary ampersand
(&) operator, on a method associated to an object instance.
import std::io;
class Foo {
pub let mut i = 0;
pub self () {}
pub def foo (self) -> void {
println (self.i);
}
}
def main () {
let dmut a = Foo::new (), dmut b = Foo::new ();
let x : (dg ()-> void) = &a.foo;
let y = &b.foo;
a.i = 89;
b.i = 42;
x ();
y ();
}
Results:
89
42
Unlike copy closure a method can have a mutable access to the object associated to it. In that case, an explicit alias must be made on the object instance, when creating the delegate, otherwise the compiler throws an error.
import std::io;
class Foo {
let mut _i = 0;
pub self () {}
pub def foo (mut self) {
self._i = 42;
}
impl Streamable;
}
def main () {
let dmut a = Foo::new ();
let x = &(a.foo);
x ();
println (a);
}
Errors:
Error : undefined operator & for type (a).foo
--> main.yr:(18,13)
18 ┃ let x = &(a.foo);
╋ ^
┃ Note : candidate foo --> main.yr:(8,13) : (mut self) => main::Foo::foo ()-> void
┃ ┃ Error : discard the constant qualifier is prohibited, left operand mutability level is 2 but must be at most 1
┃ ┃ --> main.yr:(18,13)
┃ ┃ 18 ┃ let x = &(a.foo);
┃ ┃ ╋ ^
┃ ┃ ┃ Note : implicit alias of type mut &(mut main::Foo) is not allowed, it will implicitly discard constant qualifier
┃ ┃ ┃ --> main.yr:(18,15)
┃ ┃ ┃ 18 ┃ let x = &(a.foo);
┃ ┃ ┃ ╋ ^
┃ ┃ ┗━━━━━┻━
┃ ┗━━━━━┻━
┗━━━━━┻━
Error : undefined symbol x
--> main.yr:(20,5)
20 ┃ x ();
╋ ^
ymir1: fatal error:
compilation terminated.
This can be easily resolved by aliasing the variable a when
creating the delegate. Either by using the keyword alias, or by
using the :. binary operator.
import std::io;
class Foo {
let mut _i = 0;
pub self () {}
pub def foo (mut self) {
self._i = 42;
}
impl Streamable; // to make the type printable
}
def main () {
let dmut a = Foo::new ();
let x = &(a:.foo); // or &((alias a).foo);
x ();
println (a);
}
Results:
main::Foo(42)
Polymorphic delegate
Method delegates respect the polyphormism introduced by class inheritance.
import std::io;
class Foo {
pub self () {}
pub def foo (self) {
println ("Bar");
}
}
class Bar over Foo {
pub self () {}
pub over foo (self) {
println ("Bar");
}
}
def main ()
{
let x : &Foo = Bar::new ();
let d = &(x.foo);
d ();
}
Results:
Bar
Pattern matching
The pattern matching is an important part of the Ymir language. It
allows to make test over values and moreover on types, especially when
it comes to objects. The pattern matching syntax always start with the
keyword match followed by an expression, and then a list of patterns
enclosed between {}.
The syntax of the pattern matching is described in the following code block.
match := 'match' expression '{' pattern* '}'
pattern := pattern_expression '=>' expression (';')?
pattern_expression := pattern_tuple
| pattern_option
| pattern_range
| pattern_var
| pattern_call
| expression
pattern_tuple := '(' (pattern_expression (',' pattern_expression)*)? ')'
pattern_option := pattern_expression ('|' pattern_expression)*
pattern_range := pattern_expression ('..' | '...') pattern_expression
pattern_var := (Identifier | '_') ':' (type | '_') ('=' pattern_expression)?
pattern_call := (type | '_') '(' (pattern_argument (',' pattern_argument)*)? ')'
pattern_arguments := (Identifier '->')? pattern_expression
Match is a kind of control flow, relatively close to if
expressions. As if expressions, a match expression can have a
value. In that case, every branch of the match must share the same
type, and there must be a guarantee that at least one test of the
match succeed, and thus that a branch is entered. For example, in
the following example, all the branch of the match share the same
type i32, however it is possible (and even inevitable in that
specific case), that no branch of the match were entered. So the
compiler throws an error, as the variable x might be unset,
which is prohibited by the language. In the following example, simple
tests are made on the value, so the first pattern is equal to an if
expression, where the test is 12 == 1.
def main () {
let x = match (12) {
1 => 8
2 => 7
3 => 6
};
}
Errors :
Error : match of type i32 has no default match case
--> main.yr:(2,10)
2 ┃ let x = match (12) {
╋ ^^^^^
ymir1: fatal error:
compilation terminated.
Matching on everything
The token _ declares a pattern test that is always valid. It can
be placed at different level of the pattern test, as we will see in
the rest of this chapter.
import std::io;
def main () {
match 42 {
_ => { println ("Always true"); }
}
}
Matching over a range of values
Pattern matching aims to be more expressive than if expressions, and
therefore to allow faster writting of complex test. For example, to
check wether a value is included in an interval of values, writing the
interval in the test of the pattern is sufficient. In the following
example, the first pattern can be rewritten as the following if
expression : 1 <= 42 && 10 > 42, the second into : 10 <= 42 && 40 >= 42, and the third one into : 42 == 41 || 42 == 42 || 42 == 43.
import std::io
def main () {
match 42 {
1 .. 10 => {
println ("The answer is between 1 and 10 not included");
}
10 ... 40 {
println ("The answer is between 10 and 40 included");
}
41 | 42 | 43 => {
println ("The answer is either 41, 42 or 43");
}
}
}
The pattern are tested in the order they are written in the source
code, thus if two pattern are valid, only the first one is
entered. For example, in the following source code, only the pattern
at line 5 is entered, and the pattern at line 6, even if
it is valid, is simply ignored.
import std::io;
def main () {
match 42 {
1 .. 100 => { println ("Between 1 and 100"); }
10 .. 100 => { println ("Between 10 and 100"); }
}
}
Variable pattern
A variable declaration can be used to store a value during the pattern
matching. The variable is declared like a standard variable
declaration but with keyword let ommitted. The variable pattern
can also be used to match over the type of the expression that is
tested, when the type of the variable can be dynamic (e.g. on class
inheritance). In all other cases the test is done during the
compilation, and the type of the newly declared variable must in any
case be fully compatible with the type of the value that is tested. In
the following example, the type of the variable patterns is always
i32, because it is the only compatible type with the type of the
value.
import std::io
def main () {
match 13 {
_ : i32 => {
println ("It is a i32, but I don't care about the value");
}
_ : i32 = 13 => {
println ("It is a i32, whose value is 13");
}
_ : _ = 13 => {
println ("It is a i32, whose value is 13, but I didn't checked the type");
}
x : i32 => {
println ("It is a i32, and the value is : ", x);
}
}
}
In the above example, every pattern tests are valid, but only the first pattern is evaluated, leading to the following result.
It is a i32, but I don't care about the value
One can note that the token : is important in that case, even if
the type is not mandatory and can be omitted (by replacing it with the
token _). This is to distinguish a variable declaration to a
simple variable referencing. For example, in the following source
code, a variable x is declared before the pattern matching, and
its value is compared with the value that is tested in the match. A
second pattern declares a variable y.
import std::io;
def main () {
let x = 42;
match 42 {
x => { println ("x == 42"); } // simple test on the variable declare 2 lines above
y : _ => { println (y); } // declaration of a new variable y that stores the matched value
}
}
Results:
x == 42
Matching over type
When the type of the value that is tested can be dynamic (i.e. class
inheritance, which is the only possibility), then the type of the
variable in the test can be used to test the type of the value. In the
following example, the class Bar and Baz inherit from the
abstract class Foo. The variable x declared in the
main function, is of type Foo meaning that it can contains
either a Bar or a Baz value. The match expression then
make a test over the type of the variable x.
import std::io;
class @abstract Foo {
self () {}
}
class Bar over Foo {
pub self () {}
}
class Baz over Foo {
pub self () {}
}
def foo ()-> &Foo {
Bar::new ()
}
def main () {
let x = foo ();
match x {
_ : &Bar => println ("Contains a Bar");
_ : &Baz => println ("Contains a Baz");
}
}
Results:
Contains a Bar
There is another pattern that can be used to test a dynamic type, that
is presented in a following sub section (cf. Destructuring class),
but pattern matching is the only way to cast a value whose type is an
ancestor class to an heir class, and this way is safe. In many
language like Java, D or C++, it is possible to use the casting
system, that has a undefined behavior in C++, makes the program crash
in Java, and returns the value null in D. These three behaviors are
not acceptable since they are not safe. By using the pattern matching,
the failing case is let to the discretion of the user. And as we have
seen in the introduction of this chapter, because a match can't have a
value if there is a possibility that none of the branch were entered,
then the user has to write a default case when the cast failed if they
want to retreive a value from the matching. This default case can of
course be used to throw an exception (cf Error
handling).
Reference variable
A mutable value can be updated inside a pattern, by using a reference variable. This works exactly like variable referencing (as presented in chapter References).
import std::io
def main () {
let mut z = 1;
match ref z {
// ^^^
// ref is important here, otherwise the compiler throw an error
ref mut x : _ => {
x = 42;
}
}
println (z);
}
Destructuring patterns
Destructuring patterns are patterns that divide the values contained in a value is type is a compound type. Compound types are 1) tuple, 2) structures and 3) classes.
Destructuring a tuple
To destructure a tuple, parentheses surrounding other patterns are
used. The arity of the destructuring pattern must be the same as the
arity of the tuple that is destructured. In the following example, a
tuple of arity 3, and type (i32, c32, f64) is
destructured, using two different patterns. The first pattern only
check the first value of the tuple (the other are always true, using
the token _), by verifying that the value is equals to 1
and putting it in the variable i. The second pattern does not do
any tests but associate the values of the tuple to the variable
x, y and z. As one can note from that test, any
pattern can be used to test inner values of the tuple, (another
destructuring pattern if the inner value is a compound type, a range
pattern, etc.)
import std::io
def main () {
let tuple = (1, 'x', 3.14)
match tuple {
(i : i32 = 1, _, _) => {
println ("This tuple has an arity of three and its first element is an i32, whose value ", i, " == 1");
}
(x : _, y : _, z : _) => {
println ("This tuple has an arity of three, and its values are : (", x, ", ", y, ", ", z, ")");
}
}
}
Results:
This tuple has an arity of three and its first element is an i32, whose value 1 == 1
Destructuring structure
Destructuring structure is made by using a call expression. The
argument of the call expressions are patterns. Unlike tuple
destructuring, there is no need to test all the values of the
structure, but only those which are relevant. The order of the fields
is respected in the destructuring (i.e. the pattern, at line 15 of the
following example, tests the value of the field x). Named
expressions can be used to test specific fields of the structure.
import std::io
struct
| x : i32
| y : i32
-> Point;
def main () {
let p = Point (1, 2);
match p {
Point (y-> 1) => {
println ("Point where y is equal to 1");
}
Point (1) => {
println ("Point where x is equal to 1");
}
Point () => {
println ("Any point");
}
}
}
Of course, any kind of pattern can be used inside a structure
destructuring, for example a variable pattern, that refers to the
values later in the content of the pattern. In the following example,
a variable p is declared to refer to the value contained in the
variable point, and a variable y is declared to refer to
the value contained in the field point.y.
import std::io
struct
| x : i32
| y : i32
-> Point;
def main () {
let point = Point (1, 2);
match point {
p : _ = Point (y-> y : i32) => {
println (p, " is a point, whose y field is equal to ", y);
}
}
}
Destructuring class
The syntax for destructuring object is the same as the syntax for
destructuring structure. However, only named expressions are
admitted, and this expressions refer to object fields that must be
public in the context of the pattern matching. For example, in the
source code below, the field x of the class Point is
public from the context of the main function, for that reason it
is accessible inside the class destructuring pattern. On the other
hand the field _y is private for the main function, thus
cannot be used.
import std::io
class Point {
pub let x : i32 = 1;
let _y : i32 = 2;
pub self () {}
}
def main () {
let p = Point::new ();
match p {
Point (x-> 1, _y-> 2) => {
println (p.x, " is a equal to 1");
}
}
}
Errors:
Error : undefined field _y for element &(main::Point)
--> main.yr:(14,17)
14 ┃ Point (x-> 1, _y-> 2) => {
╋ ^
┃ Note : i32 --> main.yr:(5,11) : _y is private within this context
┗━━━━━━
ymir1: fatal error:
compilation terminated.
We have seen in a previous section (cf. Matching over type), that
because class types are dynamic when there is inheritance, pattern
matching can be used to test the type of the values. Class
destructuring is an alternative way to check the type of a value,
whose type is a class that have heirs. The following example,
demonstrate the use of the pattern matching to retreive the center of
a Shape when it is a Circle. In this example, the
foo function lied, and returned a Rectangle instead of a
Circle, in order to be compilable the source code must manage
that case, otherwise the variable center declared at line
28 could be unset, and that is prohibited by the language.
import std::io
class @abstract Shape {
self () {}
}
class Rectangle over Shape {
pub self () {}
}
class Circle over Shape {
pub let center : i32 ;
pub self (center : i32) with center = center {}
}
/**
* Don't worry I will return you a circle
*/
def foo () -> &Shape {
Rectangle::new ()
}
def main () {
let circle = foo ();
let center = match circle {
Circle (center-> c : _) => c
};
println ("The center of the circle is : ", center);
}
Errors:
Error : match of type i32 has no default match case
--> main.yr:(28,15)
28 ┃ let center = match circle {
╋ ^^^^^
Error : undefined symbol center
--> main.yr:(31,45)
31 ┃ println ("The center of the circle is : ", center);
╋ ^^^^^^
ymir1: fatal error:
compilation terminated.
This can be corrected by adding a default case to the match expression. The following source codes are two possibilities.
-
- Setting a default value :
def main () {
let circle = foo ();
let center = match circle {
Circle (center-> c : _) => c
_ => {
println ("Foo lied ....");
0 // center is equal to 0, if foo returned something other than a Circle
}
};
println ("The center of the circle is : ", center);
}
-
- Throwing an error (cf. Error handling)
def main ()
throws &AssertError
{
let circle = foo ();
let center = match circle {
Circle (center-> c : _) => c
_ => {
throw AssertError::new ("Foo lied...");
}
};
println ("The center of the circle is : ", center);
}
A pattern using an ancestor class, will succeed if the object instance
that is used is a heir class. That is to say, if the pattern tries to
get a Shape value, when giving a Circle value to the
pattern, the pattern test succeeds. So the order has to be carefully
set (putting heir class tests first). The phenomenon is the same with
variable patterns. Contribution Add verification when a pattern
test cannot be entered because previous test is always valid.
def main () {
let circle : &Shape = Circle::new (); // Important to have a &Shape, and not a &Circle
match circle {
Shape () => {
println ("Shape");
}
Circle () => {
println ("Circle");
}
}
}
Results:
Shape
Error handling
This section will introduce error handling in the Ymir language. As
with many languages, error are managed by throwing
exceptions. Exception can be recovered thanks to scope guards that
manage the errors in different manners. The keyword throw is used to
throw an exception when an error occurs in the program. An exception
is a class that inherits the core class core::exception::Exception.
Exceptions are always recoverable, and must be managed by the user,
who cannot simply ignore them. Ymir does not allow the possibility
to ignore that an exception is thrown in a function, and may cause the
function to exit prematurely. To avoid this possibility, excpetion
must be written in the definition of the function, or managed
directly.
// Exception is defined in a core module, so does not need import
class MyError over Exception {
pub self () {}
}
def main ()
throws &MyError
{
throw MyError::new ();
}
Assert
We have seen in previous section the assert expression. This simple
expression throws an &AssertError value when the condition is
not valid. AssertError is a common exception defined in a core
file (that does not need to be imported).
def main ()
throws &AssertError
{
let i = 11;
assert (i < 10, "i must be lower than 10")
}
Rethrowing
The error rethrowing is a way of defining that a function could throw
an exception, and that this exception must be taking into account by
the caller functions. It is a system relatively close to error
rethrowing of the Java language, apart that the specific name of the
exception must be written in the possible rethrowed exceptions. That
is to say, it is impossible to write that a function throws a parent
class of the actually thrown exception (e.g. &Exception, when
the function actually throws &AssertError). Thanks to that, the
compiler is always able to check the type of the exceptions, and can
force the user to handle them.
In the following example, the function foo is an unsafe function
that can throw the exception &AssertError. This exception is
thrown by the function assert at line 6, and is not
managed by the function foo. Because the main function
calls the foo function, it is also unsafe, and also throws the
exception &AssertError. In this example, the program stops,
because of an unhandled exception.
import std::io
def foo (i : i32)
throws &AssertError
{
assert (i < 10, "i is not lower than ten");
println (i);
}
def main ()
throws &AssertError
{
foo (10);
}
Results (in debug mode, -g option):
Unhandled exception
Exception in file "/home/emile/ymir/Runtime/midgard/core/exception.yr", at line 84, in function "core::exception::abort", of type core::exception::AssertError.
╭ Stack trace :
╞═ bt ╕ #1
│ ╘═> /lib/libgyruntime.so:??
╞═ bt ╕ #2
│ ╘═> /lib/libgyruntime.so:??
╞═ bt ╕ #3 in function core::exception::abort (...)
│ ╘═> /home/emile/ymir/Runtime/midgard/core/exception.yr:84
╞═ bt ╕ #4 in function main::foo (...)
│ ╘═> /home/emile/Documents/test/ymir/main.yr:7
╞═ bt ╕ #5 in function main (...)
│ ╘═> /home/emile/Documents/test/ymir/main.yr:10
╞═ bt ╕ #6
│ ╘═> /lib/libgyruntime.so:??
╞═ bt ╕ #7 in function main
│ ╘═> /home/emile/Documents/test/ymir/main.yr:10
╞═ bt ╕ #8
│ ╘═> /lib/x86_64-linux-gnu/libc.so.6:??
╞═ bt ═ #9 in function _start
╰
Aborted (core dumped)
The compiler does not allow to forget the possibility of a error
throwing, and requires the user to write it down. In the following
example, the function foo call the function assert that
could throw an &AssertError if the test fails. In that case the
function foo can also throw an error, and that must be written
in the prototype of the function. Otherwise the compiler gives an
error.
import std::io
def foo (i : i32)
{
assert (i < 10, "i is not lower than ten");
println (i);
}
Errors:
Error : the function main::foo might throw an exception of type &(core::exception::AssertError), but that is not declared in its prototype
--> main.yr:(3,5)
3 ┃ def foo (i : i32)
╋ ^^^
┃ Note :
┃ --> main.yr:(5,2)
┃ 5 ┃ assert (i < 10, "i is not lower than ten");
┃ ╋ ^
┗━━━━━┻━
ymir1: fatal error:
compilation terminated.
As previously stated, the name of the exceptions specified in the
prototype function must be the actual name of the exception, not the
name of an ancestor. In the following example, the class
ParentException and ChildException are two throwable
class. The function foo throws an object of type
ChildException, but the prototype declares that the function
throws a ParentException object. To avoid losing accuracy, the
Ymir language does not allow that. This is however still possible to
perform this kind of behavior (necessary when the function throw
multiple kind of errors, all deriving from ParentException for
example), by using a cast, that we have seen in chapter Cast
and Dynamic
typing. That way,
there is a loss of accuracy, but properly defined and intended by the
user.
class ParentException over Exception {
pub self () {}
}
class ChildException over Exception {
pub self () {}
}
def foo ()
throws &ParentException
{
throw ChildException::new ()
}
Errors:
Error : the function main::foo might throw an exception of type &(main::ChildException), but that is not declared in its prototype
--> main.yr:(9,5)
9 ┃ def foo ()
╋ ^^^
┃ Note :
┃ --> main.yr:(12,5)
┃ 12 ┃ throw ChildException::new ()
┃ ╋ ^^^^^
┗━━━━━┻━
Error : the function main::foo prototype informs about a possible throw of an exception of type &(main::ParentException), but this is not true
--> main.yr:(9,5)
9 ┃ def foo ()
╋ ^^^
┃ Note :
┃ --> main.yr:(10,12)
┃ 10 ┃ throws &ParentException
┃ ╋ ^
┗━━━━━┻━
ymir1: fatal error:
compilation terminated.
Scope guards
Scope guards are expressions attached to a scope (block of code), that
are executed on specific cases in the scope that is guarded. There are
four different scope guards, exit, failure, success
and catch. This chapter does not discuss the catch scope
guard, that will be discussed in the next chapter.
The syntax of exit, success and failure scope guards is the following:
guarded_scope := '{' expression ((';')? expression)* (';')? '}' guards
guards := (Guard expression)* ('catch' catching_expression)? (Guard expression)*
Guard := 'exit' | 'success' | 'failure'
Success guard
Scope guards are associate with expressions, that are executed when a specific events occurs in the scope that is guarded. In the case of success scope guard, the event that triggers the guard expression, is when no error occured (nothing was thrown in the scope).
import std::io;
def foo (i : i32)
throws &AssertError
{
println ("I : ", i);
assert (i < 10, "i must be lower than 10");
} success {
println ("Nothing was thrown !!");
}
def main ()
throws &AssertError
{
foo (1);
foo (20);
}
Results:
I : 1
Nothing was thrown !!
I : 20
Unhandled exception
Exception in file "/home/emile/ymir/Runtime/midgard/core/exception.yr", at line 84, in function "core::exception::abort", of type core::exception::AssertError.
╭ Stack trace :
╞═ bt ╕ #1
│ ╘═> /lib/libgyruntime.so:??
╞═ bt ╕ #2
│ ╘═> /lib/libgyruntime.so:??
╞═ bt ╕ #3 in function core::exception::abort (...)
│ ╘═> /home/emile/ymir/Runtime/midgard/core/exception.yr:84
╞═ bt ╕ #4 in function main::foo (...)
│ ╘═> /home/emile/Documents/test/ymir/main.yr:8
╞═ bt ╕ #5 in function main (...)
│ ╘═> /home/emile/Documents/test/ymir/main.yr:12
╞═ bt ╕ #6
│ ╘═> /lib/libgyruntime.so:??
╞═ bt ╕ #7 in function main
│ ╘═> /home/emile/Documents/test/ymir/main.yr:12
╞═ bt ╕ #8
│ ╘═> /lib/x86_64-linux-gnu/libc.so.6:??
╞═ bt ═ #9 in function _start
╰
Aborted (core dumped)
This scope guard can be used on scope that never throw exceptions, in that case it is always executed. This goal of this scope guard is to execute operation at the end of a scope, only when the operation succeded (e.g. writting logs, sending acknolegement, etc.). It can be coupled with other scope guards, to perform different operation when the scope didn't succeded.
Failure guard
The failure scope guard does the opposite of the success scope guard, meaning that the associated expression is only executed when an exception was thrown in the scope that is guarded. This scope guard is really useful to perform operation without recovering from the error. Indeed, the failure guard is not a catch guard, and the execption that is thrown in the guarded scope continue its journey, but the expression in the scope guard are guaranteed to be executed (e.g. logging the error, closing a socket, unlocking a mutex, etc.).
import std::io;
def foo (i : i32)
throws &AssertError
{
println ("I : ", i);
assert (i < 10, "i must be lower than 10");
} failure {
println ("Well there was an error...");
}
def main ()
throws &AssertError
{
foo (1);
foo (20);
}
Results:
I : 1
I : 20
Well there was an error...
Unhandled exception
Exception in file "/home/emile/ymir/Runtime/midgard/core/exception.yr", at line 84, in function "core::exception::abort", of type core::exception::AssertError.
╭ Stack trace :
╞═ bt ╕ #1
│ ╘═> /lib/libgyruntime.so:??
╞═ bt ╕ #2
│ ╘═> /lib/libgyruntime.so:??
╞═ bt ╕ #3
│ ╘═> /lib/libgyruntime.so:??
╞═ bt ╕ #4 in function main::foo (...)
│ ╘═> /home/emile/Documents/test/ymir/main.yr:8
╞═ bt ╕ #5 in function main (...)
│ ╘═> /home/emile/Documents/test/ymir/main.yr:12
╞═ bt ╕ #6
│ ╘═> /lib/libgyruntime.so:??
╞═ bt ╕ #7 in function main
│ ╘═> /home/emile/Documents/test/ymir/main.yr:12
╞═ bt ╕ #8
│ ╘═> /lib/x86_64-linux-gnu/libc.so.6:??
╞═ bt ═ #9 in function _start
╰
Aborted (core dumped)
Exit guard
The exit scope guard is the combination of the success and failure guards. The operation contained in the guards are always executed, no matter what happened in the scope that is guarded. It can be seen as a shortcut for the success and failure guards doing the same operations, but avoiding code repetition.
import std::io;
def foo (i : i32)
throws &AssertError
{
println ("I : ", i);
assert (i < 10, "i must be lower than 10");
} exit {
println ("The scope is exited, with an error or not, who knows");
}
def main ()
throws &AssertError
{
foo (1);
foo (20);
}
Results:
I : 1
The scope is exited, with an error or not, who knows
I : 20
The scope is exited, with an error or not, who knows
Unhandled exception
Exception in file "/home/emile/ymir/Runtime/midgard/core/exception.yr", at line 84, in function "core::exception::abort", of type core::exception::AssertError.
╭ Stack trace :
╞═ bt ╕ #1
│ ╘═> /lib/libgyruntime.so:??
╞═ bt ╕ #2
│ ╘═> /lib/libgyruntime.so:??
╞═ bt ╕ #3
│ ╘═> /lib/libgyruntime.so:??
╞═ bt ╕ #4 in function main::foo (...)
│ ╘═> /home/emile/Documents/test/ymir/main.yr:8
╞═ bt ╕ #5 in function main (...)
│ ╘═> /home/emile/Documents/test/ymir/main.yr:12
╞═ bt ╕ #6
│ ╘═> /lib/libgyruntime.so:??
╞═ bt ╕ #7 in function main
│ ╘═> /home/emile/Documents/test/ymir/main.yr:12
╞═ bt ╕ #8
│ ╘═> /lib/x86_64-linux-gnu/libc.so.6:??
╞═ bt ═ #9 in function _start
╰
Aborted (core dumped)
Scope guard priority
It is possible to use multiple scope guards for the same scope. In that case, the order of execution of the scopes is the following :
-
- for the scope guards of same nature (e.g. two failure guards), the execution is done is the order they are written.
import std::io;
def main ()
{
{
println ("Scope operation");
} exit {
println ("Exit 1");
} exit {
println ("Exit 2");
}
}
Results:
Scope operation
Exit 1
Exit 2
-
- If there is an exit guard and a success or a failure guard, then the success and failure guards are executed first.
import std::io;
def main ()
{
{
println ("Scope operation");
} success {
println ("Success");
} exit {
println ("Exit 1");
} exit {
println ("Exit 2");
} success {
println ("Success 2");
}
}
Results:
Scope operation
Success
Success 2
Exit 1
Exit 2
-
- The priority between failure and success is not defined, they simply cannot happen at the same time.
Catching exceptions
The main idea of exception is the possibility to recover from a failing program state. In order to do that, another scope guard exits in Ymir, this scope guard is named catch. The syntax of this scope guard is relatively close to the other scope guard, and to the pattern matching. Indeed, this scope guard does not execute an expression but match over an exception that has been caught. The following code block present the grammar of the catch scope guard. The pattern_expression used in this code block are those defined in the chapter Pattern matching.
guarded_scope := '{' expression ((';')? expression)* (';')? '}' guards
guards := (Guard expression)* ('catch' catching_expression)? (Guard expression)*
Guard := 'exit' | 'success' | 'failure'
catching_expression := pattern_var | pattern_call | '_'
pattern_var := (Identifier | '_') ':' (type | '_') ('=' pattern_expression)?
pattern_call := (type | '_') '(' (pattern_argument (',' pattern_argument)*)? ')'
pattern_arguments := (Identifier '->')? pattern_expression
Catch everything
Catch scope guard can be used to catch any exception and continue
the execution of the program. In the following example, the main
function calls the foo function, that throws an
&AssertError. The call is guarded by a catch expression, that
catch every kind of Exception (using the _ token). Because
the exception of the foo function is caught the main
function is considered safe, and thus cannot throw an exception, this
is why nothing is declared in its prototype. In this example, the
program ends normaly, after exiting the main function.
import std::io;
def foo (i : i32)
throws &AssertError
{
assert (i < 10, "i must be lower than 10");
println (i);
}
def main () {
println ("Before foo");
{
foo (10);
} catch {
_ => {
println ("Foo failed");
}
}
println ("After foo");
}
Results:
Before foo
Foo failed
After foo
A variable pattern can also be used to get the value of the
exception. There is no much change in the following example, in
comparison to the previous one, except that the main function
prints the exception that has been throw by the foo function. In
debug mode (-g option of the compiler), when throwing an
exception, the stack trace is accessible and printed, when printing an
exception. This stack trace (for efficiency reasons) is not created in
release mode.
import std::io;
def foo (i : i32)
throws &AssertError
{
assert (i < 10, "i must be lower than 10");
println (i);
}
def main () {
println ("Before foo");
{
foo (10);
} catch {
err : _ => {
println ("Foo failed : ", err);
}
}
println ("After foo");
}
Results:
Before foo
Foo failed : core::exception::AssertError (i must be lower than 10):
╭ Stack trace :
╞═ bt ╕ #1 in function core::exception::AssertError::self (...)
│ ╘═> /home/emile/ymir/Runtime/midgard/core/exception.yr:49
╞═ bt ╕ #2 in function core::exception::abort (...)
│ ╘═> /home/emile/ymir/Runtime/midgard/core/exception.yr:84
╞═ bt ╕ #3 in function main::foo (...)
│ ╘═> /home/emile/Documents/test/ymir/main.yr:7
╞═ bt ╕ #4 in function main (...)
│ ╘═> /home/emile/Documents/test/ymir/main.yr:14
╞═ bt ╕ #5
│ ╘═> /lib/libgyruntime.so:??
╞═ bt ╕ #6 in function main
│ ╘═> /home/emile/Documents/test/ymir/main.yr:10
╞═ bt ╕ #7
│ ╘═> /lib/x86_64-linux-gnu/libc.so.6:??
╞═ bt ═ #8 in function _start
╰
After foo
Catch a specific exception
The content of a catch scope guard is a list of patterns, that can
be used to get a different behavior for different kind of
exception. In the following example, the foo function, can throw
two different kind of exception, &AssertError and
&OutOfArray. The catch of the main function has a
different behavior if the exception that is thrown is a
&AssertError or a &OutOfArray, (by using a variable pattern
for &AssertError, and a call pattern for &OutOfArray).
import std::io;
def foo (i : [i32])
throws &AssertError, &OutOfArray
{
assert (i [0] < 10, "i[0] must be lower than 10");
println (i);
}
def main () {
println ("Before foo");
{
foo ([]);
} catch {
err : &AssertError => {
println ("Foo failed : ", err);
}
OutOfArray () => {
println ("Foo failed, the slice was empty");
}
}
println ("After foo");
}
Results:
Before foo
Foo failed, the slice was empty
After foo
Rethrowing exceptions
Catch scope guard must catch every exceptions that are thrown by the
scope that is guarded. For example, if the main function of the
previous example, was defined as presented in the next code block, the
compiler would have returned an error. Indeed, in this example, the
&OutOfArray exception is not managed by the catch guard.
def main () {
println ("Before foo");
{
foo ([]);
} catch {
err : &AssertError => {
println ("Foo failed : ", err);
}
}
println ("After foo");
}
Errors:
Error : the exception &(core::array::OutOfArray) might be thrown but is not caught
--> main.yr:(13,7)
13 ┃ foo ([]);
╋ ^
┃ Note :
┃ --> main.yr:(14,4)
┃ 14 ┃ } catch {
┃ ╋ ^^^^^
┗━━━━━┻━
ymir1: fatal error:
compilation terminated.
The OutOfArray exception can be rethrown inside the catch
scope guard to remove this error. In that case the stack trace is
still correct, as it is created by the constructor of the
Exception class.
def main ()
throws &OutOfArray
{
println ("Before foo");
{
foo ([]);
} catch {
err : &AssertError => {
println ("Foo failed : ", err);
}
x : &OutOfArray => throw x;
}
println ("After foo");
}
Catch as a value
In some cases (many cases), a scope is used to compute a value. In
that circumstance, if an error occurs inside the scope, the value of
the scope is not set, and cannot be used. For example, in the
following source code, the main function tries to initialize a
variable from the value of the foo function. This function is
not safe, and might return no value at all. In order to guarantee,
that the variable x is initialized, and usable no matter what
happened in the foo function, the catch scope guard can be
used as the default value. This is presented as well at line 21
to initialize the variable y.
import std::io;
def foo (i : i32)
throws &AssertError
{
assert (i < 10, "i[0] must be lower than 10");
i + 12
}
def main ()
{
{
let x = foo (10);
println (x);
} catch {
_ => {
println ("Foo failed");
}
}
let y = {
foo (10)
} catch {
_ => {
42
}
}
println (y);
}
Results:
Foo failed
42
Because, the catch scope guard is a pattern matching, multiple
branch can be entered. In that case, every branch of the catch guard
must share the same type. In the following example, the value y
is set conditionaly, depending on the type of exception that is thrown
by the foo function, or if the function foo succeeds. In
this example, the foo function throws a &OutOfArray
exception, thus the variable y is set to 42 (value
computed at line 19).
import std::io;
def foo (i : [i32]) -> i32
throws &AssertError, &OutOfArray
{
assert (i[0] < 10, "i[0] must be lower than 10");
i[0] + 12
}
def main ()
{
let y = {
foo ([])
} catch {
AssertError () => {
11
}
OutOfArray () => {
42
}
}
println (y);
}
Results:
42
Catch along other scope guards
Catch scope guards can be used along other scope guards, (success, failure and exit), but there can be only one catch scope guard per scope . In that case the priority is the following: 1) failure,
- catch, 3) exit. If there is a success scope guard that is executed, then the catch scope guard cannot be executed, so the priority over these two guards is not defined.
import std::io;
def foo (i : [i32])
throws &AssertError, &OutOfArray
{
assert (i [0] < 10, "i[0] must be lower than 10");
println (i);
}
def main ()
{
println ("Before foo");
{
foo ([]);
} catch {
err : &AssertError => {
println ("Foo failed : ", err);
}
_ : &OutOfArray => {
println ("Out");
}
} success {
println ("Succ");
} failure {
println ("Fails");
} exit {
println ("Exit");
}
println ("After foo");
}
Results:
Before foo
Fails
Out
Exit
After foo
The behavior is exactly the same when catch scope guard has a value.
import std::io;
def foo (i : [i32]) -> i32
throws &AssertError, &OutOfArray
{
assert (i[0] < 10, "i[0] must be lower than 10");
i[0] + 12
}
def main ()
{
let y = {
foo ([])
} catch {
AssertError () => {
println ("Assert");
11
}
OutOfArray () => {
println ("Out");
42
}
} failure {
println ("Fails");
} exit {
println ("Exit");
}
println (y);
}
Results:
Fails
Out
Exit
42
Relation between exception and option type
We have seen in the chapter Basic programming
concept,
that the Ymir language have a primitive option type. This type has a
really close relation with exceptions. Indeed, any value can be store
inside an option type, and any failing scope can be used to create an
empty option value. The token ? is used to transform a value
into an option type.
In the following example, the foo function can throw an
exception. The main function calls it, but use enclose the
result inside an option type, to handle the errors. The type of the
variable x is then (i32)?, meaning option of i32. A
pattern matching, is then used to check wether the x contains a
value or not. In this example, a new pattern of the pattern matching
is presented. This pattern is specific to the case of option type, and
adds two keywords Ok, and error Err. They can be used with
or without internal pattern (never named), to get the content of the
option (in case of Ok), or the exception (in case of Err).
import std::io;
def foo (i : i32)-> i32
throws &AssertError
{
assert (i < 10, "i must be lower than 10");
i + 12
}
def main () {
let x = foo (10) ?
match x {
Ok (y : _) => {
println ("x contains the value : ", y);
}
Err (err : _) => {
println ("x has no value, because : ", err);
}
}
}
Results (in release mode) :
x has no value, because : core::exception::AssertError (i must be lower than 10)
One can note from the previous example, that the main function
is safe. The option enclosing catches every exceptions. The exception
can then be retreived by using a pattern matching, as presented above.
Warning Unfortunately, the accuracy of the exception type that is
thrown is lost at compile time, (i.e. the type contained inside an
option type is Exception). Even, if the type can be specifically
retreived at execution time. To remove this limitation, the different
type of exception would have to be written in the definition of the
option type. This would be extremely verbose. Contribution Maybe
adding the possibility to write it, but optionaly, in order to store
it if possible. I don't know if it is a good idea.
Empty option without exception
It is possible to initialize an empty option value without throwing an
exception. This can be done using the type specific attribute
err. In that case, the option does not have a value, even if it
is an Err value.
import std::io;
def foo ()-> i32? {
(i32?)::__err__
}
def main () {
match foo () {
Err (err : _) => {
println ("Empty but with exception : ", err);
}
Err () => {
println ("Totally empty, init with __err__");
}
}
}
Results:
Totally empty, init with __err__
Void option type
Option type can store values of type void, in that case the
Ok pattern has no value to get. This can be usefull to execute a
function, and verify afterwards if it succeeded or not.
import std::io;
def foo (i : i32)-> void
throws &AssertError
{
assert (i < 10, "i must be lower than 10");
println (i);
}
def main () {
let x : void? = foo (10) ?
match x {
Ok () => {
println ("Foo succeeded");
}
Err (err : _) => {
println ("Foo failed, because : ", err);
}
}
}
Results:
Foo failed, because : core::exception::AssertError (i must be lower than 10)
Function pointer and closure
It is impossible to create a function pointer or closure from a function that can throw exceptions. Indeed, because funtion pointers type definition does not include the possibility to throw exception (and will not for verbosity, and annoyance reason), the Ymir language does not allow them to throw exception, in order to keep the guarantee of safety introduced by exception rethrowing. For that reason, the following example is not accepted by the compiler.
import std::io;
def main () {
let x = |i : i32| => {
assert (i < 10, "i must be lower than 10");
println (i);
};
x (10);
}
Errors:
Error : a lambda function must be safe, but there are exceptions that are not caught
--> main.yr:(5,13)
5 ┃ let x = |i : i32| => {
╋ ^
┃ Note : &(core::exception::AssertError)
┃ --> main.yr:(6,9)
┃ 6 ┃ assert (i < 10, "i must be lower than 10");
┃ ╋ ^
┗━━━━━┻━
Error : undefined symbol x
--> main.yr:(10,6)
10 ┃ x (10);
╋ ^
ymir1: fatal error:
compilation terminated.
To avoid that problem, every exception must be caught inside the lambda function.
Create function pointer from unsafe function
Sometimes it can be usefull to create function pointer from functions
that are not safe (for example the function foo in the following
example). To do that, the core modules, define a template function
(cf. Templates,
named toOption that transform a function symbol, into another
function symbol that returns an option value. This other function
symbol can be used to create a function pointer, using the ampersand
(&) unary operator.
import std::io;
def foo (i : i32)-> void
throws &AssertError
{
assert (i < 10, "i must be lower than 10");
println (i);
}
def main () {
let x = & (toOption!foo);
println (x (10));
println (x (3));
}
Results:
Err(core::exception::AssertError (i must be lower than 10))
3
Ok()
Contribution This is not possible for method delegate.
Templates
The templates system provide the possibility to reuse source code, that is valid for multiple types. The template system of Ymir is powerful, and allows the generation of code, that will be used many times for many purpose, by writting minimal source code, and conditional compilation. Templates is a main part of the Ymir language, and almost everything in the standard library is written using templates. It is important to understand the template system, to use the language.
Template definition syntax
Multiple symbols in Ymir can be templates. Every template symbol has
a name, and the template parameters are following that name enclosed
between curly brackets (this time they are always mandatory). For
example, a function can be a template, as it can be seen in the
following example. In this example, the function foo takes a
type as template parameter, and this type is named T in the
function symbol, and is used as the type of the first parameter of the
function (i.e. the type of the parameter a). By convention, the
identifiers of the template parameters are in upper case, however that
is not mandatory.
def foo {T} (a : T) {
println (a);
}
Other symbols can also be templates. These symbols are :
- Classes
- Structures
- Enumerations
- Local modules
- Traits
- Aka
The templates arguments always follows the name of the symbol. In the following example, templates are defined for various symbols.
class A {T} {
let value : T;
pub self (v : T) with value = v {}
}
struct
| x : T
-> S {T};
enum
| X = cast!T (12)
-> F {T};
mod Inner {T} {
pub def foo (a : T) {
println (a);
}
}
trait Z {T} {
pub def foo (self, a : T)-> T;
}
aka X {T} = cast!T (12);
Template argument syntax
The template call syntax is declared using the token !, followed
by one are multiple arguments, enclosed inside curly
brackets. Template arguments are elements that must be known by the
compiler at compile time, in order to produce a valid template
specialization and create a symbol that can be used and is fully
validated (i.e. where every types are correctly defined). The
following code block present the syntax of the template
call. Template call is a high priority expression, that has a even
higher level of priority than the :: operator, and unary
operators. Operator priority is presented in the chapter Operator
priority.
template_call := expression (single_arg | multiple_args)
single_arg := '!' expression
multiple_args := '!' '{' (expression | template_call) (',' (expression | template_call))*)? '}'
And the following code block presents example of template call on a
function named foo.
foo!i32 (12); // One template argument (i32)
foo!(i32, f32) (12); // One template tuple (i32, f32)
foo!{i32, f64} (12); // Two template arguments, types i32 and f64
When the arguments, are also template, the curly brackets are mandatory even if there is only one parameter, to avoid ambiguity.
foo!{foo!i32} (); // Ok
foo!foo!i32 (); // No
Template instanciation
When a template symbol is defined, the template call is used to
reference it, and make a specialization. The arguments used in the
template call are associated to the template parameters of the
template symbol, in the order they are defined. In the following
example, a function foo has a template argument, that must be a
type, and is named T. The main function use the template
call syntax to use that symbol, and associate to T the type
i32. The symbol with a i32 is then created by the
compiler, and the main function calls it using the standard call
syntax using the parentheses operator.
import std::io;
def foo {T} (a : T) {
println (a);
}
def main () {
foo!i32 (42);
}
Results:
42
When the template symbol is a function, it can happened that the template parameters can be infered from the parameters of the function. For example in the above example, there is no need to specify a template call, and the standard call expression is sufficient.
import std::io;
def foo {T} (a : T) {
println (a);
}
def main () {
foo (42); // T, is infered as i32
foo ("Hi !!"); // T, is infered as a [c32]
}
Results:
42
Hi !!
This cannot be done for structure or module. However, this is possible to do on classes, and this will be presented a little later, in the following section of the chapter.
We have seen in the chapter about
function (cf.
Functions),
the uniform call syntax. This syntax is also applicable on template
functions. In the following example, a function that takes two types
as template parameters is called in the main function.
import std::io;
def foo {T} (a : T) {
println (a);
}
def main () {
(42).foo ();
}
Multiple template parameters
As said earlier the parameters are specialized using the arguments of
the template call syntax in the order they are presented. For
example, in the following example, the template call syntax at line
1 creates a symbol where T=i32, and U=f64.
def foo {T, U} () {}
def main () {
foo!{i32, f64} ();
}
It is not necessary to put all the argument in the other template
parameters can be infered from the previous template arguments, or by
the parameters of the function. We will see in a next chapter some way
to determine the kind of type that can be used in a template symbol,
but briefly in the following example, the foo function only
accepts types that are slices of U, where U can
be any type. In that case, because T can be used to infer the
type of U, there is no need to specify the type of U
explicitly.
import std::io;
def foo {T of [U], U} () {
println ("T=", T::typeid, " U=", U::typeid);
}
def main () {
foo![i32] ();
}
Results:
T=[i32] U=i32
The same behavior can be observed when the type can be infered from a
standard parameter of the function. In the following example, the type
T is defined by the template call syntax, but the type U
is defined by the first argument of the standard call. Thus, type
T is i32, and type U is f64.
import std::io;
def foo {T, U} (a : U) {
println ("T=", T::typeid, " U=", U::typeid, " a=", a, "");
}
def main () {
foo!i32 (3.14);
}
Results:
T=i32 U=f64 a=3.140000
One can note that the type T cannot be infered from anything
aside the template call. Thus it has to be the first template
parameter, otherwise the template call would have defined the type
U. In the following example, the parameter T and U
have been reversed, but the call is the same. In that case, the
compiler fails to create a valid symbol and throws an error.
import std::io;
def foo {U, T} (a : U) {
println ("T=", T::typeid, " U=", U::typeid, " a=", a, "");
}
def main () {
foo!i32 (3.14); // set U to i32, and T cannot be infered
}
Errors (in this error, we can see that U is set to i32 at line 10, and that the compiler failed to set T) :
Error : the call operator is not defined for foo {T}(a : U)-> void and {f64}
--> main.yr:(8,10)
8 ┃ foo!i32 (3.14);
╋ ^ ^
┃ Note : candidate foo --> main.yr:(3,5) : foo {T}(a : U)-> void
┃ ┃ Error : unresolved template
┃ ┃ --> main.yr:(3,13)
┃ ┃ 3 ┃ def foo {U, T} (a : U) {
┃ ┃ ╋ ^
┃ ┃ Note : for : foo --> main.yr:(3,5) with (U = i32)
┃ ┗━━━━━━
┗━━━━━┻━
ymir1: fatal error:
compilation terminated.
Using the template call syntax to set only a part of the template symbols is named a two time template validation. We will see in the next chapter, that template specialization can be very powerful and can be used to choose between multiple template symbols. Refering to a template symbol without using the template call syntax can be seen as a special case of two time validation, where the template call is made but with no arguments.
Template class instanciation
When a class template is declared, the compiler is sometimes able to
infer the type of the templates from the argument passed to the
constructors. The rule is the same as for function instanciation. In
the following example, the class X is a template class that
takes two types as template parameters. The main function
instanciate a X class at line 10 without using the
template call syntax. This is possible, because the constructor of
the class at line 6 is sufficient to infer the types T and
U exactly as it would be done if it was a function
template. Because T and U has no restriction any type can
be used.
import std::io;
class X {T, U} {
let x : T, y : U;
pub self (x : T, y : U) with x = x, y = y {}
}
def main () {
let a = X::new (1, 'r');
let b = X::new ([1, 2], "foo");
println (a::typeinfo.name);
println (b::typeinfo.name);
}
Results:
main::X(i32,c32)::X
main::X([i32],[c32])::X
A two time validation can also be used to set the types of a part of
the template parameters, and let the other be infered by the
constructor call. In the following example, the type T is set by
the template call syntax, and the type U is infered from the
type of the parameter y of the constructor (here c32).
import std::io;
class X {T, U} {
let y : U;
pub self (y : U) with y = y {}
}
def main () {
let x = X!(i32)::new ('r');
println (x::typeinfo.name);
}
Results:
main::X(i32,c32)::X
Contribution other template symbols cannot be called without template call. This is normal for modules, traits, and enumeration, as nothing can be used to infer the types. But structures are called using arguments, that are used to set the values of the fields, this is thus possible to infer the templates types in that case. Has to be done, though.
Template specialization
We have seen in the last chapter, the declaration of template symbol, that can be instanciated using any types. Sometimes, it can be usefull to restrict the set of types that can be used in a given template symbol (e.g. only slices but of any type, only classes, only structures, etc.). In order to make this possible, the Ymir language offers some elements to filter the different types that can be used.
The following code block present the complete syntax of a template parameter.
template_parameter := Identifier | of_filter | class_filter | struct_filter | impl_filter | variadic_filter
of_filter := Identifier 'of' type
class_filter := 'class' Identifier
struct_filter := 'struct' Identifier
impl_filter := Identifier impl type
variadic_filter := Identifier '...'
One can note that every template parameters have an Identifier. This
identifier are the root of the specialization tree. For example, in
the following template parameters {T of [U], U} there are two
roots, T and U. The root U is important, these
template parameters are different to {T of [U]}. In the first
case, the identifier U refers to a template type (as it is a
root of the parameters), and in the second case it refers directly to
a type that is named U, and that has to be declared somewhere.
Of filter
The of filter is declared using the keyword of. This filter is
used to specify the form of the type that can be used to instanciate
the template. The form can be any form of type, it can be for example
a slice, an array, a template symbol, etc. In the following example,
the first function foo declared at line 6, is a template
function that can be instanciated using only T=i32. The second
function foo at line 14 use the of filter to inform
that the type T must have the same form as the type Z, but
does not filter the type Z. The third function foo at line
21, accepts for the type T any slice that have as internal
type a template type declared as Z, there is no filter on
Z.
import std::io;
/**
* This function will only be callable, with a i32 as T
*/
def foo {T of i32} (_ : T) {
println ("First ??");
}
/**
* This function will only be callable, with a type that fit the Z pattern
* That is to say every type
*/
def foo {T of Z, Z} (_ : T) {
println ("Second ?");
}
/**
* This function will be only callable, with a slice of Z, where Z can be anything
*/
def foo {T of [Z], Z} (_ : T) {
println ("Third !");
}
def main () {
foo ([1, 2]);
}
In the above example, one can note that, two functions can be called
by the expression foo ([1, 2]). The second and third ones. The
template definition that match the best the types, will be used. Here,
this is the third one, the filter is more specific and thus has a
better score.
Results:
Third !
The of filter is a kind of destructuring pattern. They can be chained, and composed with other filters. Here some other example, where this time the of filter is used to get the template types parameters of a given class type, and apply some filter on them.
import std::io;
/** A template class, that takes any type as template parameters */
class X {T} {
let _x : T;
pub self (x : T) with _x = x {}
}
/**
* This function accepts any X object, as long as its template parameter is a slice
*/
def foo {T of &(X!{U}), U of [Z], Z} (x : T) {
println ("Slice X : ", x::typeinfo.name);
}
/**
* Accept all the X objects, that have not been accepted by the first function
* Indeed, the template is less specific, and is used only if the first one fails
*/
def foo {T of &(X!{U}), U} (x : T) {
println ("Not a slice X : ", x::typeinfo.name);
}
def main () {
let a = X::new ([1, 2, 3]);
let b = X::new ("Test");
let c = X::new (23.0f);
foo (a);
foo (b);
foo (c);
}
Results:
Slice X : main::X([i32])::X
Slice X : main::X([c32])::X
Not a slice X : main::X(f32)::X
As presented in the introduction of this chapter, there is a
difference between identifier that can be found in the roots of the
template parameters and those which are not. In the following example,
the foo function accept a slice of U where U is not
defined, resulting in an error by the compiler. Indeed, the type
U could have been defined somewhere, and there must be a
distinction between this type and a template parameter.
import std::io;
def foo {T of [U]} (a : T) {}
def main () {
foo ([1, 2]);
}
Errors:
Error : the call operator is not defined for foo {T of [U]}(a : T)-> void and {mut [mut i32]}
--> main.yr:(6,6)
6 ┃ foo ([1, 2]);
╋ ^ ^
┃ Note : candidate foo --> main.yr:(3,5) : foo {T of [U]}(a : T)-> void
┃ ┃ Error : undefined type U
┃ ┃ --> main.yr:(3,16)
┃ ┃ 3 ┃ def foo {T of [U]} (a : T) {}
┃ ┃ ╋ ^
┃ ┗━━━━━┻━
┗━━━━━┻━
ymir1: fatal error:
compilation terminated.
Struct and Class filters
The keywords struct and class defines respecitvely the struct
and class filters. They filter the accepted types of a template
symbol. Unlike of filter they cannot be chained, and accept only an
identifier. In the following example, the first foo function at
line 11 is instanciable using a class type, and the second at
line 15 only accept struct types. Warning class filter
accepts a reference class type, and not directly the class type
(&A not A).
import std::io
struct
| x : i32
-> X;
class A {
self () {}
}
def foo {class T} () {
println ("Class !");
}
def foo {struct T} () {
println ("Struct !");
}
def main () {
foo!(&A) ();
foo!(X) ();
}
Results:
Class !
Struct !
Even if this filters cannot be chained, they can be used as the leaf
of a of filter. In the following example, the function foo
accepts a slice of class objects.
import std::io;
class A {
pub self () {}
impl Streamable;
}
class B {
pub self () {}
impl Streamable;
}
def foo {T of [U], class U} (a : T) {
println (T::typeid, " = ", a, "");
}
def main () {
foo ([A::new (), A::new ()]);
foo ([B::new ()]);
}
Results:
[&(main::A)] = [main::A(), main::A()]
[&(main::B)] = [main::B()]
Implement filter
We have seen in the chapter about traits
(cf. Traits),
that class type can implement a given trait. Implementing a trait
gives specific method to a class type, that can be called. However
traits lose most of their interest if it is impossible to accept a
type that implements the trait without knowning the type itself. This
cannot be done by inheritance, as traits are not types, however
templates have a specific filter to perform this operation. In the
following example, the impl filter is used by the foo
function, that thus accepts any kind of object as long as they impl
the trait Getter.
import std::io;
trait Getter {
pub def get (self)-> i32;
}
class A {
pub self () {}
impl Getter {
pub over get (self)-> i32 {
12
}
}
}
def foo {T impl Getter} (a : T) -> i32 {
a.get ()
}
def main () {
let a = A::new ();
println (foo (a));
}
A trait can be a template symbol. In that case it has some template
parameters, that can be destructured by a template filter. For
example, in the following source code, the trait Getter is a
template, that is implemented using the type i32 by the class
A. The first foo function at line 1 accepts any kind
of object as long as they impl the trait Getter, and filter the
template parameter of this trait to get it under the identifier
X. The second foo function only accepts types that
implements the trait but using a slice. Because the second foo
function is more specific when using &B object, it is called at
line 44.
import std::io;
trait Getter {T} {
pub def get (self)-> T;
}
class A {
pub self () {}
impl Getter!{i32} {
pub over get (self)-> i32 {
12
}
}
}
class B {
pub self () {}
impl Getter!{[i32]} {
pub over get (self)-> [i32] {
[12, 24]
}
}
}
def foo {T impl Getter!{X}, X} (a : T) -> X {
print ("First : ");
a.get ()
}
def foo {T impl Getter!{X}, X of [U], U} (a : T)-> X {
print ("Second : ");
a.get ()
}
def main () {
let a = A::new ();
let b = B::new ();
println (foo (a));
println (foo (b));
}
Results:
First : 12
Second : [12, 24]
Variadic templates
Variadic templates are special templates, that takes an arbitrary
number of type as arguments. They are defined using an identifier
followed by the token .... When the specialization is done, the
identifier of the variadic template, can be used to define a tuple
type. In the following example, the type of the parameter a of
the foo function is (i32, i32, i32, i32, i32). Warning
If only one type is given to the variadic template, then it is not a
tuple, but directly the type that has been given. As you may have
guessed by now, the println function is a variadic template
function.
import std::io
def foo {T ...} (a : T) {
println (a.0, expand a);
}
def main () {
foo (1, 2, 3, 4, 5);
}
Results:
112345
The identifier can also be used to complete another type. For example,
a function pointer type. In the following source code, the structure
X accepts an arbitrary number of type as template parameters,
and use them to form the type of the field foo. When
instanciated by the main function at line 12, the field
foo takes the type fn (i32, f32)-> void.
import std::io
struct
| foo : fn (T)-> void
-> X {T...};
def foo (x : i32, y : f32)-> void {
println ("(", x, ", ", y, ")");
}
def main () {
let x = X!{i32, f32} (&foo);
x.foo (12, 3.14f);
}
Results:
(12, 3.140000)
To force the type to be a tuple inside another type, the standard
syntax of tuple can be used. For example, the field foo could
have been defined as follows fn ((T,))-> void, in that case it
would have been equal to fn ((i32, f32))-> void, meaning a
function pointer that takes a parameter of type (i32, f32), and
returns nothing.
Recursive variadic template
Variadic template must contain at least one type. To perfom recursive
variadic function, end case functions must be written, this end case
generally contains a standard template parameter. For example, the
following example presents a foo function that takes variadic
parameters, and prints them. The end case is described at line
3, where the function takes only one standard template
parameter. The function foo at line 8 takes two template
parameter, a standard one that will be used for the first parameter of
the function, and a variadic one for the rest of the parameters. One
can note from the line 5 that even if the type of b is
c8 and thus not a tuple, the keyword expand is usable, and
does nothing particular.
import std::io;
def foo {F, R...} (a : F, b : R) {
println ("FST : ", F::typeid, "(", a, ")");
foo (expand b);
}
def foo {F} (a : F) {
println ("SCD : ", F::typeid, "(", a, ")");
}
def main () {
foo (1, 3.f, "Test", 'r'c8);
}
Results:
FST : i32(1)
FST : f32(3.000000)
FST : [c32](Test)
SCD : c8(r)
Template values
In Ymir, templates are seen as compilation time execution
parameters. These parameters can be either types or values. When
dealing with values, as with any values, decisions and program
branching can be made, but because these values are known at
compilation time, the decisions can also be made at compilation
time. This system is called compilation time execution or cte for
short. The keyword cte is used to ensure that a part of the code
is executed at compilation time, and generates a value (that can be
void) at compilation as well, to save time at execution time and
have a better optimized executable.
Compilation time values
Basically, every values can be known at compilation time as long as
they do not implies variable, or dynamic branching. For example, the
value of the foo function in the following source code can be
knwon at compilation time. Indeed, it implies only constants, that can
be computed by the compiler directly. The main function uses the
keyword cte to force the compiler to call the function foo
during the compilation. If the keyword is omitted then the function
foo is called at execution time.
import std::io;
def foo () -> i32 {
bar () + baz ()
}
def bar () -> i32
12
def baz () -> i32
30
def main () {
let z = cte foo ();
println (z);
}
To verify that the compilation time execution effectively
happened, the option -fdump-tree-gimple can be used. This option
creates alternative files, that give information about the
compilation, and can be used to see what the frontend of the Ymir
compiler gave to the gcc compiler (source code close the C
language). The following block of code presents a part of the content
of this file. One can note that the main function does not call
the foo function, but only the println function with the
value 42.
main ()
{
{
signed int z;
z = 42;
_Y3std2io11printlnNi327printlnFi32Zv (z);
}
}
Values as template parameter
We have seen in the previous chapter that templates parameters are
used to accept types. They also can be used to accept values, in that
case the syntax - described in the following code block - is a bit
different. The syntax for template values is close to variable
declaration, using the token :, or by using directly the literal
that is accepted.
template_value := literal | Identifier ':' (Identifier | type) ('=' literal)?
Template literal
A literal that can be known at compilation time can be used to make a template specialization. The types that can be knwon at compilation time are the following :
- string ([c8] or [c32])
- char (c8 or c32)
- integer (signed or unsigned)
- float
Contribution: tuple, and struct are not compilation time knowable, but this seems possible if they only contains cte values, same for slice that are not strings.
In the following example, there are three different definition of the
function foo. The first one at line 3 can be called using
a the cte value 3, the second one at line 8 using the
value 2, and so on. The main function calls the function
foo using the value 5 - 2, so the first definition at line
3 is used.
import std::io;
def foo {3} () {
println ("3");
foo!2 ();
}
def foo {2} () {
println ("2");
foo!1 ();
}
def foo {1} () {
println ("1");
foo!0 ();
}
def foo {0} () {
println ("Go !");
}
def main () {
foo!{5 - 2} ();
}
Results:
3
2
1
Go !
Literal string can also be used as template parameter. We will see in
a forthcoming chapter that those are used for operator overloading
(cf. Operator
overloading). A
simple example is presented in the following source code, where the
foo function accepts the literal Hi I'm foo !, and is called
by the main function using different ways.
import std::io;
def foo {"Hi I'm foo !"} () {
println ("Yes that's true !");
}
def bar () -> [c32] {
"I'm foo !"
}
def main () {
foo!"Hi I'm foo !" ();
foo!{"Hi " ~ bar ()} ();
}
Results:
Yes that's true !
Yes that's true !
Template variable
Because it would be utterly exhausting to write every definitions of
the template function with every possible literals (and even
impossible when dealing with infinite types such as slice), we
introduced the possibilty of writing template variables. Unlike real
variables those are evaluated at compilation time, and can be defined
only inside template parameters. The definition syntax of template
variable is close to the definition of a standard parameter, with the
difference that the type can be a template type (containing root
identifiers, foundable inside the template parameters). The following
example presents the definition of a function that make a countdown to
0 (the generalization of the function foo presented in the
first example of the previous section). For the recursivity to stop,
the definition of a final case is mandatory, here it is achieved by
the function foo at line 8.
import std::io;
def foo {n : i32} () {
println (n);
foo!{n - 1} ();
}
def foo {0} () {
println ("Go !");
}
def main () {
foo!12 ();
}
Results:
12
11
10
9
8
7
6
5
4
3
2
1
Go !
Limitation: to avoid infinite loops, the compiler uses a very
simple verification. It is impossible to make more that 300
recursive call. For that reason, make the following call foo!300 () is impossible and generate a compilation error :
Error : undefined template operator for foo and {300}
--> main.yr:(13,5)
13 ┃ foo!300 ();
╋ ^
┃ Error : undefined template operator for foo and {300}
┃ --> main.yr:(13,5)
┃ 13 ┃ foo!300 ();
┃ ╋ ^
┃ ┃ Note : in template specialization
┃ ┃ --> main.yr:(13,5)
┃ ┃ 13 ┃ foo!300 ();
┃ ┃ ╋ ^
┃ ┃ Note : foo --> main.yr:(3,5) -> foo
┃ ┃ Error : undefined template operator for foo and {299}
┃ ┃ --> main.yr:(5,5)
┃ ┃ 5 ┃ foo!{n - 1} ();
┃ ┃ ╋ ^
┃ ┃ ┃ Error : undefined template operator for foo and {299}
┃ ┃ ┃ --> main.yr:(5,5)
┃ ┃ ┃ 5 ┃ foo!{n - 1} ();
┃ ┃ ┃ ╋ ^
┃ ┃ ┃ ┃ : ...
┃ ┃ ┃ ┃ Note : there are other errors, use option -v to show them
┃ ┃ ┃ ┃ Error : undefined template operator for foo and {2}
┃ ┃ ┃ ┃ --> main.yr:(5,5)
┃ ┃ ┃ ┃ 5 ┃ foo!{n - 1} ();
┃ ┃ ┃ ┃ ╋ ^
┃ ┃ ┃ ┃ ┃ Note : in template specialization
┃ ┃ ┃ ┃ ┃ --> main.yr:(5,5)
┃ ┃ ┃ ┃ ┃ 5 ┃ foo!{n - 1} ();
┃ ┃ ┃ ┃ ┃ ╋ ^
┃ ┃ ┃ ┃ ┃ Note : foo --> main.yr:(3,5) -> foo
┃ ┃ ┃ ┃ ┃ Error : undefined template operator for foo and {1}
┃ ┃ ┃ ┃ ┃ --> main.yr:(5,5)
┃ ┃ ┃ ┃ ┃ 5 ┃ foo!{n - 1} ();
┃ ┃ ┃ ┃ ┃ ╋ ^
┃ ┃ ┃ ┃ ┃ ┃ Error : undefined template operator for foo and {1}
┃ ┃ ┃ ┃ ┃ ┃ --> main.yr:(5,5)
┃ ┃ ┃ ┃ ┃ ┃ 5 ┃ foo!{n - 1} ();
┃ ┃ ┃ ┃ ┃ ┃ ╋ ^
┃ ┃ ┃ ┃ ┃ ┃ ┃ Note : in template specialization
┃ ┃ ┃ ┃ ┃ ┃ ┃ --> main.yr:(5,5)
┃ ┃ ┃ ┃ ┃ ┃ ┃ 5 ┃ foo!{n - 1} ();
┃ ┃ ┃ ┃ ┃ ┃ ┃ ╋ ^
┃ ┃ ┃ ┃ ┃ ┃ ┃ Note : foo --> main.yr:(3,5) -> foo
┃ ┃ ┃ ┃ ┃ ┃ ┃ Error : limit of template recursion reached 300
┃ ┃ ┃ ┃ ┃ ┃ ┃ --> main.yr:(3,5)
┃ ┃ ┃ ┃ ┃ ┃ ┃ 3 ┃ def foo {n : i32} () {
┃ ┃ ┃ ┃ ┃ ┃ ┃ ╋ ^^^
┃ ┃ ┃ ┃ ┃ ┃ ┗━━━━━┻━
┃ ┃ ┃ ┃ ┃ ┗━━━━━┻━
┃ ┃ ┃ ┃ ┗━━━━━┻━
┃ ┃ ┃ ┗━━━━━┻━
┃ ┃ ┗━━━━━┻━
┃ ┗━━━━━┻━
┗━━━━━┻━
ymir1: fatal error:
compilation terminated.
Contribution: add an option to the compiler to change this
value of 300.
Template type for template variable
The type of a cte variable can be a template. In that case the used
template identifiers must be roots of the template parameters (exactly
the same behavior as the of filter). In the following example, the
function foo takes a value as template parameter, the type of
this value can be anything as long as it can be known at compile time.
import std::io;
def foo {N : T, T} () {
println (T::typeid, "(", N, ")");
}
def main () {
foo!42 ();
foo!"Hi !" ();
}
Results:
i32(42)
[c32](Hi !)
Compilation time values, can also be used to get the size of a
static array at compilation time, and make a template function that
accepts arrays of any size. This evidently works only on static
arrays, and not on slice, because the size of the array has to be
knwon at compilation time. However, this would not be necessary when
using slice, because function accepting slice as parameter already
accepts slices of any size.
import std::io
def foo {ARRAY of [T; N], T, N : usize} (a : ARRAY) {
println ("Got an array of ", T::typeid, " of size : ", N);
println (a);
}
def main () {
let array = [0; 10u64];
foo (array);
}
Results:
Got an array of i32 of size : 10
[0, 0, 0, 0, 0, 0, 0, 0, 0, 0]
Function pointers
Lambda functions and function pointers can be compile time knwon
values. This is not the case for closure, and method delegates. Unlike
function pointers, template function are statically written in the
generated executable, thus more efficient (even if we are talking of
marginal gain). To accept a function pointer, a template variable must
be defined in the template parameters. In the following example, the
function foo accepts a function pointer, that takes two
parameters, and return a value of the same type of the
parameters. This type seems to be unknown and is not inferable from
the lambda function that is passed to the function at line 13,
but is infered from the execution time parameters passed to the
function. At line 14, one can note that a standard function can
be used as a template variable.
import std::io;
def foo {F : fn (X, X)-> X, X} (a : X, b : X) {
println ("Foo : ", F (a, b));
}
def bar (a : i32, b : i32) -> i32 {
a * b
}
def main () {
foo!{|x, y| => x + y} (11, 31);
foo!bar (6, 7);
}
Results
Foo : 42
Foo : 42
In the following example, the function pointer this time return a
different type from the type of the parameters it takes. This function
foo applies this function pointer to all element of the slice it
takes as parameters.
import std::io;
def foo {F : fn (X)-> Y, X, Y} (a : [X]) {
for i in a {
println ("Foo : ", F (i));
}
}
def main () {
foo!{|x| => cast!i64 (x) + 12i64} ([1, 2, 3]);
}
Results:
Foo : 13
Foo : 14
Foo : 15
Template values
In the previous chapter, we saw that some values can be known at the time of compilation. These values can be used for the compiler to decide which part of the code should be compiled and which part should not, using branching operations.
Compile time condition
The keyword cte is used to inform the compiler that a value can
be known at compile time, and must be evaluated during the
compilation. It is not the default behavior of the compiler, as the
compilation would be extremely long, if every values had to be
checked. This keyword can be used on if expression to execute the
condition at compile time, and evaluate compile only a part of the
source code. In the following example, an if expression is used to
check if the template value that is passed to the foo function
was lower than 10. Because it is the case only the scope of the
if expression is compiled (not the scope of the else), that is why
even if the scope of the else part has no sense in term of types,
the compiler does not return any error.
import std::io;
def foo {X : i32} () {
cte if X < 10 {
println ("X is < 10 : ", X);
} else {
println (X + "foo");
}
}
def main () {
foo!{2} ();
}
Results:
X is < 10 : 2
As normal if expression, cte if expression can be chained,
however the keyword cte must be repeated before each if expression
otherwise the compiler consideres that they are execution time if
expression.
import std::io;
def foo {X : i32} () {
cte if X < 10 {
println ("X is < 10 : ", X);
} else cte if X < 25 {
println ("X is < 25 : ", X);
} else {
println ("X is > 25 : ", X);
}
}
def main () {
foo!{2} ();
foo!{14} ();
foo!{38} ();
}
X is < 10 : 2
X is < 25 : 14
X is > 25 : 38
Is expression
The is expression (that must not be confused with the is operator applicable only on pointers) is used to check template specialization, and gives a cte bool value. The syntax of the is expression is similar to the syntax of a template call, following by template parameters, as presented in the following code block. The template parameters are used to create a specialization from the template arguments.
is_expression := 'is' '!' (single_arg | multiple_args) '{' (template_parameter (',' template_parameter)*)? '}'
In the following example, the foo function accepts any kind of
type as template parameter, and a cte if expression is used to apply
a different behavior depending on the type of X. The first test
at line 1 works if the X is a i32, the second at
line 2 works if X is a slice of anything.
import std::io;
def foo {X} () {
cte if is!{X} {T of i32} {
println ("Is a i32");
} else cte if is!{X} {T of [U], U} {
println ("Is a slice");
} else cte if is!{X} {T of [U; N], U, N : usize} {
println ("Is a static array");
} else {
println ("I don't know ...");
}
}
def main () {
foo!i32 ();
foo![i32] ();
foo![i32 ; 4us] ();
foo!f32 ();
}
Results:
Is a i32
Is a slice
Is a static array
I don't know ...
Warning An is expression is not a complete template specialization, it is not attached to any code block. Thus the variable declared inside the expression are not accessible from anywhere. It is a volontary limitation, if the variable are to be used a declaration such as a function, must be made.
Cte assert
The keyword cte can be used on an assert expression. In
that case the condition of the assertion must be known at compilation
time. If the value of the condition is false, then an error is thrown
by the compiler, with the associated message. In the following
example, the assert test wether the template class T implements
the traits Hashable, and throws an explicit error message.
trait Useless {}
class X {class T} {
cte assert (is!T {U impl Useless}, T::typeid ~ " does not implement Useless");
pub self () {}
}
class B {}
def main () {
let _ = X!{&B}::new ();
}
Errors:
Note :
--> main.yr:(12,14)
12 ┃ let _ = X!{&B}::new ();
╋ ^
┃ Error : undefined template operator for X and {&(main::B)}
┃ --> main.yr:(12,14)
┃ 12 ┃ let _ = X!{&B}::new ();
┃ ╋ ^
┃ ┃ Note : in template specialization
┃ ┃ --> main.yr:(12,14)
┃ ┃ 12 ┃ let _ = X!{&B}::new ();
┃ ┃ ╋ ^
┃ ┃ Note : X --> main.yr:(3,7) -> X
┃ ┃ Error : assertion failed : main::B does not implement Useless
┃ ┃ --> main.yr:(4,9)
┃ ┃ 4 ┃ cte assert (is!T {U impl Useless}, T::typeid ~ " does not implement Useless");
┃ ┃ ╋ ^^^^^^
┃ ┗━━━━━┻━
┗━━━━━┻━
ymir1: fatal error:
compilation terminated.
Condition on template definition
Every template symbol can have a complex condition that is executed at
compilation time. This condition is executed when all the template
parameter have been infered, and can be used to add further test on
the template parameters that cannot be done by the syntax provided by
Ymir (for example accept either a i32 or a i64). The
test is defined using the if keyword followed by an expression,
the value of the expression must be known at compilation time. In this
expression the template parameters can be used. The if keyword
always followes the keyword that is used to declare the symbol
(def for function, class for classes, etc.), unlike the
template parameters that always follow the identifier of the symbol.
class if (is!T {U of i32}) A {T} {
let value : T;
pub self if (is!U {J of T}) {U} (v : U) with value = v {}
}
struct if (is!T {U of f64})
| x : T
-> S {T};
enum if (is!T {U of f64})
| X = cast!T (12)
-> F {T};
mod if (is!T {U of f64}) Inner {T} {
pub def foo (a : T) {
println (a);
}
}
trait if (is!T {U of f64}) Z {T} {
pub def foo (self, a : T)-> T;
}
aka if (is!T {U of f64}) X {T} = cast!T (12);
In the following example, the function foo have a simple
template specialization, but only accepts i32 or i64
types, thanks to the condition test. Because u64 is not
accepted, the compiler throws an error due to line 10.
import std::io;
def if (is!{X}{T of i32} || is!{X}{T of i64}) foo {X} (x : X) {
println (x);
}
def main () {
foo (12);
foo (12i64);
foo (34u64);
}
Errors:
Error : the call operator is not defined for foo {X}(x : X)-> void and {u64}
--> main.yr:(10,6)
10 ┃ foo (34u64);
╋ ^ ^
┃ Note : candidate foo --> main.yr:(3,47) : foo {X}(x : X)-> void
┃ ┃ Error : the test of the template failed with {X -> u64} specialization
┃ ┃ --> main.yr:(3,26)
┃ ┃ 3 ┃ def if (is!{X}{T of i32} || is!{X}{T of i64}) foo {X} (x : X) {
┃ ┃ ╋ ^^
┃ ┗━━━━━┻━
┗━━━━━┻━
ymir1: fatal error:
compilation terminated.
Template symbol with condition have a the same score than template
with the same template specialization but without a condition. For
that reason, in the following example, the call of foo at line
12 create an error by the compiler. To avoid this error, the
reverse test must be added to the function foo defined at line
7.
import std::io;
def if (is!{X}{T of i32} || is!{X}{T of i64}) foo {X} (x : X) {
println ("First : ", x);
}
def foo {X} (x : X) {
println ("Second : ", x);
}
def main () {
foo (12);
}
Errors:
Error : {foo {X}(x : X)-> void, foo {X}(x : X)-> void} x 2 called with {i32} work with both
--> main.yr:(12,6)
12 ┃ foo (12);
╋ ^
┃ Note : candidate foo --> main.yr:(3,47) : main::foo(i32)::foo (x : i32)-> void
┃ Note : candidate foo --> main.yr:(7,5) : main::foo(i32)::foo (x : i32)-> void
┗━━━━━━
ymir1: fatal error:
compilation terminated.
Common tests
The module std::traits of the standard library defines some
cte function that can be used to add more complex test of the type
in template condition.
| Function | Result |
|---|---|
isFloating | true for f32 and f64 |
isIntegral | true for any integral types (signed and unsigned) |
isSigned | true for any integral types that are signed |
isUnsigned | true for any integral types that are unsigned |
isChar | true for c8 and c32 |
isTuple | true for any tuple type |
import std::io, std::traits;
def if (isIntegral!{T} ()) foo {T} () {
println ("Accept any integral type");
}
def if (isFloating!{T} ()) foo {T} () {
println ("Accept any floating type");
}
def main () {
foo!i32 ();
foo!u64 ();
foo!f32 ();
}
Results:
Accept any integral type
Accept any integral type
Accept any floating type
Common traits
Ymir defines some common traits, that are either in the core files (automatically imported modules), or in the std. This chapters presents some of the traits that are important.
Streamable
Streamable objects are objects that can be put inside a
StringStream. These objects are also printable, using the
standard print or println functions. Streamable trait
has a default behavior, that consist in writting the typeid of the
class, followed by every fields (private and protected included) of
the class inside the stream.
Print objects to stdout
In the following example, two classes implements the traits
Streamable, and are printed to stdout. The first class Foo
does not redefine the behavior of the trait, on the other hand
Bar does.
import std::io; // the trait is accessible from std::io, or std::stream
class Foo {
let _i = 12;
let _j = "Foo";
pub self () {}
impl Streamable;
}
class Bar {
pub self () {}
impl Streamable {
pub over toStream (self, dmut stream : &StringStream)-> void {
stream:.write ("{I am a Bar}"s8);
}
}
}
def main () {
let a = Foo::new ();
let b = Bar::new ();
println (a);
println (b);
}
Results:
main::Foo(12, Foo)
{I am a Bar}
Write objects to StringStream
The Streamable trait is originaly used to transform an object
into a [c8], inside a &StringStream. StringStream is
a class provided by the module std::stream that transform types
into a growing string, in a efficient manner, to avoid unefficient
string concatenation. In the following example, instead of using the
print function, provided by std::io, the objects are added
to a StringStream, that is then printed to stdout.
import std::io; // io publically import std::stream
class Foo {
let _i = 12;
let _j = "Foo";
pub self () {}
impl Streamable;
}
class Bar {
pub self () {}
impl Streamable {
pub over toStream (self, dmut stream : &StringStream)-> void {
stream:.write ("{I am a Bar}"s8);
}
}
}
def main () {
let a = Foo::new ();
let b = Bar::new ();
let dmut stream = StringStream::new ();
a.toStream (alias stream);
stream:.write ("\n"s8) // write returns the stream
:.writeln (b) // the method write of a stringstream call the method toStream
:.write ("Hello : ", 42); // everything can be added inside a stringstream
println (stream []); // the operator [], gets the slice [c8] contained inside the stream (without copying it).
}
Results:
main::Foo(12, Foo)
{I am a Bar}
Hello : 42
Copiable
Copiable trait is a core trait, (defined in a core file, thus does
not need to be imported). This trait is used to override the
dcopy operator on a class. Contribution: for the moment
there is no default behavior for the Copiable trait, even if it is
completely possible. Copiable trait defines a method deepCopy
that takes a immutable object instance, and return a deeply mutable
one.
import std::io;
class Foo {
let mut _type : [c8];
pub self () with _type = "I am an original"s8 {}
pub def change (mut self) {
self._type = "I am modified"s8;
}
impl Copiable;
impl Streamable; // convinient for debugging
}
def main () {
let dmut a = Foo::new ();
let dmut b = dcopy a; // same as alias (a.deepCopy ())
b:.change ();
println (a);
println (b);
}
Results:
main::Foo(I am an original)
main::Foo(I am modified)
Disposable
Disposable trait is a trait used to perform an operation at the end
of the life of an object instance. Unlike class destructor, the
dispose operation must be called by hand. There is no default behavior
for the Disposable trait. This trait can be coupled with the
with scope guard. Briefly in a word, this scope guards define a
variable (or a list of variable), like the let statement, but
ensure that it is disposed when the scope is exited, no matter what
happend in the scope. The Disposable trait is commonly used for
unmanaged memory (File, TcpStream, Mutex, ...).
import std::io;
class Foo {
pub self () {}
impl Disposable {
pub over dispose (mut self) {
println ("I am disposed");
}
}
impl Streamable;
}
def main () {
with dmut a = Foo::new () {
println (a);
}
println ("After a");
}
Results :
main::Foo()
I am disposed
After a
A good practice is to call the dispose method inside the
destructor of the class. This way, even if the class was not disposed
by hand, it is disposed when the garbage collector destroy the
instance. (Warning to avoid multiple disposing the method
dispose shoud verify that the object is not already disposed,
e.g. the method can be called twice by hand, or first by hand, and
then by the destructor).
Hashable
Hashable trait (importable from std::hash) is used to
transform an object instance into a u64. The interest is to
easily compare objects, for example in
std::collection::map::HashMap, or
std::collection::set::HashSet. Hashable classes can be used in
these collections as key. A default behavior is defined in this trait,
but the method hash can be redefined, it takes a immutable
object instance as parameter, and return a u64 value.
import std::io;
import std::collection::map;
import std::hash;
class Foo {
let _v : [c8];
pub self (v : [c8]) with _v = v {}
impl Hashable, Streamable;
}
def main () {
let dmut coll = HashMap!{&Foo, i32}::new ();
coll:.insert (Foo::new ("X"s8), 12);
coll:.insert (Foo::new ("Y"s8), 34);
println (coll);
println (Foo::new ("X"s8) in coll);
}
Results:
{main::Foo(X)=>12, main::Foo(Y)=>34}
true
Packable
Packable trait (importable from std::net::packet) defines two
methods pack and unpack. There is a default behavior for
those two methods, and it is recommended to not override them, unless
you know exactly what you are doing. The pack method takes a
immutable object instance as parameter and creates a packet of
[u8], encoding the object. This packet can then be sent throw
network, and unpack from another processes.
import std::io;
import std::net::packet;
class Foo {
let _v : [c8];
pub self (v : [c8]) with _v = v {}
impl Packable;
}
def main () {
let a = Foo::new ("Test"s8);
let packet = a.pack ();
println (packet);
}
Results :
[9, 0, 0, 0, 0, 0, 0, 0, 34, 6d, 61, 69, 6e, 33, 46, 6f, 6f, 4, 0, 0, 0, 0, 0, 0, 0, 54, 65, 73, 74]
The packet can then be unpacked with the function unpack. This
function returns an Object, that can be transformed in the
appropriate type using pattern matching.
{
match unpack (packet) {
x : &Foo => println (x);
_ => {
println ("Unkown packet");
}
}
} catch {
UnpackError () => {
println ("The packet contains unknwon information");
}
}
Results:
main::Foo(Test)
Warning to work properly, the unpacker must have access to the
type information of the object that is packed. Otherwise, an
UnpackError is thrown. To make the symbol available in the unpacking
program, the class must be compiled and linked in it. For example, if
a module foo contains a class Foo, and the unpacking is
made inside the **main module. The command line of the compilation
must be :
gyc main.yr foo.yr
It is possible to verify that the symbol are present in the
executable, by running the following command (example for the class
Foo of the previous example).
$ objdump -t a.out | grep Foo
0000000000410585 g F .text 00000000000004a0 _Y3std3net6packet8Packable27__stdnetwork__unpackContentFxP9x3foo3FooSu8Zusize
0000000000447300 w O .data 0000000000000030 _Y3foo3FooTI
0000000000410a25 g F .text 000000000000006e _Y3std3net6packet8Packable25__stdnetwork__packContentFP83foo3FooxP32x3std10collection3vec6VecNu83VecZv
000000000040eb82 g F .text 0000000000000054 _Y3foo3Foo4selfFxP9x3foo3FooSc8ZxP9x3foo3Foo
00000000004472f0 w O .data 0000000000000010 _Y133foo3Foo_nameCSTxSc32
0000000000447340 w O .data 0000000000000030 _Y3foo3FooVT
000000000040f468 g F .text 0000000000000093 _Y3std3net6packet8Packable4packFP83foo3FooxP32x3std10collection3vec6VecNu83VecZv
000000000040f381 g F .text 00000000000000e7 _Y3std3net6packet8Packable4packFP83foo3FooZSu8
00000000004472c0 w O .data 0000000000000024 _Y183foo3Foo_nameInnerCSTxA9c32
In the result of this command, the symbol _Y3foo3FooTI is
present, this is the symbol containing the type info of the
foo::Foo class, _Y3foo3FooVT contains the vtable, and
_Y3std3net6packet8Packable27__stdnetwork__unpackContentFxP9x3foo3FooSu8Zusize
the function called to unpack the object. These are the three
mandatory symbols to successfully unpack a object (the other symbols
are necessarily there if the vtable is present).
I think this is not a strong problem, as it can be easily resolved; but must be taken into account when compiling the program.
Contribution: Almost every types are packable. I think the only two types that are not are function pointer and closure. I see how function pointer packing can be done, and it is not difficult and will be done in future version of the std. On the other hand, because the type info of the closure is not accessible, i don't see any way of packing this type. In any case, closure behavior can be easily simulated by using a object instance, or a structure and a function pointer. And trying to pack a not packable type creates compile time errors, so there is no bad surprise at runtime.
Serializable
Like Packable trait, Serializable is a trait that transform an
object instance into something that can be stored, or sent. However,
unlike Packable, the result is humanely readable, and can be used to
create configuration files for example (current std implements
toml and json serialization). Serializable objects
implements the method serialize. It has no default behavior
(Contribution it is however probably possible to create a default
behavior based on the name of the fields). This method takes an
immutable object instance, and return a &Config value.
import std::io;
import std::config::conv;
import std::config, std::config::toml;
struct
| A : &Foo
| B : &Foo
-> Bar;
class Foo {
let _v : [c32];
let _u : i32;
pub self (v : [c32], u : i32) with _v = v, _u = u{
}
impl Serializable {
pub over serialize (self)-> &Config {
let dmut d = Dict::new ();
d:.insert ("v", self._v.to!(&Config) ());
d:.insert ("u", self._u.to!(&Config) ());
d
}
}
}
def main () {
let x = Bar (Foo::new ("Test", 12), Foo::new ("Test2", 34));
println (toml::dump (x.to!(&Config) ()));
}
Results :
[A]
u = 12
v = "Test"
[B]
u = 34
v = "Test2"
Operator overloading
Ymir proposes the possibility of overloading the operators. The operator overload is done by rewriting the operations applied on objects operands. No new syntax is used to define operator overloading, as compilation time values (cf. ) are used.
There are multiple types of operators that can be overloaded, the unary operators, binary operators, comparison operators, access operator, contain operator, and the for loop. The presentation is divided in two parts, the first one presents the operator that are generally applicable to any type, and the second part presents the operator overloading of set objects.
Simple operator overloading
This chapter presents the standard operator overloading : unary, binary and comparison.
Unary operator
Unary operators are operators that are applied to only one
operand. The overloading of the operator is made by defining a
template method inside the class definition. The name of the template
method must be opUnary, and must take a template value as first
argument. The table bellow lists the rewrite operations that are done
by the compiler to call the correct template method for operator
overloading.
| expression | rewrite |
|---|---|
| -e | e.opUnary!("-") |
| *e | e.opUnary!("*") |
| !e | e.opUnary!("!") |
In the following example, the class A has two opUnary
methods. The first one at line 8, is applicable with the operator
-, and the second one at line 12 is applicable with any
other operators.
import std::io;
class A {
let _a : f32;
pub self (a : f32) with _a = a {}
pub def opUnary {"-"} (self) -> &A {
A::new (-self._a)
}
pub def opUnary {op : [c32]} (self) -> &A {
cte if (op == "!") // op is compile time known
A::new (1.f / self._a)
else // operator '+'
self
}
impl Streamable;
}
def main () {
let a = A::new (10.0f);
println (!a);
}
This example, call the method defined at line 12 by using the
operator !. In this method the value of op is known at
compile time, and thus can be compared (also at compile time). The
! unary operator is defined for the class A as giving the
inverse of the value stored in the object, thus the result is the
following :
main::A(0.10000)
Binary operator
Binary operators are also overloadable. As for unary operators, the overloading of binary operators is made by code rewritting at compile time. In the case of binary operators, the operation involves two different operands, one of them must be an object instance.
The following operators are overloadable. The use indicated in the left column is only an indication and corresponds to the common use of these operators, but they can of course be used for other purposes.
+ |
- |
* |
/ |
% |
^^ |
|
| |
& |
^ |
<< |
>> |
||
~ |
The following example presents a class A that overload the
operator + and - using a i32 as a second operand.
import std::io;
class A {
let _a : i32;
pub self (a : i32) with _a = a {}
pub def opBinary {"+"} (self, a : i32) -> &A {
A::new (self._a + a)
}
pub def opBinary {"-"} (self, a : i32) -> &A {
A::new (self._a - a)
}
impl Streamable;
}
def main () {
let a = A::new (12);
println (a - 30);
}
Results:
main::A(-18)
Because there are two operands (sometimes of different types), binary
operation can sometimes be not commutative (for example the math
binary operator -). To resolve that problem the rewritting is
made in two different steps, the first step tries to rewritte the
operation using the method opBinary, if this first rewritte
failed a second rewritte is made, but this time using the right
operand and by calling the method opBinaryRight. If the right
operator is not defined, the compiler does not try to make the
operation commutative, the two methods must be defined.
import std::io;
class A {
let _a : i32;
pub self (a : i32) with _a = a {}
pub def opBinaryRight {"-"} (self, a : i32) -> &A {
A::new (a - self._a)
}
impl Streamable;
}
def main () {
let a = A::new (12);
println (54 - a);
}
Results:
main::A(42)
Limitations
For the moment, templates method cannot be overriden by children classes. For that reason, it is impossible to override the behavior of the binary operator of an ancestor class. The limitation is the same for unary operators. However, to allow such behavior, the overloading method can call a standard method (without template), that is overridable by a children class. An example is presented in the following source code.
import std::io
class A {
let _i : i32;
pub self (i : i32) with _i = i {}
pub def opBinary {"+"} (self, i : i32) -> &A {
self.add (i)
}
pub def add (self, i : i32)-> &A {
A::new (i + self._i)
}
impl Streamable;
}
class B over A {
pub self (i : i32) with super (i) {}
pub over add (self, i : i32)-> &A {
B::new (i * self._i)
}
impl Streamable;
}
def main () {
let mi = B::new (8);
println (mi + 8);
}
Contribution How to override template method is currently under discussion ! But it seems impossible for many reasons that are not discussed here, you can contact us for more information.
Comparison operators
The equality and comparison are treated via two different methods
opEquals and opCmp. Because while almost all types can be compared
for equality, only some have meaningful order comparison.
The opCmp method is used for the operators <, >, <= and >=
only. And the method opEquals is used for the operator == and
!=. When the method opEquals is not defined for the type, the
compiler will try to use the method opCmp instead. When both the
methods are defined, it is up to the user to ensure that these two
functions are consistent.
Indeed, it is impossible to verify that in a general case. For example
the operator < can be used on a set object, where the operator
x < y stand for x is a strict subset of y. Therefore, even if
neither x < y and y < x are true, the equality x == y is not
implied.
Overloading == and !=
The method opEquals is a simple method, that does not take
template arguments. Expressions of the form a != b, are rewritten
into !(a == b), therefore there is only one method to define.
import std::io
class Point {
let x : i32, y : i32;
pub self (x : i32, y : i32) with x = x, y = y {}
pub def opEquals (self, other : &Point) -> bool {
self.x == other.x && self.y == other.y
}
}
def main ()
throws &AssertError
{
let a = Point::new (1, 2);
let b = Point::new (2, 3);
let c = Point::new (1, 2);
assert (a == c);
assert (a != b);
}
The operator opEquals is assumed commutative, thus when the
operator is only defined for the type on the right operand, the
operation will simply be rewritten reversely. The following example
presents such a case, where the operator opEquals is only
defined by the class A. The line 19 is simple rewritten into
mi.opEquals (8).
import std::io
class MyInt {
let i : i32;
pub self (i : i32) with i = i {}
pub def opEquals (self, i : i32) -> bool {
self.i == i
}
}
def main ()
throws &AssertError
{
let mi = MyInt::new (8);
assert (8 == mi);
}
Overloading <, >, <= and >=
The method opCmp is used to compare an object to another
value. The comparison unlike equality evaluation, gives a comparison
order between two values. The method opCmp does not take any
template parameter, but returns an integer value. A negative value
meaning that the left operand is lower than the right operand, an
positive value, that the left operand is higher than the right one,
and a nul value that both operands are equals.
The following table lists the possible rewritting of the comparison operators. As we can see in this table, the operator is assumed to be not commutative, thus if the first rewritting fails to compile (for type reason), then the second rewritting is used.
| comparison | rewrite 1 | rewrite 2 |
|---|---|---|
| a < b | a.opCmp (b) < 0 | b.opCmp (a) > 0 |
| a > b | a.opCmp (b) > 0 | b.opCmp (a) < 0 |
| a <= b | a.opCmp (b) <= 0 | b.opCmp (a) >= 0 |
| a >= b | a.opCmp (b) >= 0 | b.opCmp (a) >= 0 |
In the following example, a comparison operator is used at line
19, the rewritting (7).opCmp (mi) < 0 does not compile,
because 7 is not an object value, and thus does not have any
method. The second rewritting is thus used, mi.opCmp (7) > 0.
import std::io
class MyInt {
let i : i32;
pub self (i : i32) with i = i {}
pub def opCmp (self, i : i32) -> i32 {
self.i - i
}
}
def main ()
throws &AssertError
{
let mi = MyInt::new (8);
assert (7 < mi);
}
Assignment
The assignment operator is not overloadable, it will always perform
the same operation. However, the shortcut operators +=, -=,
*= etc, are usable on object when oveloading the binary
operator. This operation is simply rewritten at compilation time, for
example the expression a += 12 is rewritten into a = a.opBinary!{"+"}(12). The following example presents an utilisation
example of the += shortcut.
import std::io
class MyInt {
let _i : i32;
pub self (i : i32) with _i = i {}
pub def opBinary {"+"} (self, a : i32)-> &MyInt {
MyInt::new (self._i + a)
}
impl Streamable;
}
def main () {
let mut mi = MyInt::new (8);
mi += 9;
println (mi);
}
Results:
main::MyInt(17)
One can note that the instance of the object stored in the variable
mi is changed after the affectation. This is the standard
behavior of the = operator.
Set operators
In this chapter are presented the operators related to set object. The operators are : access, contains and iteration operators.
Access operator
The operator of index [] is overloadable by the method
opIndex. This method is called with the parameters passed inside of
the brackets of the index operator. For example, the following
operation a [b, c, d] is rewritten into a.opIndex (b, c, d).
import std::io
class A {
let dmut i : [i32];
pub self (a : [i32]) with i = copy a {}
pub def opIndex (self, x : i32) -> i32
throws &OutOfArray
{
self.i [x]
}
impl Streamable;
}
def main ()
throws &OutOfArray, &AssertError
{
let i = A::new ([1, 2, 3]);
assert (i [2] == 3);
}
One can note from the above example, that the object stored in i
is immutable, and that the opIndex is always a right operand. It
is possible to modify the values inside the i object (if it is
mutable) using the opIndexAssign method. This method rewritte
the assignement operation where the left operand is an access
operation. The following example presents an example of usage of this
method.
import std::io
class A {
let dmut i : [i32];
pub self (a : [i32]) with i = copy a {}
pub def opIndex (self, x : i32) -> i32
throws &OutOfArray
{
self.i [x]
}
pub def opIndexAssign (mut self, x : i32, z : i32)
throws &OutOfArray
{
self.i [x] = z;
}
impl Streamable;
}
def main ()
throws &OutOfArray, &AssertError
{
let dmut i = A::new ([1, 2, 3]);
(alias i) [2] = 9; // alias is important, otherwise the method is not callable
println (i);
assert (i [2] == 9);
}
Results:
main::A([1, 2, 9])
Contains operator
The contain operator is a binary operator used to check if an element
is inside another one. This operator is defined using the keyword
in. Unlike other operator, the rewritte for the overloading is made
only once on the right operand, and call the method opContains, for
example the expression a in b is rewritten into b.opContains (a). The expression a !in b will be rewritten into !(a in b).
class A {
let _a : [i32];
pub self (a : [i32]) with _a = a {}
pub def opContains (self, i : i32)-> bool {
for j in self._a {
if (i == j) return true;
}
false
}
}
def main ()
throws &AssertError
{
let i = A::new ([1, 2, 3]);
assert (2 in i);
assert (9 !in i);
}
Iteration operator
Object can be iterated using a for loop. As for any operators, the for loop used on object is rewritten at compilation time. There are multiple methods to write when writting an iterable class. The following source code present an example of a for loop, and the source code underneath it present its rewritten equivalent.
let a = A::new ();
for i, j in a {
println (i, " ", j);
}
let a = A::new ();
{
let dmut iter = a.begin ();
while !iter.opEquals (a.end ()) {
let i = iter.get!{0} ();
let j = iter.get!{1} ();
{
println (i, " ", j);
}
iter:.next ();
}
}
In this example, two elements can be highlighted: 1) the iter
variable, that stores an iterator object, 2) the begin and
end method of the class A. Indeed, an iterable object is
an object that contains two methods begin and end, that
returns an mutable iterator pointing respectivelly to the beginning
and to the end of the iterable set.
The iterator type is a type defined by the user, and that contains the
opEquals method, a method next on a mutable instance, and
the method get, template method thats returns value pointed by
the current iteration.
The following example presents the implementation of a Range
that has the same behavior as a r!i32 with a step 1 and a
not including the end value.
import std::io;
class Range {
let _fst : i32;
let _lst : i32;
pub self (fst : i32, lst : i32) with _fst = fst, _lst = lst {}
pub def begin (self)-> dmut &Iterator { // must return a dmut value
Iterator::new (self._fst)
}
pub def end (self)-> &Iterator {
Iterator::new (self._lst)
}
impl Streamable;
}
class Iterator {
let mut _curr : i32;
pub self (curr : i32) with _curr = curr {}
pub def get {0} (self) -> i32 {
self._curr
}
pub def opEquals (self, o : &Iterator) -> bool {
self._curr == o._curr
}
pub def next (mut self) {
self._curr += 1;
}
}
def main () {
let mut r = Range::new (0, 10);
for i in r {
println (i);
}
}
To be more efficient and avoid a new allocation at each iteration, the
end method should return a value that is computed once.
Contribution Enhance this section, which is completely unclear. And add information about error handling maybe.
Version
Version is another conditional compilation process (in addition to compile time execution with templates), that select parts of the code that must be compiled or not. The following code block presents the grammar of the version declaration and expression.
version_decl := '__version' Identifier '{' declaration '}' ('else' declaration)?
version_expr := '__version' Identifier block ('else' expression)?
The identifier used in the version block are in their own name space,
meaning that they do not conflict with the other identifiers
(variable, types, etc...). Warning the identifier of the version
is not case sensitive, thus Demo and DEMO are
identical. The version are activated by the command line using the
option -fversion. In the following example the version
Demo, and Full are used.
import std::io;
__version Demo {
def foo () {
println ("Foo of the demo version");
}
} else {
__version Full {
def foo () {
println ("Foo of the full version");
}
}
}
def main () {
foo ();
}
$ gyc main.yr -fversion=Demo
$ ./a.out
Foo of the demo version
$ gyc main.yr -fversion=Full
$ ./a.out
Foo of the full version
To use multiple version, the option must be set for each version.
$ gyc main.yr -fversion=Demo -fversion=Full
Debug version
The debug option of the command line -g activates the
Debug version even without the option -fversion.
import std::io;
def foo () {
__version DEBUG {
println ("Entering foo");
}
println ("foo");
}
def main () {
foo ();
}
$ gyc main.yr -g
$ ./a.out
Entering foo
foo
$ gyc main.yr
$ ./a.out
foo
Predefined versions
Contribution There is no predefined version for the moment, but it is a work in progress. These versions will depend on the compiler, os, etc..
Macro
Macros are used to perform operation at a syntactic level, instead of a semantic level, as it is done by all the other symbols. A macro call is an expansion of a syntaxic element.
Macros are defined using the keyword macro. They contains two
kind of elements, constructors and rules.
import std::io;
macro Vec {
pub self (x = __expr "," y = __expr z=foo) skips (" ") {
#{z};
println ("#{x}");
println ("#{y}");
}
pub def foo (z=__expr rest=(__expr y="machin")) {
println ("#{z}#{rest::y}");
}
}
def main () {
Vec#{1,2 9 9 machin};
}
Documentation
The Ymir compiler is able to generate documentation files
automatically. These documentation files in json format are easier
to read for a documenation generator than a source code. The option
-fdoc generates documentation file for each compiled
modules. The name of the json file is the path of the module, where
the double colon operators :: are replace with underscores
_.
$ tree
.
└── foo
└── bar
└── baz.yr
2 directories, 1 file
$ gyc foo/bar/baz.yr -fdoc
$ ls
foo foo__bar__baz.doc.json
The following chapters present the json format of the different declarations (functions, class, etc...). The first chapter presents the encoding of the types, and the second the encoding of the symbols.
Contribution A very basic standard documentation website generator is under development ydoc.
Ymir Type
Ymir type are the value type (cf. Data
types). They
are not always validated for many reasons (templates, aka, ...). The
type value contains the kind of type that is encoded,
unknown means that the type cannot be validated, and is always
associated with name that contains the string name of the type.
Each type contains the attribute mut set to true or
false.
Integer
| Name | Value |
|---|---|
type | int |
name | i8 V u8 V i32 etc... |
Void
| Name | Value |
|---|---|
type | void |
name | void |
Boolean
| Name | Value |
|---|---|
type | bool |
name | bool |
Floating
| Name | Value |
|---|---|
type | float |
name | f32 V f64 |
Char
| Name | Value |
|---|---|
type | char |
name | c8 V c32 |
Array
| Name | Value |
|---|---|
type | array |
size | The size in a string |
childs | An array containing the inner type of the array |
Slice
| Name | Value |
|---|---|
type | slice |
childs | An array containing the inner type of the slice |
Tuple
| Name | Value |
|---|---|
type | tuple |
childs | An array containing the list of inner type of the tuple |
Struct
| Name | Value |
|---|---|
type | struct |
name | The name of the structure |
Enum
| Name | Value |
|---|---|
type | enum |
name | The name of the enum |
Pointer
| Name | Value |
|---|---|
type | pointer |
childs | An array containing the inner type of the pointer |
ClassPointer
| Name | Value |
|---|---|
type | class_pointer |
childs | An array containing the inner type of the pointer |
Range
| Name | Value |
|---|---|
type | range |
childs | An array containing the inner type of the range |
Function pointer
| Name | Value |
|---|---|
type | fn_pointer |
childs | An array containing the parameter types of the function pointer |
ret_type | The return type of the function pointer |
Closure
Warning the closure here is the element contained inside a delegate, not the delegate type
| Name | Value |
|---|---|
type | closure |
childs | An array containing the inner types of the closure |
Delegate
| Name | Value |
|---|---|
type | dg_pointer |
childs | An array containing the parameter types of the delegate pointer |
ret_type | The return type of the function pointer |
Option
| Name | Value |
|---|---|
type | option |
childs | An array containing the inner type of the option |
Unknown
| Name | Value |
|---|---|
type | unknown |
name | The string name of the type |
Symbols
Each element contains standard information :
| Name | Value |
|---|---|
type | The type of the symbol (module, function, etc..) |
name | The name of the symbol |
loc_file | The name of the file containing the symbol |
loc_line | The number of the line at which the symbol is declared |
loc_column | The number of the column at which the symbol is declared |
doc | The documentation associated with the symbol (user comments) |
protection | The protection of the symbol (pub V prot V prv) |
Module
| Name | Value |
|---|---|
type | module |
childs | The symbols declared inside the module |
Function
| Name | Value |
|---|---|
type | function |
attributes | The custom attributes of the function |
params | The list of parameters of the function |
ret_type | The return type of the function |
throwers | The list of type that can be thrown by the function |
The parameters are defined according to the following table :
| Name | Value |
|---|---|
name | The name of the parameter |
type | The type of the parameter (ymir type) |
mut | true V false |
ref | true V false |
value | Can be unset if the variable has no value, encoded in a string |
Variable declaration
Declaration of a static global variable.
| Name | Value |
|---|---|
type | var |
mut | true V false |
var_type | The ymir type of the variable |
value | Can be unset if the variable has no value, encoded in a string |
Aka
| Name | Value |
|---|---|
type | aka |
value | The value of the aka, encoded in a string |
The value of the aka is encoded in a string, because as aka are
only evaluated when used, we can't have more information on them.
Structure
| Name | Value |
|---|---|
type | struct |
attributes | union, packed |
fields | The list of fields of the structure |
Fields
| Name | Value |
|---|---|
name | The name of the field |
type | The ymir type of the field |
mut | true V false |
doc | The user documentation about the field |
value | Set if the field has a default value, encoded in a string |
Enumeration
| Name | Value |
|---|---|
type | enum |
en_type | The ymir type of the enumeration fields |
fields | The fields of the enum |
Fields
| Name | Value |
|---|---|
name | The name of the field |
doc | The user comments about the field |
value | The value associated with the field, in a string |
Class
| Name | Value |
|---|---|
type | class |
ancestor | Set if the class has an ancestor, ymir type |
abstract | true V false |
final | true V false |
fields | The fields of the class |
asserts | The list of static assertion inside the class |
cstrs | The list of constructor of the class |
impls | The list of implementation of the class |
methods | The list of methods of the class |
Fields
| Name | Value |
|---|---|
name | The name of the field |
type | The ymir type of the field |
mut | true V false |
doc | The user comments about the field |
protection | prv V prot V pub |
value | Set if the field has a default value, inside a string |
Asserts
| Name | Value |
|---|---|
test | The condition in a string |
msg | The msg of the assert |
doc | The user comment about the assertion |
Constructors
| Name | Value |
|---|---|
type | cstr |
params | The list of parameters of the constructor, identical to those of a function |
throws | The list of ymir types thrown by the constructor |
Implementations
| Name | Value |
|---|---|
type | impl |
trait | The name of the trait, in a string |
childs | The list of overriden methods, identical to methods |
Methods
| Name | Value |
|---|---|
type | method |
over | true V false |
params | The list of parameters of the method, identical to function |
ret_type | The ymir type of the return type |
attributes | virtual, final, mut |
throwers | The list of types thrown by the method |
A virtual method is method with no body, and a mutable method is a method that accepts only a mutable object.
Traits
| Name | Value |
|---|---|
type | trait |
childs | The list of method inside the trait |
Templates
| Name | Value |
|---|---|
type | template |
test | Set if the template has a test, in a string |
params | The list of parameter of the template, in strings |
childs | The list of symbol inside the template |
Macros
| Name | Value |
|---|---|
type | macro |
cstrs | The list of constructor of the macro |
rules | The list of rules of the macro |
Constructors and Rules
| Name | Value |
|---|---|
rule | The rule of the macro in a string |
skips | The list of token skiped, list of string |